Extension: Screen Capture Extension
Introduction
When viewing a web page, we often want to share and archive content. To do this, this chapter describes an extension that allows the user to click a button to download the current web page as a file. The user also has the ability to record a video of themselves interacting with a web page, which they can then download and view in the browser. To aid this recording process, additional context menus are added into the extension, allowing the user to right-click on any web page to view the recording options the extension has.
To perform this recording process, this extension includes a sample from the official Chrome extension sample code repository to aid the screen capture process. This chapter begins in Section 9.2 Extension, outlining the required files for this extension. As this extension does not require a back-end, no additional servers are described. Section 9.3 Summary concludes this chapter, outlining the core takeaway tips.
Source code for this chapter can be found here.
Extension
To get started, create a new folder titled capture-extension. Inside this file, create the following six empty files:
File Structure
-
/capture-extension/manifest.json
-
/capture-extension/side.html
-
/capture-extension/popup.js
-
/capture-extension/offscreen.html
-
/capture-extension/offscreen.js
-
/capture-extension/background.js
In addition to this, a /lib folder was added with Bootstrap to aid styling.
File Structure
-
/capture-extension/lib/
-
/capture-extension/lib/bootstrap.bundle.min.js
-
/capture-extension/lib/bootstrap.min.css
Source code: /ch9/capture-extension
In this folder, the manifest.json file is used to define the basic information of the extension and the required permissions. The popup.html file is the user interface for the extension, where the user can control the capture processes. The popup.js file associated with the popup.html contains three button listeners, one for each button on the user interface.
The core of the extension is the background.js file, which is used for adding right-click context menus to the web page the user is viewing, and for listening to various events triggered by the extension to start and stop the recording process. The offscreen.html file and the associated offscreen.js file are used for displaying the recording in a new tab.
In addition to these files, a folder titled lib is also added to the extension. This folder contains the additional library Bootstrap, required by the extension to style the user interface. This library consists of a single JavaScript file and the associated CSS file.
When the extension is loaded, a simple notification is first presented to the user informing them that the extension has been successfully installed. After this, the user can right-click on any web page to open a custom menu. On this menu, three options are available:
-
Download page - This allows the user to download the current page as a single file.
-
Start recording- A video stream is started to capture all the interactions with the current web page.
-
Stop recording - The video recording stream is stopped and presented to the user in a new tab to view.
In addition to this context menu, when the extension icon itself is clicked, a small pop-up will open that contains three buttons to trigger the same options as the right-click context menus.
File Name: manifest.json
The manifest.json file contains basic information about the extension and also defines the permissions it requires. This file begins by defining the name, description, and version number of the extension. The minimum version of Chrome required for this extension is also defined here as 116. After this, the permissions required by the extension are then defined.
The first of these is the activeTab, and tabCapture permissions, which allow the extension to access the tab the user is currently viewing and to capture the content. The contentMenus permission allows the extension to add a custom menu that is accessed by the user right-clicking on the page they are currently viewing. The notifications permission is then added, as when we first install the extension, a notification pop-up will be triggered to tell the user the installation has been successful. The pageCapture permission allows us to capture the content of the page the user is currently viewing.
The downloads permission is then added, as we want the user to have the ability to download the current page or recording. Finally, the offscreen permission to manage the generated files off-screen. The action attribute is then added to define the default behaviour of the extension's icon in the Chrome menu bar when clicked. In this, the default_title is used to define a message that is shown when the user hovers their mouse over the icon. The default_icon is used to set the icon for the extension to the same smiley face PNG used throughout this book.
Finally, the default_popup is used to define the HTML page that pops open when the user clicks the extension’s icon in the menu bar. In this example, the popup.html page is opened to show the user the extension’s user interface. Finally, the last permission added is the background attribute, which defines a service worker titled background.js. This file is used to listen for messages sent across from the extension to start and stop the recording process.
{
    "manifest_version": 3,
    "name": "Screen capture extension",
    "description": "Screen capture extension",
    "minimum_chrome_version": "116",
    "version": "1.0",
    "permissions": [
        "activeTab",
        "tabCapture",
        "contextMenus",
        "notifications",
        "pageCapture",
        "downloads",
        "offscreen"
    ],
    "action": {
        "default_title": "Click to open",
        "default_icon": "icon.png",
        "default_popup": "popup.html"
    },
    "background": {
        "service_worker": "background.js"
    }
}
File Name: popup.html
When the user clicks the extension icon in Chrome's menu bar, the popup.html page is opened. Here, a <link> tag is first used to import the Bootstrap CSS file from the extension's lib folder. The <body> has a style attribute defined to set the default height and width of the pop-up to 200px. The padding attribute is then used to add padding around the edges to 10px. A <h1> tag is then used to define the title at the top of the pop-up that the user will see.
As the extension offers three separate functions, three <button> tags are added. Each has the class attribute set to btn btn-primary to add Bootstrap styling. To trigger the browser to record, the first button has the ID set to startRecordingButton. To stop a recording that is currently in process, a second button is added with the ID set to stopRecordingButton. A third button is then added with the ID set to downloadPageButton, which triggers the download page process. At the end of this page, a <script> tag is used to first import the Bootstrap JavaScript file, followed by another <script> tag to import the popup.js file that contains the button listeners for this user interface.
<!DOCTYPE html>
<html>
<head>
    <link rel="stylesheet" href="lib/bootstrap.min.css">
</head>
<body style="width:200px;height:200px; padding:10px">
    <h1> Screen Capture </h1>
    <div style="height:50px"></div>
    <button id="startRecordingButton" type="button" class="btn btn-primary"> Start Recording</button>
    <div style="height:50px"></div>
    <button id="stopRecordingButton" type="button" class="btn btn-primary"> Stop Recording</button>
    <div style="height:50px"></div>
    <button id="downloadPageButton" type="button" class="btn btn-primary"> Download Page </button>
    <script src="lib/bootstrap.bundle.min.js"></script>
    <script src="popup.js"></script>
</body>
</html>
File Name: popup.js
The popup.js file contains the JavaScript for the user interface. Inside this file, three button click handlers are added to listen for the clicks on the user interface. To do this, the querySelector is first used to select the button with the ID set to startRecordingButton and the reference is placed into a variable titled startRecordingButton. Using this, the addEventListener() function is appended to add the click listener. When the start button is clicked, a call is made to the chrome.runtime.sendMessage() function to send a message across to the background.js page. This is done by sending JSON with the attribute type, which defines the custom message we want to send, and the target, which defines the page we are sending the message to.
This process is repeated for the other two buttons, with the only change being the message that is sent across to the background.js page. The stop recording button sends across the message stop-recording. The button to download the current web page sends across the download-page message.
let startRecordingButton = document.querySelector("#startRecordingButton");
startRecordingButton.addEventListener("click", function () {
  chrome.runtime.sendMessage({ type: "start-recording", target: "background" });
});

let stopRecordingButton = document.querySelector("#stopRecordingButton");
stopRecordingButton.addEventListener("click", function () {
  chrome.runtime.sendMessage({ type: "stop-recording", target: "background" });
});

let downloadPageButton = document.querySelector("#downloadPageButton");
downloadPageButton.addEventListener("click", function () {
  chrome.runtime.sendMessage({ type: "download-page", target: "background" });
});
File Name: background.js
The bulk of the functionality for the extension is contained inside the background.js file that runs in the background of the extension. This file is responsible for listening to messages sent across from the right-click context menu on a web page and also from the popup.js file when buttons are clicked on the user interface.
At the top of this file, a call is made to the chrome.runtime.onInstalled.addListener() function to append a listener to trigger when the extension is installed in a user's browser. When installed, inside this, three calls to the chrome.contextMenus.create() function to add three items into the right-click menu of the user's browser when they are viewing web pages.
Inside each of these, the id for the menu item is first set. This is the unique identifier for the menu item. After this, the title attribute is added, which is a plain text string that is shown to the user. The type attribute defines what type of menu item will be added. These include normal for a basic menu item, checkbox or radio to allow the user to interact with the menu item, and separator to add a line between menu items.
The contexts attribute defines where the context menu will appear for the user. Common examples are page, to show only on a web page, selected, for when the user has selected text, or link, when the user is interacting with a link. (A complete listing can be found on the official API (Source).
console.log("In background.js");
chrome.runtime.onInstalled.addListener(async () => {

    // right click content menus
    chrome.contextMenus.create({
        id: "download_page",
        title: "Download page",
        type: 'normal',
        contexts: ['page'],
    });

    chrome.contextMenus.create({
        id: "start_recording",
        title: "Start recording",
        type: 'normal',
        contexts: ['page'],
    });

    chrome.contextMenus.create({
        id: "stop_recording",
        title: "Stop recording",
        type: 'normal',
        contexts: ['page'],
    });
At the end of this listener, when the extension has been first installed, a call is made to the chrome.notifications.create() function, which is used to pop up a notification to the user's browser after the extension has been installed. The type attribute can be set to the following options:
-
Basic - Contains an icon, title, message, expandedMessage, and up to two buttons.
-
Image - Contains an icon, title, message, expandedMessage, image, and up to two buttons.
-
List - Contains an icon, title, message, items, and up to two buttons.
-
Progress - Contains an icon, title, message, progress, and up to two buttons.
In this example, we will use the basic notification. The iconURL is used to define where the icon for the notification can be found in the extension folder. The title attribute is used to place a text string at the top of the notification. The message attribute is the core piece of text visible to the user when the notification is shown. The buttons attribute is used to add a number of buttons to the notification when required. In this example, a single button is added with some text. Finally, the last attribute is the priority of the notification. The priority ranges from -2 to 2. The default value for this attribute is 0.
    // Notification popup
chrome.notifications.create({
    type: 'basic',
    iconUrl: 'icon.png',
    title: 'Installed',
    message: "Extension installed!",
    buttons: [{ title: 'Great job, you installed the extension!' }],
    priority: 0
});

}); // context menus listener close
Similar to previous extensions described in this book, the chrome.runtime.onMessage.addListener() function is called to append a listener that will trigger when any messages are sent to the background.js file from any other part of the extension, such as a context menu or the popup.js file. When a message arrives, the function inside will trigger, providing access to the request object that contains information about what message was sent to the page.
In this example, inside the request object, the type attribute is selected, and a simple if statement is used to check if the attribute contains the value save-video-download. If this message is found, a message is printed to the console to notify that we received a message. After this, a call is made to the chrome.downloads.download() function to trigger a file download to start in the user's browser. The url attribute of this function is set to the value of the request.data parameter that contains the raw video data recorded by the extension. This was sent as a result of the recording process being stopped.
  chrome.runtime.onMessage.addListener(

function(request, sender, sendResponse) {

    console.log(request);

    // sent from offscreen.js
    if(request.type == "save-video-download"){
        console.log("Saving downloaded video")

        // save the video that was recorded
        chrome.downloads.download({
            url: request.data
        });
    }
Three more if statements are added to check the request.type that was sent to the background.js file from the pop-up user interface. This contains a JSON message to identify which button was pressed, indicating what action should be performed.
In the case where the first button is pressed, the message sent across contains the value download-page. This triggers the current page to download by calling saveCurrentPageToFile(). If the user clicks the start recording button, the message start-recording is sent across, and the startRecordingCurrentTab() function is called. Finally, if the stop recording button is pressed, the stop-recording message is sent, and the stopRecordingCurrentTab() function is called.
   // sent from the popup.js associated with the popup.html UI
    else if(request.type == "download-page"){
        saveCurrentPageToFile()
    }
    else if(request.type =="start-recording"){
        startRecordingCurrentTab()
    }
    else if(request.type =="stop-recording"){
        stopRecordingCurrentTab()
    }
}// function
) // listener
As we previously defined menus that will appear when the user right-clicks on a web page, a handler is needed to listen for when their menu items are clicked. To do this, a chrome.contextMenus.onClicked.addListener() function is added that will listen for these clicks. When a click is performed, a call is made to the checkClicks() function to search through the data sent across to identify which of the menus has been clicked.
Inside this checkClicks() function, a single attribute titled data is passed. This variable contains information about which button was clicked inside an attribute called data.menuItemId.
A simple if statement is then used to check if the menuItemId is equal to download_page. If it is, a call is made to the saveCurrentPageToFile() function that is responsible for downloading the current page and starting a file download within the user's browser.
If the menuItemId is set to start_recording, a call is made to the startRecordingCurrentTab() function to begin the recording process of the current tab. When the menuItemId is identified as stop_recording, a call is made to the stopRecordingCurrentTab() function.
// context menu listeners
chrome.contextMenus.onClicked.addListener(checkClicks);

function checkClicks(data) {
  console.log("click happened in menu");
  console.log(data.menuItemId);

  if (data.menuItemId == "download_page") {
    saveCurrentPageToFile();
  } else if (data.menuItemId == "start_recording") {
    startRecordingCurrentTab();
  } else if (data.menuItemId == "stop_recording") {
    stopRecordingCurrentTab();
  }
}
These three core functions are then defined in the file to perform the save file process, the start recording process, and the stop recording process. The startRecordingCurrentTab() function is used for triggering the recording process of the current tab. The recording code shown in this section is based on the Google Chrome extension sample extension repository (Source) code for recording.
Here, a call is first made to the chrome.runtime.getContexts() function that is used to get the current context, which in this case is a browser tab. A variable is then added titled recording, which is used to track if the offscreen file has been created or not. An offscreen document is a file used to perform an action, such as controlling the recording process, which is done in the background of the browser without the user seeing it. A call to the find() function is performed on the existingContexts reference. Here it checks to see if the content found has a contextType set to OFFSCREEN_DOCUMENT. If found, it is placed into a reference titled offscreenDocument.
A simple if statement is then used to check if the offscreen document exists. If it does not exist, we begin the process of creating one. To do this, a call is made to the chrome.offscreen.createDocument() function. The URL attribute is set to the offscreen.html file, which exists in the extension folder (defined later). A reason attribute is added to define the reason why we want it, in this case, for USER_MEDIA. An attribute titled justification is then added that allows us to define a string that contains the justification reason for needing this.
In the case where the offscreen document was already created, the else statement triggers. Here, a reference to the offscreenDocument.documentUrl is performed to find the document that ends with #recording and places it into a reference titled recording.
At the end of this block of code, an if statement is used to check if the recording document exists. If it does, a call is made to the chrome.runtime.sendMessage() function to send a message to the offscreen file, and send the type of message set to stop-recording. This message will be processed by the offscreen file and trigger the recording to stop.
async function startRecordingCurrentTab(){

    const existingContexts = await chrome.runtime.getContexts({});
    let recording = false;

    const offscreenDocument = existingContexts.find(
    (c) => c.contextType === 'OFFSCREEN_DOCUMENT'
    );

    // If an offscreen document is not already open, create one.
    if (!offscreenDocument) {
        // Create an offscreen document.
        await chrome.offscreen.createDocument({
            url: 'offscreen.html',
            reasons: ['USER_MEDIA'],
            justification: 'Recording from chrome.tabCapture API'
        });
    } else {
        recording = offscreenDocument.documentUrl.endsWith('#recording');
    }

    if (recording) {
        chrome.runtime.sendMessage({
            type: 'stop-recording',
            target: 'offscreen'
        });

        return;
    }
A call is then made to the chrome.tabs.query() function to identify the last tab the user was viewing and place the reference into a variable titled tab. The parameters active:true and lastFocusedWindow:true are passed to ensure the last viewed tab is selected. After this, the chrome.tabCapture.getMediaStreamId() function is called and the tab.id is passed in as the targetTabId attribute to record the correct tab.
Once the streamId has been collected, to begin the recording process, a call to the chrome.runtime.sendMessage() is performed to send the message start-recording to the file titled offscreen. A data attribute is also added that contains a reference to the unique streamId that we wish to record.
  // Get the current tab
const [tab] = await chrome.tabs.query({
    active: true,
    lastFocusedWindow: true,
});

// Get a MediaStream for the active tab.
const streamId = await chrome.tabCapture.getMediaStreamId({
    targetTabId: tab.id
});

// Send the stream ID to the offscreen document to start recording.
chrome.runtime.sendMessage({
    type: 'start-recording',
    target: 'offscreen',
    data: streamId
});
}
In addition to the user having the ability to start and stop screen recordings, another option was added to allow them to download the current web page as a file to their local machine. To do this, a new function is added titled saveCurrentPageToFile(). Inside this, the chrome.tabs.query() function is used to select the tab that the user has been using and store the reference in a variable titled tab. Again, the activeTab attribute and the lastFocusedWindow are both set to true, indicating we want to use the last tab accessed by the user.
Once the tab has been found, a call is made to the chrome.pageCapture.saveAsHTML() function that allows us to download the current page as a single file. A single attribute titled tabId is passed to the function that contains a reference to the tab we just found, which was stored in the tab.Id.
When this saving process starts, a reference titled blob becomes available. The blob.text() function extracts the content and places it into a variable titled content. To trigger the downloading process for this video blob, a URL is first defined. This URL contains the format base 64. At the end of this url variable, the btoa(content) function call is added on to convert the content into base64 encoded content. Base 64 encoded content is a basic string representation of the data that can be easily moved between pages.
To trigger the download itself, a call is made to the chrome.downloads.download() function and the url variable is passed in. The attribute filename defines the name of the file that will be created, which in this case is filename.mhtml.
async function saveCurrentPageToFile() {
  const [tab] = await chrome.tabs.query({
    active: true,
    lastFocusedWindow: true,
  });

  chrome.pageCapture.saveAsMHTML({ tabId: tab.id }, async (blob) => {
    const content = await blob.text();
    const url = "data:application/x-mimearchive;base64," + btoa(content);
    chrome.downloads.download({
      url,
      filename: "filename.mhtml",
    });
  });
}
A function titled stopRecordingCurrentTab() is then created. This contains a single call to the chrome.runtime.sendMessage() function that is used to send a type attribute with the value stop-recording to the to the offscreen file, which is defined as the target.
async function stopRecordingCurrentTab() {
  chrome.runtime.sendMessage({
    type: "stop-recording",
    target: "offscreen",
  });
}
File Name: offscreen.html
The offscreen.html file contains very little content as it is used as a placeholder for the extension when recording a video of the current page. In this, a <script> tag is added which contains a reference to the offscreen.js file, as the HTML file itself cannot contain any JavaScript itself.
<!doctype html>
<script src="offscreen.js"></script>
File Name: offscreen.js
The offscreen.js file contains the core functionality to start and stop a recording of the page the user is currently viewing. At the top of this file, two variables are added. The first titled recorder contains a reference to the recording object itself. The data variable is used for storing data generated.
let recorder;
let data = [];
After this, a call is made to the chrome.runtime.onMessage.addListener() function to add a listener to the current file. This listener triggers when messages are sent across to the file from the background.js. When a message is received, it is available through the message variable.
An if statement is then used to check if the message attribute titled target contains the value offscreen, which would identify that the message is destined for this page. If a message is found, a switch statement is then used to check the message.type attribute. Here we check to see if a start-recording or stop-recording message was sent across.
When the message contains the value start-recording, a call is made to the startRecording() function and the message.data is passed to it. Otherwise, if a stop-recording message is found, a call is made to the stopRecording() function. In the case where an unknown message is sent, the default block of the switch statement triggers, throwing a new error.
chrome.runtime.onMessage.addListener(async (message) => {
  if (message.target === "offscreen") {
    switch (message.type) {
      case "start-recording":
        startRecording(message.data);
        break;
      case "stop-recording":
        stopRecording();
        break;
      default:
        throw new Error("Unrecognized message:", message.type);
    }
  }
});
Below this, the body of the startRecording() function is then defined. When this is called, it is passed a reference to the tab's unique stream titled streamId. A simple check is then performed to see if the state of the recorder is set to recording. If it is, it will throw an error saying the recording is already in progress.
Below this, a call is then made to the navigator.mediaDevices.getUserMedia() function that is responsible for getting access to the raw data stream from the user's browser tab. Here, JSON is used to define the sources for the audio and video. For the audio, we define the mandatory attribute. In this, the chromeMediaSource is set to tab and the chromeMediaSourceId is set to the steamId. This process is then repeated for the video attribute.
async function startRecording(streamId) {
  if (recorder?.state === "recording") {
    throw new Error("Called startRecording while recording is in progress.");
  }

  const media = await navigator.mediaDevices.getUserMedia({
    audio: {
      mandatory: {
        chromeMediaSource: "tab",
        chromeMediaSourceId: streamId,
      },
    },
    video: {
      mandatory: {
        chromeMediaSource: "tab",
        chromeMediaSourceId: streamId,
      },
    },
  });
After this, a new AudioContext() object is then created, titled output. A call is then made to the output.createMediaStreamSource() function and the media reference defined earlier is passed in. This is then placed into a variable titled source. A call is then made to the source.connect() function to attach the output.destination.
To begin the recording process, a new MediaRecorder object is then created and the media reference is passed in along with the mimeType, which is set to video/webm. On this recorder, the ondataavailable reference is set to data.push(event.data). This function triggers when the data becomes available, and places it into the data array for later retrieval.
// Continue to play the captured audio to the user.
const output = new AudioContext();
const source = output.createMediaStreamSource(media);
source.connect(output.destination);

// Start recording.
recorder = new MediaRecorder(media, { mimeType: "video/webm" });
recorder.ondataavailable = (event) => data.push(event.data);
As the recording process will eventually end, a function is defined for the recorder.onstop. When this occurs, a new Blob object is created and the data array containing content is passed in along with the type of data, which is set to video/webm.
This data is stored in an object titled blob. As we want to show the user the content recorded, a call is made to window.open() function to open a new tab.
The URL for this new window is then defined using the URL.createObjectURL() function. This is passed the blob of data we wish to create the URL for. The _blank attribute is added to define it as a new window. It is important to note that at this time, the data recorded is not saved anywhere permanently. It is simply being shown to the user.
To trigger a save process, a call is made to the chrome.runtime.sendMessage() function to send the keyword save-video-download to the background.js file. The data attribute is also passed to it, which contains the object URL of the data we recorded.
At the very end of this process, the recorder is removed, and the data array is set to undefined. After this stop process has been defined, a call is made to the recorder.start() to begin the recording process, and the window.location.hash is set to recording as a flag to identify recording is in process.
recorder.onstop = () => {
    const blob = new Blob(data, { type: "video/webm" });
    window.open(URL.createObjectURL(blob), "_blank");

    // send a message to background.js to save the
    // recording we have just made
    chrome.runtime.sendMessage({
      type: "save-video-download",
      target: "background",
      data: URL.createObjectURL(blob),
    });

    // Clear state ready for next recording
    recorder = undefined;
    data = [];
  };
  recorder.start();

  window.location.hash = "recording";
}
The last function in this file is a simple function titled stopRecording. In this, the recorder reference is used and the stop() function is called on it. The recorder stream tracks are also stopped by calling the recorder.stream.getTracks(), which, for each track, the stop() function is called. To ensure that in the current tab we no longer have the recording icon visible, the window.location.hash is set to null.
async function stopRecording() {
  recorder.stop();

  // Stopping the tracks makes sure the recording icon in the tab is removed.
  recorder.stream.getTracks().forEach((t) => t.stop());

  // Update current state in URL
  window.location.hash = "";
}
View Results
Once all the changes have been made to the files, load the extension into Chrome as previously described in Chapter 2, Section 2.3 Loading your Extension. Once loaded, Figure 1 shows the extension's context menu that is opened when the user right-clicks on a web page. This menu provides the user with options to download the current page or to start/stop a recording of the current tab.
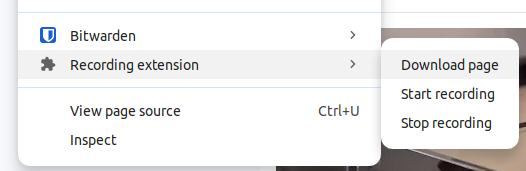
Figure 1: Screen capture extension right-click context menu on a web page.
Figure 2, below, shows the main user interface of the extension that opens when the extension icon is clicked in Chrome's menu bar. On this interface, we have three buttons available to start a recording, stop a recording, and download the current web page as a file.
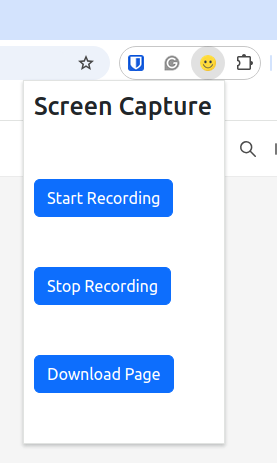
Figure 2: Screen capture extension pop-up user interface.
When recording has started, a small flashing icon is visible in the current tab to identify that recording is in progress, as shown in Figure 3.
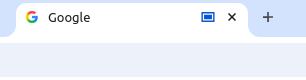
Figure 3: Screen capture extension showing a small flashing recording icon in a tab.
When the recording has stopped, the icon is removed, and a new tab is opened to allow the user to view the video, as shown in Figure 4. Here, the user can view the video and control the video using start/stop buttons.
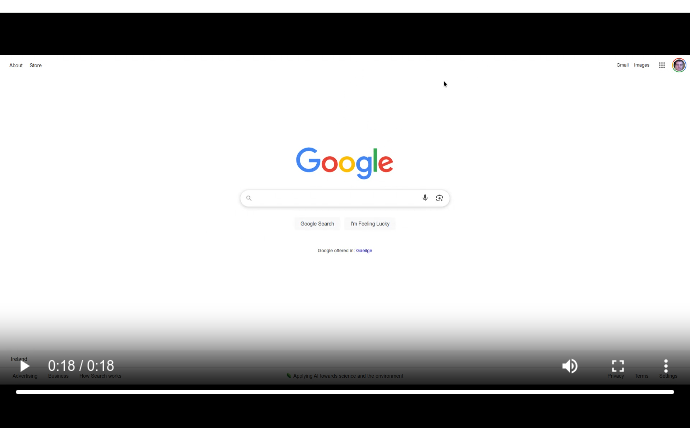
Figure 4: The recording shown to the user in a new tab with simple video controls.
When viewing the video in the browser, the video has not yet been saved. To save the data, a download is then started in the user's browser, and the video is available in the browser's download history tab as shown in Figure 5.
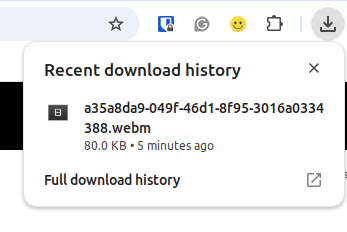
Figure 5: Screen capture extension after downloading a file.
Summary
This chapter described the process of creating an extension that harnessed the browser capture and save functionality of Chrome. When the extension was first loaded, notifications were used to tell the user the extension was installed. A custom context menu was also added that enabled the user to quickly access the extension functionality by right-clicking on the web page they are viewing. To save content, the extension enabled the user to download the web page they were viewing as a single file. In addition to this, the extension allowed the user to create a recording of the tab they are currently viewing. Once the recording was made, the user had the option to view the video in a separate tab and download the recording to their machine.
A pop-up user interface with Bootstrap styling was added to provide quick access to the core functionality. This was accessible by clicking the extension’s icon in the Chrome menu bar. Chapter 10, next, describes an extension that allows the user to authenticate an account using account records stored in a database.
Take-away Tips:
-
When videos are recorded in a browser, by default, they are not saved. A secondary process must be started to save the video using the chrome.downloads.download() function.
-
The chrome.runtime.onInstalled.addListener() function can be used to listen for when the extension has just been installed to perform a specific action, such as showing a notification or opening a welcome page to the user.
-
The chrome.notifications.create() function allows an extension to pop open a simple notification to the user after core steps, such as installing the extension.
-
When working with content types such as a video, the data is often encoded in Base64 format as simple text that uses only 64 characters. This allows the data, such as binary content, to be easily transported between pages.
-
When access to a user's video stream or audio stream is required, the navigator.mediaDevices.getUserMedia() function can be used to prompt the user in the browser to allow access.
-
The MHTML file format is an archive format used to store a web page and associated resources such as HTML, CSS, and images in a single file.
-
The chrome.downloads.download() function can be used by an extension to download content to a user’s machine, such as videos or files.