Extension: User Authentication
Introduction
When building extensions, we often require user accounts to differentiate between users and their associated data. By using user accounts, extensions can have restricted areas that are only visible once the user has logged in. In this chapter, the process of creating an extension that allows the user to register, log in, and view restricted content is described. When the user is finished viewing the content, they then have the ability to log out of the extension.
To get started, Section 10.2 Database setup describes the setup of a MongoDB database, which is used for storing the username and password data. Section 10.3 API Server describes the process of developing an API server, which is used as a middleman between the database and extension. Section 10.4 Extension then describes the construction of the extension itself. To conclude this chapter, Section 10.5 Summary provides a brief summary of this chapter and a list of core takeaway tips.
Source code for this chapter can be found here.
Database setup
Before getting started, ensure your MongoDB database is up and running on your machine and you have MongoDB Compass installed to interact with the database. If not, head to Chapter 4, Section 4.5 The Database to review the database setup process. For this extension, a simple MongoDB database titled extension_auth is created. Inside this database, two collections are then added:
-
users - This collection is used to store the records for each individual user account.
-
sessions - When a user logs into the extension, their unique token will be stored in this collection until they log out.
When your database is set up, launch MongoDB Compass and connect to the database server address localhost:27017. When connected, on the left of MongoDB Compass, click the plus sign that can be seen when the mouse hovers over the connection address, as shown in Figure 1, to create a new database.
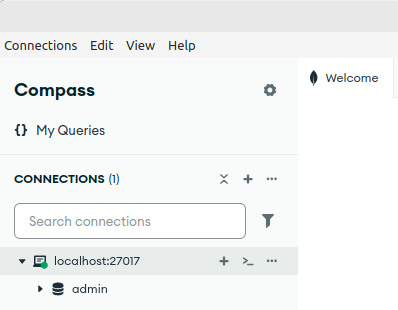
Figure 1: Clicking the plus sign on the left of MongoDB to create a new database.
Figure 2 shows the dialog that opens when the plus sign is clicked. In this dialog, enter extension_auth as the database name, and users as the collection name. After this, click Create Database.
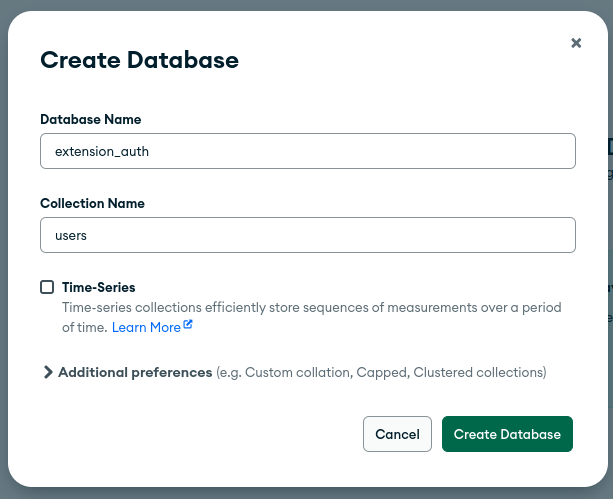
Figure 2: Adding the database name and collection name for the extension.
Once the database and the first collection have been created, we then need to create the second collection. On the left-hand side of Compass, as shown in Figure 3, hover your mouse over the new extension_auth database and click the plus sign.

Figure 3: Finding the plus sign to add another collection.
In the dialog that opens, enter sessions as the connection name and press Create collection as shown in Figure 4.
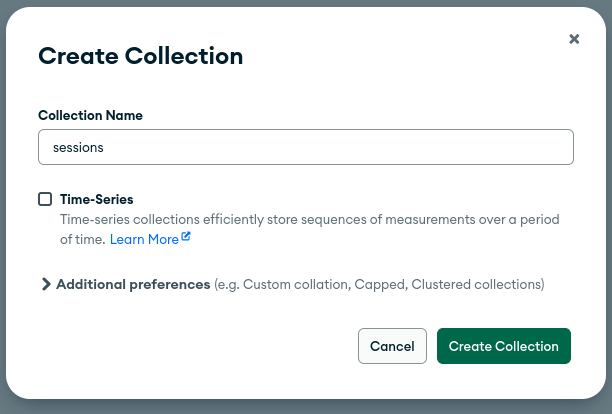
Figure 4: Adding a second collection to the extension_auth database.
Once the database has been set up, we can move on to the process of setting up the server-side API to interact with this database.
API Server
To allow the extension we develop to interact with the database, we now create a custom API server. In this example, we begin with the API server described in Chapter 4, Section 4.4 Custom API Server. The core changes to the API server are focused on the /routes/api.js file. Before we begin, one additional library is required for this example to function: the JSON Web Token library. To install this library, open a command prompt in the root folder of the API server and enter the following command:
npm install jsonwebtoken
Once this has been installed, we can move on to updating the /routes/api.js to define the new URLs our extension will interact with. These four URLs include:
- http://localhost:3000/api/register - Requires an email and pass variable passed from the extension during the register process.
- http://localhost:3000/api/login - Requires an email and pass variable passed from the extension during the login process.
- http://localhost:3000/api/validate - Requires a request header titled authorization which is passed to validate extension page access.
- http://localhost:3000/api/logout - Requires a request header titled authorization which is called when the user logs out of the extension.
For the first two URLs, the values are passed via the URL as key-value pairs. For the second two, the validation token is passed as a HTTP request header titled authorization. To implement these, we begin in the /routes/api.js file. At the start of this file, the default / (forward slash) route is added. In this, a require() statement is used to pull in the Express.js framework and an instance of the Express router. After this, another require() statement is used to import the jsonwebtoken library is placed into a variable titled jwt. This library is used in the future to aid the authentication process. A route is then added for the / URL to return the text The API was called! if the URL is accessed in a web browser.
var express = require("express");
var router = express.Router();

const jwt = require("jsonwebtoken");
router.get("/", function (req, res, next) {
  res.send("The API was called!");
});
When the user wishes to register for a new account, the extension will gather the data from the user interface and send it to the /api/register URL on the API server. Inside this, a console.log() is used to print to the console that the request has been successful. This endpoint requires two variables when the address is called by the extension: the email and pass variables. When these are passed in, a call is made to the req.query.email to extract the email variable, and it is placed into a local variable titled email. This process is then repeated for the pass variable, which is placed into a local variable titled pass.
The MongoDB library is then included, similar to previous examples, by making a call to the require() statement to place the library into a local object titled MongoClient. A new variable is then created titled uri, which is used to store the address of the local database server. This is passed into the MongoClient and placed into a reference titled client.
A new asynchronous function is then created titled run() to contain the database call itself. In this, a try-catch statement is then added to try call the database and catch the error if one occurs. In this, the database titled extension_auth is first selected using the client.db() function and placed into a variable titled database. The database.collection() function is then used to select the database collection titled users and place it into a variable titled collection.
A call is then made to the collection.insertOne() function that takes in key-value pairs to store in the database. In this example, a piece of JSON is created, and the variable email attribute is first added, followed by the value of the email variable. This is repeated again for the pass attribute, which has the value set to the pass variable. When this function is run, a new record is placed into the database.
To indicate to the extension that the process was successful, the res.json() function is used to send back a small piece of JSON to the extension with an attribute titled status and the value registered. A finally block is added that will always be called after this insert record process. In this, the client.close() function is called to close the MongoDB connection. At the end of the function, a call is made to the run() function to run the function we just created.
router.get("/register", function (req, res, next) {
  console.log("/register call success");
  const email = req.query.email;
  const pass = req.query.pass;

  const { MongoClient } = require("mongodb");
  const uri = "mongodb://root:[email protected]:27017/";
  const client = new MongoClient(uri);
  async function run() {
    try {
      const database = client.db("extension_auth");
      const collection = database.collection("users");
      const cursor = await collection.insertOne({ email: email, pass: pass });
      res.json({ status: "registered" });
    } finally {
      res.json({ status: "error" });
      await client.close();
    }
  }
  run().catch(console.dir);
});
To test this endpoint, a call can be made to the URL shown below in a web browser. The variables email and pass are appended to the URL as key-value pairs with an ampersand between the pairs.
http://localhost:3000/api/[email protected]&pass=123
When this URL has been called, a new record is then inserted into the users collection containing the email and pass variables sent via the URL. A message is then sent back to the browser indicating the process was successful.
{"status": "registered"}
After a user has registered for a new account, they then have the ability to log in. To do this, the extension gathers the email and password on the extension user interface and sends the values to the /api/login endpoint on the API server. The router.get() is first used to define the new /login URL. Inside this, the email and pass variables are extracted from the request using the req.query.email and req.query.pass. These are then placed into local variables for easy access.
Similar to the previous example, the MongoDB driver is then pulled in again to connect to the extension_auth database, and the users collection. After this, a new asynchronous function is then created titled run(). Inside this, the client.db() is used to select the extension_auth database, followed by using the database.collection() function to select the users collection inside it. To select a record in the collection, a call is made to the collection.findOne() function, and the email attribute is passed in along with the email variable value. If the record is found, it indicates that the user account exists. To aid debugging, a console.log() is added to print the results record returned from the database to the console.
router.get("/login", function (req, res, next) {
    console.log("/login call success");
    const email = req.query.email;
    const pass = req.query.pass;

    const { MongoClient, ObjectId } = require("mongodb");
    const uri = "mongodb://root:[email protected]:27017/";
    const client = new MongoClient(uri);

    async function run() {
        try {
            const database = client.db("extension_auth");
            const collection = database.collection("users");
            const results = await collection.findOne({ email: email });
            console.log(results);
An if statement is then used to check if the results object exists, indicating the record has been found in the database. If it does exist, an if statement is used to check if the pass the user entered matches the pass variable of the results object we just retrieved. After the record has been found, indicating that the details provided were correct, the process of generating a unique authentication token is performed.
This token is only generated after the user has successfully logged in. To do this, the jwt.sign() function is called. This is passed an attribute titled data that will be stored in the token itself. Here, the email address of the user is stored inside. A unique secret code is then added to sign the token. In this example, the text secretCode is used. This code will be used again in the future when we want to validate a token.
After this, an attribute titled expiresIn is added, which indicates when the token is due to expire. In this example, we set the value to 1h to indicate one hour. At the end of this process, a connection to the database titled extension_auth is created, followed by selecting the sessions collection.
A call to the collection.insertOne() function is then performed to insert the new token into the sessions collection. The attribute of the record is set to token and the value is set to the variable newToken we just created. After the insert has been performed, the res.json() function is used to send the attribute token with the value newToken back to the browser or extension where the API URL was called.
if (results) {
  console.log("found record");

  if (pass == results.pass) {
    console.log("password valid");

    console.log("inserting session record");
    const database = client.db("extension_auth");
    const collection = database.collection("sessions");

    let newToken = jwt.sign(
      {
        data: email,
      },
      "secretCode",
      { expiresIn: "1h" }
    );

    await collection.insertOne({ token: newToken });

    res.json({ token: newToken });
At the end of this code, else statements are added that return token:0 in the case of a connection error, or if the user’s record is not found in the database. A finally block is added at the end to always call client.close() to ensure the database connection is always closed.
        } else {
          res.json({ token: 0 });
        }
      } else {
        res.json({ token: 0 });
      }
    } finally {
      await client.close();
    }
  }
  run().catch(console.dir);
});
To test the login endpoint for a user account, we can make the call to the /api/login endpoint. Here, the email attribute is added with the value [email protected], and the pass attribute is added with the value 123. Note: For this login to work correctly, ensure that you have the record in your users collection with this email and password.
http://localhost:3000/api/[email protected]&pass=123
When the login address is called, and the record exists in the collection, a piece of JSON containing the JWT token is sent back. Here, token attribute is shown with the JWT token as the value. This token contains three core parts separated by dots. Although not visible, encoded in this token, the email address of the user is present, and the expiry date of the token.
{"token":"eyJhbGciOiJIUzI1NiIsInR5cCI6IkpXVCJ9.eyJkYXRhIjoia3lsZUBnbWFpbC5jb20iLCJpYXQiOjE3M
zY1MjI3OTcsImV4cCI6MTczNjUyNjM5N30.JAV_Bamk7e3j-NBiaM2pR_MdgZn-6QxAJYS7LhwFpZM"}
When a user is interacting with the extension, the extension automatically checks if their token is still valid. To do this, a call is made to the /validate endpoint and the user's JWT token is passed to the page. Instead of passing the values as key-value pair via the URL, the user's token is passed as request header titled authorization. To do this, the router.get() function is first used to define the /validate address. A single HTTP header is passed to this titled authorization that is extracted from the request.header and placed into a variable titled token.
Similar to the previous endpoints, the MongoDB connection is then created. After this, a new asynchronous function is added titled run(), which is responsible for calling the database and validating the token. This first begins by calling client.db() function to select the extension_auth database followed by the database.collection() function to select the sessions collection. A call is then made to the collection.findOne() function to search the sessions collection in the database to find the token passed to this /validate page via the header.
To find the token in the database, a piece of JSON is passed in with token as the attribute name and the value of the token variable. An if statement is then used to check if a record was returned from the database. If it was, a call to the jwt.verify() function is performed.
router.get("/validate", function (req, res, next) {
    console.log("/login call success");
    const token = req.headers.authorization;
    const { MongoClient, ObjectId } = require("mongodb");
    const uri = "mongodb://root:[email protected]:27017/";
    const client = new MongoClient(uri);

    async function run() {
        const database = client.db("extension_auth");
        const collection = database.collection("sessions");
        const record = await collection.findOne({ token: token });
        if (record) {
            console.log("token exists in db");
Inside this verify() function, the secret code for the token validation is added. In this example, it is the text: secretCode. When this validation is performed, a call is then made to the function that contains two attributes. The first is the err variable that contains any errors if the validation process was unsuccessful, and the decoded variable that contains the content extracted from the validated token.
If the validation fails, an if statement is used to check if the err variable is equal to true. Inside this, a call is made to res.json() to send back that the token is no longer valid. If the token was valid, the else statement triggers, and a call is made to the res.json() function to send back the extracted data to the caller.
In the case where the token was valid, we send back an attribute titled result which contains the decoded.data. This data is the content that was previously stored in the token, e.g., the user's email address. A second variable is also sent back, titled exp, which contains the value decoded.exp. This contains the expiry date of the token that was stored when the token was created. It is important to remember that if the token expires, the validation of the token will also fail, even if it exists in the database. At the end of this code, if the original token was not found in the database, a res.json() is used to send back the JSON message invalid.
      jwt.verify(token, "secretCode", function (err, decoded) {
        if (err) {
          res.json({ result: "invalid" });
        } else {
          res.json({ result: decoded.data, exp: decoded.exp });
        }
      });
    } else {
      res.json({ result: "invalid" });
    }
  }

  run();
});
The last URL added to the API is the /logout URL. The router.get() function is first used to define the route. Inside this, a call is made to the req.header to extract the variable titled authorization, which contains the user's unique token, and place it into a variable titled auth. To aid debugging, a console.log() is used to print the value to the console.
Once the token is found, we can begin the logout process. This is done by removing the token from the sessions database collection. A new asynchronous function is added titled run(). Inside this, a connection to the MongoDB is created, and the sessions collection is selected as it stores each unique token currently active. A call is made to the deleteOne() function, and the attribute token is defined, and the auth variable value is passed in as the record we wish to delete.
Once this is finished, the res.json() function is then called to send back JSON to the caller with a result attribute set to loggedout to tell the extension we are now logged out.
router.get("/logout", function (req, res, next) {
  console.log("/login call success");
  const auth = req.headers.authorization;
  console.log("Token" + auth);

  async function run() {
    const { MongoClient, ObjectId } = require("mongodb");
    const uri = "mongodb://root:[email protected]:27017/";
    const client = new MongoClient(uri);
    const database = client.db("extension_auth");
    const collection = database.collection("sessions");
    const record = await collection.deleteOne({ token: auth });
    res.json({ result: "loggedout" });
  }

  run();
});
The last line of the api.js file contains a simple module.export() to export the updated router.
module.exports = router;
Once saved, to test this URL, the user must have previously logged in to the extension, which in turn created a new token in the session database collection. As the /validate URL requires a request header titled authorization, we will call the URL from the extension itself and not via a browser. This extension is described next in Section 10.4 Extension.
Extension
This section describes each of the files contained in the extension. This extension allows the user to log in to the extension to view restricted content. The user then has the option to log out of the extension to invalidate the session. It is important to remember that for the extension to work correctly, the API server and the MongoDB database must be running. To get started, create a new folder titled auth-extension. Inside this, create the following files:
File Structure
-
/auth-extension/manifest.json
-
/auth-extension/popup.html
-
/auth-extension/popup.js
-
/auth-extension/icon.png
This extension also contains a folder titled lib that contains the Bootstrap JavaScript and CSS files for user interface styling, and the jQuery JavaScript file.
File Structure
-
/auth-extension/lib/bootstrap.bundle.min.js
-
/auth-extension/lib/bootstrap.min.css
-
/auth-extension/lib/jquery.js
Source code: /ch10/auth-extension
File Name: manifest.json
The first file in the extension is the manifest.json file. This file contains the basic name, description, version number, and minimum Chrome version required by the extension. Below this, the permissions for the extension are then defined. The only permission required is the storage permission, as when we authenticate, a token is stored in the browser.
To allow us to interact with the local API server, the host_permissions attribute is added. This contains the URL of the server we want the extension to interact with. An asterisk is added to the end of the URL to indicate we want to allow access to all URLs on the API server.
Below this, we add the action attribute to define what happens when the user clicks the extension icon. Here we define the default_title of the extension as Click to open panel. This is shown when the user places a mouse over the extension icon. The default_icon attribute is set to icon.png, which is the smiley face icon used throughout this book. The default_popup attribute is then added to define the name of the file that opens when the user clicks on the extension icon. This is set to open the popup.html file.
{
  "manifest_version": 3,
  "name": "User authentication",
  "description": "User authentication",
  "minimum_chrome_version": "116",
  "version": "1.0",
  "permissions": [
    "storage"
  ],
  "host_permissions": [
    "http://localhost:3000/*"
  ],
  "action": {
    "default_title": "Click to open panel",
    "default_icon": "icon.png",
    "default_popup": "popup.html"
  }
}
File Name: popup.html
The popup.html file is the main user interface for the extension that is opened when the user clicks on the extension icon. This page is built on the concept of a single-page application that contains all the user interfaces for the extension in a single file. At the top of this file, the <link> tag is used to include the Bootstrap stylesheet that is contained in the lib folder of the extension to style the user interface.
A <body> tag is then used to define the main structure of the user interface. In this, each different screen the user will see is defined in separate <div> tags, each with a unique ID. JavaScript is used later to select the content the user should see at any given time.
The first <div> tag added is for the login screen of the extension. This tag has the ID set to loginPanel. In this, two <input> fields are added, allowing the user to enter their email address and password.
The first <input> for the email address is then added with the ID set to userEmail. A second <input> for the password is then added with the ID set to userPassword. To trigger the login process, a <button> is then added. After this, another <button> is added with the ID signupButton, which is used to bring the user to the sign-up page if they wish to register for a new account.
<!DOCTYPE html>
<html>

<head>
    <link rel="stylesheet" href="lib/bootstrap.min.css">
</head>

<body>
<div id="loginPanel" style="width:300px; height:300px; padding:10px">
    <h1>Login</h1>
    Email address
    <input type="email" class="form-control" id="userEmail" aria-describedby="" placeholder="">
    Password
    <input type="password" class="form-control" id="userPassword" aria-describedby="" placeholder="">
    <div style="height:50px"></div>
    <button id="loginButton" type="button" class="btn btn-primary">Login</button>
    <br>
    No account? <br>
    <button id="signupButton" type="button" class="btn btn-primary">Signup</button>
    <div style="height:50px"></div>
</div>
Another <div> tag with the ID set to registerSuccessPanel is then added, which contains a simple message that will be displayed after the user has registered for a new account.
<div id="registerSuccessPanel" style="width:300px;height:300px; padding:10px">
    <h2> Success!</h2>
    <br>
    Head back to login with your new account!
</div>
A <div> tag with the ID set to registerPanel is then added that contains two <input> fields, allowing the user to enter the email and password they wish to register with. On the <input> fields, the two IDs are set to registerEmail and registerPass. These are used later in the JavaScript as we will need to select these fields to extract the values entered.
<div id="registerPanel" style="width:300px;height:300px; padding:10px">
    <h2> Register</h2>
    <br>
    Email address
    <input type="text" class="form-control" id="registerEmail" aria-describedby="" placeholder="">
    Password
    <input type="password" class="form-control" id="registerPassword" aria-describedby="" placeholder="">
    <div style="height:50px"></div>
    <button id="registerButton" type="button" class="btn btn-primary">Register</button>
    <div style="height:50px"></div>
</div>
A <div> tag with the ID set to dashboardPanel is then added. This is the core dashboard the user will see when they log into the extension. In the future, when they come back, if their account is still authorized, this page will still be accessible. This <div> contains a <h2> tag telling the user that they are on the dashboard. At the end of this, a <button> is added with the ID set to logoutButton. When this button is clicked, JavaScript is used later to trigger the log-out process.
<div id="dashboardPanel" style="width:300px;height:300px; padding:10px">
    <h2> Dashboard</h2>
    <br>
    Welcome!
    <div style="height:50px"></div>
    <button id="logoutButton" type="button" class="btn btn-primary">Log out</button>
</div>
In the case where the user enters the wrong email and password, a <div> tag with the ID set to incorrectPanel will be shown, providing them with a <button> with the ID set to goToLoginButton. When pressed, the user is returned to the login page.
<div id="incorrectPanel" style="width:300px;height:300px; padding:10px">
    <h2> Login incorrect</h2>
    <br>
    Please try again
    <div style="height:50px"></div>
    <button id="goToLoginButton" type="button" class="btn btn-primary">Go to login</button>
</div>
When a user is finished with the extension, a button exists on the dashboard to log out. When the logout occurrs, the <div> with the ID set to loggedoutPanel is shown. On this, a <button> is added with the ID goToLogin that, when pressed, returns to the login screen.
<div id="loggedoutPanel" style="width:300px;height:300px; padding:10px">
    <h2> Logged out</h2>
    <br>
    You are now logged out
    <div style="height:50px"></div>
    <button id="goToLogin" type="button" class="btn btn-primary">Go to login</button>
</div>
At the end of this file, three <script> tags are added to include the JavaScript files. These include jQuery, which is used for hiding and showing different <div> panels, Bootstrap, which is used for styling the <input> fields and <button> tags, and the popup.js file, which contains the core JavaScript and button listeners for the extension.
<script src="lib/jquery.js"></script>
<script src="lib/bootstrap.bundle.min.js"></script>
<script src="popup.js"></script>
</body>
</html>
File Name: popup.js
The popup.js file is the core JavaScript file for the extension. This file contains the button click listeners and also the JavaScript logic for hiding and showing different <div> panels of content at different times. This file is also responsible for interacting with the API server to register, log in, validate tokens, and log out from the extension.
The first piece of code is using the querySelector() function to select the button with the ID set to loginButton. Once this has been selected, the reference is placed into a variable titled loginBtn. With this reference, the addEventListener() function is used to append a button click listener to it. When the user clicks the button and the function triggers, the selector is then used again to select the <input> fields with the ID set to userEmail and userPassword. Once selected, the values are extracted and placed into local variables titled userEmail and userPassword.
A call is then made to the hideAll() function that hides all of the <div> tags containing content on the user interface before we select which <div> tag to show.
let loginBtn = document.querySelector("#loginButton");
loginBtn.addEventListener("click", async function () {

  let userEmail = document.querySelector("#userEmail").value;
  let userPassword = document.querySelector("#userPassword").value;
  hideAll();
A try-catch statement is then added to contain the call to the API server. In this, a new variable titled url is created, which contains the /api/login URL.
Here, two parameters are passed to the page. The first is the email parameter and the second is the pass parameter. To pass the values of the userEmail and the userPassword variables, the ${} syntax is used to drop the value of the variables into the string at this position. On close inspection of this string, you will notice that back tics are used instead of traditional single quotes, which allows us to use this syntax.
Once the url string is complete, a call to the fetch() function is performed. After the function has called the page, the result retrieved is placed into the local variable titled response. A console.log() call is then added to print the response JSON to the console for easy debugging.
An if statement is then used to check if the JSON returned contains an attribute titled token. If it does, a call is then made to the hideAll() function to first hide all the <div> tags from the screen, and only show the <div> with the ID dashboardPanel. This is done by using the $() selector to select the tag by ID, followed by calling the show() function on the selected tag.
  try {
    let url = `http://localhost:3000/api/login?email=${userEmail}&pass=${userPassword}`;
    const response = await fetch(url);
    const json = await response.json();
    console.log(json);

    if (json.token) {
      console.log("login details correct");
      hideAll();
      $("#dashboardPanel").show();
After the dashboard <div> has been shown to the user, a call is then made to the chrome.storage.local.set() function to store the token. When this is saved, the associated then() function triggers printing the token to the developer console.
In the case where the login was incorrect, the else statement triggers, and a call is made to the hideAll() function first to hide all the <div> panels. The selector syntax is then used to select the <div> with the ID incorrectPanel, on which the show() function is called to make it visible to the user. At the very end of this try block, the catch is added, which triggers if an error occurs during the fetch() call to the API server, printing a message to the developer console.
      // save a token to say we have auth
      chrome.storage.local.set({ token: json.token }).then(() => {
        console.log("Saved auth token" + json.token);
      });
    } else {
      console.log("login details incorrect");
      hideAll();
      $("#incorrectPanel").show();
    }
  } catch (error) {
    console.log("Cannot reach API server")
    console.error(error.message);
  }
});
When a user is new to the extension and wishes to authenticate, the user fills out the email and password they wish to use, and then clicks the register button with the ID set to registerButton. When this happens, the following piece of code is run. Here, the querySelector() function is first used to select the register button and place the reference into a variable titled registerBtn. Using this, the addEventListener() function is appended to add a click listener to it. When a click occurs, the querySelector() function is used again to select the <input> fields with the IDs set to registerEmail and registerPassword, and the value is extracted from them and placed into two local variables.
A new string variable titled url is added for the /api/register URL. Similar to the previous example, the email and pass attributes are added to the URL along with the values from the registerEmail and registerPassword variables. A call is then made to the fetch() function to call the API server URL. Once complete, the response is then placed into a local variable titled response. The json() function is called on this response to extract the JSON and place it into a local variable titled json. To aid debugging, this json variable is then printed to the console.
To update the user interface, a call is made to the hideAll() function to hide all the <div> content panels that may be open. A call is made to the show() function on the <div> with the ID set to registerSuccessPanel to provide a message to the user that the register process was successful.
let registerBtn = document.querySelector("#registerButton");
registerBtn.addEventListener("click", async function () {
  let registerEmail = document.querySelector("#registerEmail").value;
  let registerPassword = document.querySelector("#registerPassword").value;

  let url = `http://localhost:3000/api/register?email=${registerEmail}&pass=${registerPassword}`;
  const response = await fetch(url);

  const json = await response.json();
  console.log(json);

  hideAll();
  $("#registerSuccessPanel").show();
});
When the user clicks the sign-up button on the login page, the following piece of JavaScript is run. The querySelector() function is used to select the button with the ID set to signupButton, and the reference is placed into a variable titled signupButton. When this is selected, a click handler is then appended to the button using the addEventListener() function. When the button is clicked, the code inside this function will run.
Here, a call to the hideAll() function is first performed to hide any <div> panels that may be open. The selector is then used to select the <div> panel with the ID set to registerPanel. A call to the show() function is then performed on it to show the register content to the user.
let signupButton = document.querySelector("#signupButton");
signupButton.addEventListener("click", async function () {
  hideAll();
  $("#registerPanel").show();
});
When the user is on the main dashboard <div> panel of the extension, a logout button is visible to them. This code is designed to log the user out on both the back-end and the user interface of the extension. To do this, the querySelector() function is first used to select the button with the ID set to logoutButton. This reference is placed into a variable titled logoutButton. Using this, a click handler is appended to it by calling the addEventListener() function.
When the button is clicked, a call to the chrome.storage.local.get() function is performed to retrieve the record titled token from the storage. Once retrieved, an object titled result becomes available. Using this, a call to the console.log() function is performed to view the result.token value.
let logoutButton = document.querySelector("#logoutButton");
logoutButton.addEventListener("click", async function () {

  chrome.storage.local.get(["token"]).then(async (result) => {
     console.log("Current token is:  " + result.token);
Once the token that uniquely identifies the user's session is found, we can begin the process of calling the API server and telling it to delete the session record from the database. To do this, a call is made to the API server, and a custom header is passed in which contains the unique token. To do this, a new variable is created titled headers. In this, a new Authorization header string is added, and the ${} syntax is used to drop the value of the result.token variable into it. After this has been created, a new variable titled url is created, which contains the API server /api/logout URL to call.
The call is then made to the fetch() function and the url variable is passed in. The header previously created is also passed into the request. Once called, the response is then placed into a local variable titled response. After this, the json() function is called on the response to extract the JSON result from the API server.
When this call is performed, the session will be deleted from the API server. To visually update the extension, a call is made to the hideAll() function followed by using the $() selector syntax to select the <div> with the ID set to loggedoutPanel. A call is then made to the show() function to make it visible to the user.
const headers = { Authorization: `${result.token}` };
let url = `http://localhost:3000/api/logout`;
const response = await fetch(url, { headers });
const json = await response.json();
console.log(json);
hideAll();
$("#loggedoutPanel").show();
The last step in this process is to remove the token that is now invalid from the local storage. This is done by making a call to the chrome.storage.local.set() function, and passing in the key name token and setting the value to a set of double quotes indicating null. To aid debugging, the text removed token is printed to the developer console when complete.
    chrome.storage.local.set({ token: "" }).then(() => {
      console.log("removed token");
    });
  });
});
When the user wishes to return to the login <div> panel, a button is available with the ID set to goToLogin. The querySelector() function is used to find the element, and a click handler is then attached to it using the addEventListener() function. When the button is clicked, a call is made to the hideAll() function to hide all the <div> content panels visible to the user. The selector syntax is then used to select the <div> panel with the ID set to loginPanel. A call to the show() function is then performed to make it visible to the user, providing the user with the controls to log in to the extension if required.
let goToLogin = document.querySelector("#goToLogin");
goToLogin.addEventListener("click", async function () {
  console.log("go to login button clicked");
  hideAll();
  $("#loginPanel").show();
});
Through this extension, calls were made to the hideAll() function to hide all the <div> content panels that may be visible to the user. This function uses the jQuery selector syntax ${""} to select each <div> content panel by ID, and subsequently call the hide() function on each.
function hideAll() {
  $("#registerPanel").hide();
  $("#loginPanel").hide();
  $("#registerSuccessPanel").hide();
  $("#incorrectPanel").hide();
  $("#dashboardPanel").hide();
  $("#loggedoutPanel").hide();
}
The checkStatusOfAuth() function is called whenever the extension loads. This is responsible for identifying if the local storage has a valid authorization token, indicating that the dashboard <div> content panel should be shown. When no token exists, the user is returned to the login <div> panel. To do this, when the function is first called, a call is made to the chrome.storage.local.get() function, and the attribute name token is passed in to find the associated token record in storage.
A try-catch statement is then wrapped around a fetch() call to the /api/validate/ URL, and the retrieved token is passed in as the authorization header to the fetch() call, similar to the previous example. When the server responds with JSON content, it is placed into the response object. To aid debugging, a call is made to the json() function on the response object to extract the content and print it to the developer console.
function checkStatusOfAuth() {
  console.log("checking status of UI");
  chrome.storage.local.get(["token"]).then(async (result) => {
    console.log("Current token is:  " + result.token);
    // make a call to server to see if token is still valid.
    try {
      const headers = { Authorization: `${result.token}` };
      let url = `http://localhost:3000/api/validate`;
      const response = await fetch(url, { headers });
      const json = await response.json();
      console.log(json);
After this, an if statement is used to check if the json.result contains either valid or invalid. In this example, when the value is invalid, a call is made to the hideAll() function to remove all <div> content panels. The jQuery selector is then used to select the <div> panel with the ID set to loginPanel. The show() function is then called on it to make it visible to the user, allowing them to log in again if required.
When the response from the server contained the text valid, a call is made to the hideAll() function to hide all the visible panels. It then selects the <div> panel with the ID set to dashboardPanel. A call is then made to the show() function on this to make the panel visible to the user.
If an error occurs during the fetch(), or if the API server is not reachable, the catch block triggers, printing an error message to the developer console describing that the connection failed. After this, the hideAll() function is called to remove all the visible panels. The selector is used to select the panel with the ID loginPanel, on which the show() function is called.
      if (json.result == "invalid") {
        console.log("need to authenticate");
        // otherwise send them to the login
        hideAll();
        $("#loginPanel").show();
      } else {
        console.log("already authenticated");
        hideAll();
        $("#dashboardPanel").show();
      }
    } catch (er) {
      console.log("API server disconected");
       hideAll();
      $("#loginPanel").show();
    }
At the end of this block of code, an if statement is used to check if result.token was set to null. If null, it indicates the extension is running for the first time and the record may not have been created yet in storage. In this event, a call is made to the hideAll() function to remove all the visible <div> panels from the user interface. The selector syntax is then used to select the <div> panel with the ID set to loginPanel, on which the show() function is called to make the login panel visible to the user.
   // no token content
    if(result.token == ""){
        hideAll();
        $("#loginPanel").show();
    }
  }); //storage
}
At the end of this file, one additional function is added. The window.onload() function triggers when the file is reloaded in the browser, e.g., when the extension is opened. Here, a call is made each time to the checkStatusOfAuth() function, which calls the previously defined function to validate the user's session. As previously mentioned, if the session is valid, the user is brought to the dashboard page of the extension. If the session is not valid, the user will be brought to the login <div> panel, allowing them to log in.
window.onload = function () {
  checkStatusOfAuth();
};
After all the files have been saved, load the extension into your browser as previously described in Chapter 2, Section 2.3 Loading your Extension.
View Results
Once the extension has been loaded into the browser, ensure the API server and associated MongoDB database have been started. When the extension is first loaded, Figure 5 shows the login page that is presented to the user, allowing them to log in with an email address and password. If the user does not have an account, they can click the Signup button to create a new account.
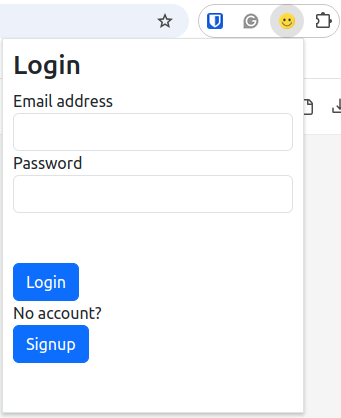
Figure 5: The default login page is shown to the user when the extension is first loaded.
Behind the scenes, when the extension icon is clicked, the extension checks to see if the user has previously logged in and created an authorization token. On the server-side, in the console log, we can see a GET request was made from the extension to the /api/validate page of the server. If no token exists, the user remains on the login page. If a valid token was found, the user is directed to the dashboard page of the extension.
GET /api/validate 200 9.874 ms
On this first page, if the user clicks the Signup button, they are then brought to the register page as shown in Figure 6.
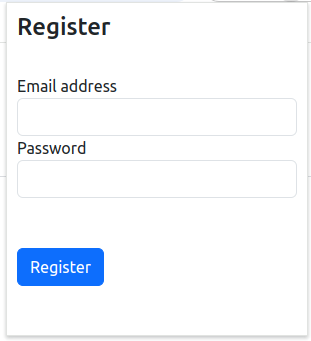
Figure 6: The extension register page allowing the user to sign up for a new account.
When the user clicks the Register button, they are shown the success page as shown in Figure 7.
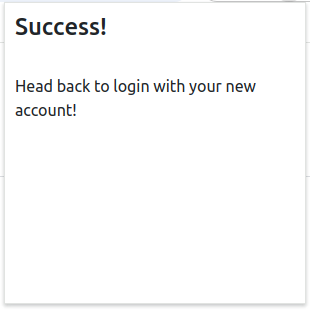
Figure 7: Registering a new account - Success page.
When the account is created, a new record is inserted into the users collection in the extension_auth database. This contains two attributes, one for the email and one for the pass, as shown below. For brevity, encryption is not performed on this password.
{
    "email": "[email protected]",
    "pass": "test"
}
After the user has logged in with an email address and password, they will then see the dashboard page of the extension as shown in Figure 8. This page is protected and is only visible after the user has logged in to create a valid JWT token.
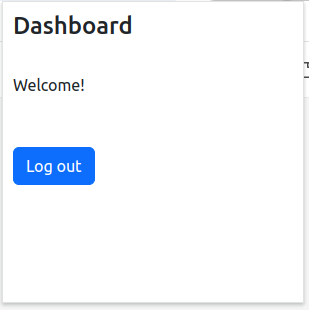
Figure 8: Dashboard page of the extension, which is only visible after logging in.
Behind the scenes, when the user logs in, the extension makes a call to the API server page /api/login/, and passes the email and pass attributes as variables. The server then searches for the user's record in the database, which, when found, is printed to the developer console along with the text record found. After this, the password provided by the user is validated. If the password is valid, the API server creates a new JWT token for the user and inserts a new record into the sessions collection in the extension_auth database. Finally, the server then prints inserting session record to the console.
GET /api/login?email=test&pass=test 200
{
    _id: new ObjectId('67813cde2f7c0672888169e5'),
    email: '[email protected]',
    pass: 'test'
}
found record
password valid
inserting session record
In the sessions collection in the database, the complete JWT token can be seen as shown below. This token consists of three text elements encoded in Base 64 separated by full stops. By storing this token in the database, if the user forges a token, no record of the token will be found in the database.
{
    "_id": {
        "$oid": "6874f3a2fd8122e917c1d13c"
    },
    "token": "eyJhbGciOiJIUzI1NiIsInR5cCI6IkpXVCJ9.eyJkYXRhIjoidGVzdCIsImlhdCI6MTc1MjQ5NTAxMCwiZXhwIjoxNzUyNDk4NjEwfQ.BWQlYOq4oXQTNrG4Z0SVlVFmOWDdaR1cqPSESZqQ7l4"
}
By using a base 64 decoder, we can view the content of the JWT token. The first piece of text contains a reference to the algorithm that was used, HS256, and the type of token, which in this case is a JWT token.
{
    "alg": "HS256",
    "typ": "JWT"
}
The payload is contained just after the first period in the JWT token. When decoded, it provides us with three attributes, data, which contains the email address of the user who created the token, iat, which defines the issue time of the token, and exp, which defines the time when the token expires. Both of these times are in Epoch Format.
{
    "data": "[email protected]",
    "iat": 1752495010,
    "exp": 1752498610
}
The last piece of text contained after the second period of the JWT token is the signature, shown below. This was created when the token was signed by the API server using the custom secret key.
BWQlYOq4oXQTNrG4Z0SVlVFmOWDdaR1cqPSESZqQ7l4
In the browser, each time the extension icon is clicked, a call is made to the API server to validate the token, as shown below. If the token is valid, the dashboard will continue to be shown. If the token is not valid or does not exist, the user will be redirected to the login page of the extension.
GET /api/validate 200 9.874 ms
When the user has finished using the extension, they can click the Logout button on the dashboard. The logged-out page is then shown to the user as shown in Figure 9.
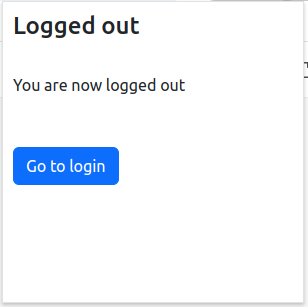
Figure 9: Logout page shown to the user after logout.
During this process, the extension makes a call to the /api/logout page on the API server, instructing it to delete the token from the database as shown below.
GET /api/logout 200 20.874 ms
Section 10.5 Summary, next, provides a summary of this chapter and outlines the core takeaway tips.
Summary
This chapter described the process of developing an authentication extension that allowed a user to create a new user account and log in to view restricted content. A single-page application was developed that used jQuery to hide and show different <div> tags containing page content.
To aid the authentication process, a JWT token was created to track who logged in to the extension and when the token expires. This was stored in a MongoDB database collection after creation. A reference to this token was also stored in the user's browser. This token was passed to the API server each time the user interacted with the extension's protected page by calling the /api/validate URL and passing the token as a request header. The API server was then tasked with validating the API token before returning the result to the extension to allow or deny the user access to the restricted page.
Take-away Tips:
-
When sending variables to a page, they can be added as key-value pairs in the URL, or sent via a HTTP request header.
-
The req.headers.authorization can be used to select the authorization header variables from a HTTP request.
-
A single popup.html file along with a popup.js file can be used for rendering multiple extension user interfaces by creating <div> tags with unique IDs that can be made visible or hidden using jQuery's hide() and show() functions.
-
JSON Web Tokens (JWT) are a simple URL-safe data encoding format for authorization data, allowing custom fields such as a user ID or email address to be stored along with predefined fields such as the token's expiry time in a single string.
-
JWT token validation should be performed on the API server and not on the client-side of an extension to prevent security issues.
-
JWT tokens are signed by the API server using a secret key, preventing people from forging a JWT token for the extension to use. This signature is used again during the validation of a JWT token.
-
When working with session authorization, an external API server and database can be used to keep track of tokens and their validity where required.
-
Authorization tokens should always have an expiry date, ensuring that users need to re-authenticate at a defined interval to keep using an extension.