Extension: Browser Activity Logger
Introduction
In this chapter, an extension for logging user browsing activity is described. This extension is based on the concept of recording a snapshot of the web address being viewed by the user. This capture process is performed every 1, 5, or 10 minutes, depending on the option selected by the user in the extension's option page.
To provide an always-present user interface, a browser-side panel is used. This panel can be expanded or hidden from view during use. This panel provides insights into the total number of URLs visited by the user and the total unique URLs visited. An additional text area is added to provide a log of all URLs. A start and stop button is also added to control the recording process. An additional extension options page is also included, allowing a user to define the delay interval between URL snapshots. No database is required for this extension as all the records are stored locally in the browser. This chapter begins in Section 8.2 Extension, describing the core file structure of the extension and the library dependencies.
Source code for this chapter can be found here.
Extension
In this section, each of the individual files that make up the extension are described. To get started, create a new folder titled logger-extension with the following empty files:
File Structure
-
/logger-extension/manifest.json
-
/logger-extension/background.js
-
/logger-extension/icon.png
-
/logger-extension/side.html
-
/logger-extension/popup.js
-
/logger-extension/options.html
-
/logger-extension/options.js
-
/logger-extension/lib/
As this extension requires an additional library to style the user interface, the lib folder contains two additional files for the Bootstrap library as shown below:
File Structure
-
/logger-extension/lib/bootstrap.bundle.min.js
-
/logger-extension/lib/bootstrap.min.css
Source code: /ch8/logger-extension
The manifest.json is the core file that describes the name, description, version number, and permissions of the extension. The background.js is a JavaScript file designed to run in the background of the browser to perform the recording while the user is browsing the web. The icon.png is a small smiley face icon shown in Chrome's menu bar, which, when clicked, opens the side panel. The user interface for this side panel is contained in a file titled side.html.
As extensions often have a number of different parameters that can change how the extension works, extensions have the facility to have dedicated options pages. In this extension, the options.html is the HTML options user interface that can be opened from the extension settings page. As the HTML file cannot have any JavaScript, a separate options.js is pulled in, which contains the click handlers and JavaScript to save the options changed by the user. The popup.js is the core JavaScript file for the side.html side panel. The popup.html file itself is used as a simple pop-up to tell the user to right-click the extension icon to open the side panel.
File Name: manifest.json
The core of the extension is the manifest.json file. In this file, we have basic information about the extension, including the name, description, and version number. The permissions attribute defines the individual permissions required by the extension. In this attribute, the activeTab and tabs permissions are added to allow us to interact with the tabs the user is currently using in the browser. The sidePanel permission is added as we want the extension to load on the side of the browser, and allow the user to expand or minimize the panel. The storage attributes allow the extension to save data to the local storage. The alarms permission is also added, which is used to trigger the recording process to start and stop in the background. This is used instead of the traditional JavaScript setInterval() function.
The side_panel attribute is added along with the default_path attribute that defines what file should be loaded on the side of the browser when the extension is opened. In this case, we point to the main user interface file, side.html. To allow the user to specify how often they would like the tool to capture their activity, an additional extension options page is added under the options_page attribute. Here, the options.html page is set as the default options page.
The action attribute is added, allowing us to define the default icon as icon.png, which will show up in the menu bar of Chrome, along with the text defined in the default_title that will show up when the user hovers their mouse over the icon. The background attribute allows us to define a JavaScript file that will run in the background of the extension, which is set to background.js. This file is used to log data when the user is browsing web pages.
The last attribute added is the commands attribute. This attribute allows us to define a key sequence that, when pressed, will trigger the extension to perform a specific action. In this example, the open-tab attribute is added, which contains a suggested_key attribute. Here we define the key sequence itself by setting the default attribute to Alt+Shift+W. The description attribute is used to define the text that describes what happens when a user presses this key sequence. The options page associated with this is described later.
{
    "manifest_version": 3,
    "name": "Activity Logger",
    "description": "Activity Logger side panel",
    "version": "1.0",
    "permissions": [
        "activeTab",
        "tabs",
        "sidePanel",
        "storage",
        "alarms"
    ],
    "side_panel": {
        "default_path": "side.html"
    },
    "options_page": "options.html",
    "action": {
        "default_title": "Click to open panel",
        "default_icon": "icon.png"
    },
    "background": {
        "service_worker": "background.js",
        "type": "module"
    },
    "commands": {
        "open-tab": {
            "suggested_key": {
                "default": "Alt+Shift+W"
            },
            "description": "Open options.html"
        }
    }
}
File Name: side.html
The core user interface for the extension is opened when a user right-clicks on the extension icon in the browser menu bar and views the menu. This menu contains a menu item that allows the user to show the side panel. This panel stays open on the side of the browser while the user is interacting with web pages. At the start of this page, a <link> tag is used to import the Bootstrap library CSS file for styling HTML components. A <h1> tag is used to print a title text that the user will see at the top of the panel.
To hold a status indicator message, a <div> tag is then added with the ID set to status. This is the core indicator that tells the user when the logger is in the state active or inactive. By default, the text inactive is shown here. A <div> tag is then used with a style attribute to add some vertical space between the components. Two <button> tags are then added with the ID set to startSession and stopSession. The JavaScript that listens for these clicks will be described in the popup.js file later.
<!DOCTYPE html>
<html>

<head>
    <link rel="stylesheet" href="lib/bootstrap.min.css">
</head>

<body>
    <h1> Activity Logger</h1>
    <b>Status:</b>
    <div id="status"> Inactive </div>
    <div style="height:50px"></div>
    <button id="startSession" type="button" class="btn btn-primary">Start Session</button>
    <button id="stopSession" type="button" class="btn btn-primary">Stop Session</button>
    <br>
    <div style="height:50px"></div>
Below this, a <table> tag is then added, which is used as the main display area for statistics about the logging process. The <thead> tag is then used to define the header for the table. Here, a <tr> tag is used to create a new row in the table, which, inside, contains a <th> tag to hold a column. To hold the data, a <tbody> tag is added with a <tr> tag to create a new row. Inside this, the <th> tag is used to define the column header, followed by a <td> tag to define the column in the row itself. In total, three rows are added.
Inside the first row, a <div> tag is added with the ID total_urls_ui, which is used to show a count of the number of URLs the user visited. In the second row, a <div> tag is then added with the ID set to unique_url_ui, which will display the total number of unique URLs the user has visited. The last row of the table contains a <div> tag with the ID set to totalTime, which displays in seconds the amount of time the logging session has been running for.
<h2>Statistics </h2>
<div>
    <table class="table table-bordered">
        <thead>
            <tr>
                <th scope="col"></th>
                <th scope="col">Count</th>
            </tr>
        </thead>

        <tbody>

            <tr>
                <th scope="row">Total URLs recorded</th>
                <td>
                    <div id="total_urls_ui">0</div>
                </td>
            </tr>

            <tr>
                <th scope="row">Unique URLs viewed</th>
                <td>
                    <div id="unique_url_ui">0</div>
                </td>
            </tr>

            <tr>
            <tr>
                <th scope="row">Total time</th>
                <td>
                    <div id="totalTime">0</div>
                </td>
            </tr>
            <tr>
        </tbody>
    </table>
</div>
<div style="height:50px"></div>
The next section of the user interface is used for displaying all the URLs the user has visited during a logging session. This section starts with a <h2> tag with the text History. One <textarea> tag is added the ID of this is set to history. Two buttons are then added below this. The first is a <button> titled Options which is used for displaying the options.html page of the extension. A second <button> with the ID set to clear is added with the text Clear All. This button is used to wipe the previous session from all the <div> tags and the <textarea> placeholders. At the end of this file, three JavaScript files are imported using <script> tags. The first of these is jQuery, followed by Bootstrap, followed by the popup.js, which contains the core JavaScript for the extension’s panel.html file.
<h2>History</h2>
<textarea id="history" rows="10" cols="30"></textarea>
<div style="height:50px"></div>
<button id="options" type="button" class="btn btn-primary">Extension options</button>
<button id="clear" type="button" class="btn btn-primary">Clear All</button>
<script src="lib/jquery.js"></script>
<script src="lib/bootstrap.bundle.min.js"></script>
<script src="popup.js"></script>
</body>

</html>
Once all the changes have been made to these files, we can then load the extension into Chrome, as previously described in Chapter 2, Section 2.3 Loading your Extension, to view the user interface.
View Results
Once the extension has been loaded into Chrome, the user interface of the extension can be viewed. Figure 1 and Figure 2 show the side panel. Here we can see the main Start Session and Stop Session buttons that are used to control the logging process. Under the Statistics heading, <div> tags were used as place holders to hold content that is updated when the current logging session is stopped. By default, all counters are set to zero.
Under the History heading, the large <textarea> tag can be seen, which is used to hold logs of the URLs visited. At the end of this user interface, the button titled Extension options can be seen, which is used for opening the options.html configuration page of the extension. Next to this, a button titled Clear All can be seen, which is used for resetting all the counters back to zero and wiping the URL logs from the <textarea>.
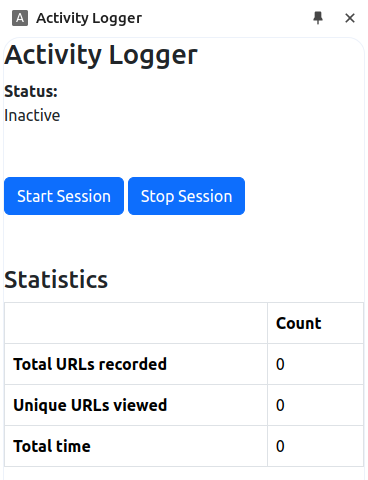
Figure 1: Activity logger side panel user interface - Part 1.
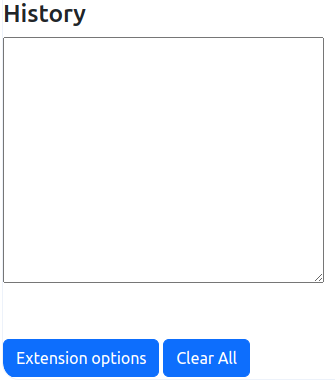
Figure 2: Activity logger side panel user interface - Part 2.
File Name: popup.js
In this section, the core JavaScript file for the extension titled popup.js is described. The first element added to this file is a function to interact with the browser's storage to retain information about the current state of the logging process. This is important for this extension, as when the side panel of the extension is opened or closed, the data on the side panel is removed. To store the current state in storage so it can later be recalled when the panel is opened again, the state of the logging process is saved in the browser's storage as a single record. This state can either be active, e.g., the user's activity is currently being recorded, or inactive, e.g., the activity is not being recorded.
To implement this, the chrome.storage.local.get() function is used to retrieve a record titled status. When this function is called, and the data becomes available, the associated then() function triggers, making a variable titled result available. To aid debugging, a console.log() is used to print the result.status attribute to the developer console. An if statement is then used to check if the status attribute is set to active. If it is, a call is made to the setActiveUI() function (described later), to update the side panel to show that the logging process is currently active.
chrome.storage.local.get(["status"]).then((result) => {
  console.log("Current status is:  " + result.status);

  if (result.status == "active") {
    setActiveUI();
  }
});
The function setActiveUI() is then defined. This first prints to the console, outlining that we are about to update the UI bar to green to indicate that logging is in progress. The getElementById() selector is used to select the <div> tag that is used to show the status on the side.html page with the ID set to status. The reference is then placed into a local variable titled status.
After this, the innerHTML of the status object is used to update the visible text to show the word Active. The status.style.backgroundColor attribute is then used to update the background of the status <div> tag to a shade of green using a hex code. It is important to note here that no changes are performed on any data. These changes are purely to update the UI components of the extension dynamically.
function setActiveUI() {
  console.log("Updating UI satus to green");
  let status = document.getElementById("status");
  status.innerHTML = "Active";
  status.style.backgroundColor = "#46ff33";
}
As four different buttons exist on the user interface, the JavaScript button listeners associated with each one are added here. The querySelector() function is first used to select the button with the ID set to startSession and store the reference in a variable titled startButton. Using this reference, the addEventListener() function is used to append a click listener to it. When a click occurs, the content of this function triggers. Here, a call is made to the startSession() function. Just below this, the same process is repeated for the button with the ID stopSession, which is used to trigger the stopSession() function.
As the extension has an options page that allows the user to update settings for the extension, the button with the ID set to options has a click listener that calls the openOpens() function, which is used to open the options.html page in the user's browser as a new tab. The last button listener added to this section is the clear button listener. When this is clicked, a call is made to the clearUI() function that is responsible for resetting all the <div> tag values on the UI back to zero and erasing the previous URL history from the <textarea>.
let startButton = document.querySelector("#startSession");
startButton.addEventListener("click", function () {
  startSession();
});

let stopButton = document.querySelector("#stopSession");
stopButton.addEventListener("click", function () {
  stopSession();
});

let stopButton2 = document.querySelector("#options");
stopButton2.addEventListener("click", function () {
  openOptions();
});

let clear = document.querySelector("#clear");
clear.addEventListener("click", function () {
  clearUI();
});
The main function of the entire extension is then added, which is titled startSession(). This function begins by printing to the console that a new session has just started. After this, a call is made to the clearUI() function described earlier to reset the <div> tags on the UI. After this, a call is then made to the previously defined setActiveUI() function to update the <div> tag with the ID set to status to change the text from Inactive to Active, and change the background color of the <div> tag to a bright green color.
As we need to find out how long the logging session has been running for, a marker is needed to define the start time. The current time is retrieved using the Date.now() function, and then it is divided by 1000 miliseconds, and then placed into a variable titled start. The time recorded in this variable is the current time in seconds since the Unix epoch (1st Jan 1970).
Once the start time has been created, the second part of this process is to store it for future calculations. The chrome.storage.local.set() function is used to set a new attribute titled startTime into the local storage with the value of the variable start we just created. When stored, the associated then() function is triggered, and a message is printed to the console, which prints this start time to aid debugging. A similar process is then performed to save the attribute titled status to the storage with the value set to active to indicate the logging process has started.
The final step in this process is to send a message across to the background.js script to tell it that the logging process has just started. This is done by using the chrome.runtime.sendMessage() function which takes in the name of an attribute, followed by the value you wish to send across. In this case, we are sending a variable titled status and the value start.
function startSession() {
  console.log("Session started....");
  // clear the UI fields
  clearUI();
  setActiveUI();

  // Save the start time locally
  let start = Math.round(Date.now() / 1000);
  chrome.storage.local.set({ startTime: start }).then(() => {
    console.log("Saved start time: " + start);
  });

  // Save the status as active as we are starting a new recording
  // session
  chrome.storage.local.set({ status: "active" }).then(() => {
    console.log("Status is set to active");
  });

  // Send a message to the background.js file to start recording
  chrome.runtime.sendMessage({ status: "start" });
}
When the extension has just finished a logging process, we often need to reset the user interface. To do this, a function is added titled clearUI(). This very simple function uses the getElementById() selector to select each of the individual <div> tags by ID and then set the innerHTML attribute to empty double quotes.
function clearUI() {
  document.getElementById("history").innerHTML = "";
  document.getElementById("unique_url_ui").innerHTML = "";
  document.getElementById("total_urls_ui").innerHTML = "";
  document.getElementById("totalTime").innerHTML = "";
}
Similar to this, when the user clicks on the Stop Session button on the user interface, a call is made to the stopSession() function. This function uses the chrome.runtime.sendMessage() function to send an attribute titled status with the value stop to the background.js file which is responsible for the activity logging process.
function stopSession() {
  console.log("Session stopped");
  // Send message to background.js to stop
  chrome.runtime.sendMessage({ status: "stop" });
}
When the user interface of the extension in the side.html is opened, it is automatically refreshed and loses all the data stored on it. To allow the data to be restored based on values stored, a function titled updateUI() is added. This begins with a call to the chrome.storage.local.get() function to retrieve the variable titled startTime from the storage. When this becomes available, the associated then() function triggers. Inside this, the end time is then calculated by calling the Date.now() and dividing it by 1000 milliseconds. This returns the number of seconds since epoch and stores it into a local variable titled end. After this, to calculate the total time the extension was logging data, a new variable is created titled total. To calculate total time, the result.startTime is subtracted from the end time variable. Here, the Number() function is wrapped around the result.startTime, to ensure the data type of the retrieved record is in a number format, not text.
Once the total has been calculated, to make it visible to the user, the getElementById() selector is used to select the <div> tag on the user interface with the ID set to totalTime. The innerHTML attribute is then set to the value of the total variable. After this, the process is repeated for the totalUnique variable in storage that contains the total number of unique URLs the user visited during the session. The <div> tag on the UI with the ID set to unique_url_ui has the innerHTML updated to the result result.totalUnique attribute retrieved from storage. This is repeated again for the total number of URLs visited that is stored in the local storage as totalURLs and placed into the <div> tag with the ID set to total_urls_ui.
function updateUI(){
    chrome.storage.local.get(["startTime"]).then((result) => {
      let end = Math.round(Date.now() / 1000);
      let total = end - Number(result.startTime);
      document.getElementById("totalTime").innerHTML = total;
    });

    chrome.storage.local.get(["totalUnique"]).then((result) => {
      document.getElementById("unique_url_ui").innerHTML = result.totalUnique;
    });

    chrome.storage.local.get(["totalURLs"]).then((result) => {
      document.getElementById("total_urls_ui").innerHTML = result.totalURLs;
    });
To update the user interface, the getElementById() selector is used to select the <div> tag with the ID set to status and place it into a variable titled status. The status.style.backgroundColor attribute is then used to set the background to #FFFFFF.
The last step in the process is to use the chrome.storage.local.get() function to retrieve the history attribute from storage that contains all the URLs the user visited during their session. When this is found, the then() function triggers, and the selector is used again to select the <textarea> tag with the ID set to history. The innerHTML attribute is then set to the value of the history attribute of the result record just retrieved from storage.
     // change the colour of the status field
     let status = document.getElementById("status");
     status.innerHTML = "Inactive";
     status.style.backgroundColor = "#FFFFFF";

     // get the session history and add it to the UI
     chrome.storage.local.get(["history"]).then((result) => {
         document.getElementById("history").innerHTML = result.history;
     });
}
In the case when the background.js file wants to communicate with the extension UI, the chrome.runtime.onMessage.addListener() function is used. This listens for any messages that are sent from the background.js file. When a message is sent across, the function triggers, providing access to three objects, request, sender, and sendResponse. The request object is of most interest here as it contains the data sent across. When the message arrives, a console.log() is used to identify that a message has just been received. An if statement is then used to check if the request object that was received contains a status attribute. If this attribute is equal to update, a call is made to the updateUI() function.
chrome.runtime.onMessage.addListener(function (request, sender, sendResponse) {
  console.log("in popup.js");
  console.log(request);
  if (request.status == "update") {
    updateUI();
  }
});
At the end of this file, a function titled openOptions() is added. When this is called, the options.html page is opened as a new tab by calling window.open() function and passing in a chrome.runtime.getURL() for the options.html. This returns the complete URL for the options.html file in the extension folder.
function openOptions() {
  window.open(chrome.runtime.getURL("options.html"));
}
The last element of this file is a window.onload() function, which runs when the extension side panel is opened. As by default the panel will not retain any information from the last time it was opened, a call is made to the checkStatusofUI() function to see if the UI needs to be updated to active if the status is currently set to active in the local storage.
window.onload = function () {
  checkStatusofUI();
};
Once all the content has been added to the file, we can move on to working on the options page for the extension.
File Name: options.html
To provide additional customization for the extension, the options.html page is added. This page allows the user to change specific setting variables for the extension. In this file, a <select> element is added with the ID set to interval. This is used to store a variable that defines the interval between user activity snapshots. Inside this, <option> tags are added to define the individual delay intervals available, shown as 1, 3, 5, or 10 minutes. To save these values, a <button> is added titled Save. At the end, a <script> tag is used to import the options.js file, which records the value selected by the user, as no JavaScript can be added to the HTML file itself.
<!DOCTYPE html>
<html>

<head>
    <title>Activty Logger Extension options</title>
</head>

<body>
    Record URL every (minutes):
    <select id="interval">
        <option value="1">1</option>
        <option value="3">3</option>
        <option value="5">5</option>
        <option value="10">10</option>
    </select>
    <br>
    <button id="save">Save</button>
    <script src="options.js"></script>
</body>

</html>
Figure 3 shows the options.html page for the extension.
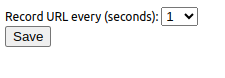
Figure 3: Activity logger extension custom options page.
File Name: options.js
As the options.html page cannot run the JavaScript itself, the options.js file is included. The saveOptions() function first uses the getElementByID() selector to select the <select> tag with the ID set to interval. The value is then extracted and placed into a variable titled value. After this, the chrome.storage.local.set() function is used to save the interval variable name to the storage along with the value of the variable. When saved, the then() function triggers and prints a message to the console outlining that the record has been saved.
After this the the restoreOptions() function is added. Inside this, a call is made to the chrome.storage.local.get() function to retrieve the interval variable from storage. When retrieved, the then() function triggers, making a variable titled result available. A console.log() is then used to print the result.interval to the console to aid debugging. To update the <select> on the user interface with the previously saved value when the page is reloaded, the getElementById() selector is then used to select the <select> drop-down with the ID set to interval. The result.records retrieved from the storage is then set as the value.
To trigger these two functions, at the end of this file, the addEventListener() function is used to add a new DOMContentLoaded listener, which will run when the options.html is opened by the user. This calls the restoreOptions() function just defined. The getElementById() is then used to select the <button> tag on the user interface with the ID set to save. Another addEventListener() function is then appended to it so when clicked, it calls the saveOptions() function to save the <select> value to storage.
// Saves options to storage
const saveOptions = () => {
  const value = document.getElementById("interval").value;
  chrome.storage.local.set({ interval: value }).then(() => {
    console.log("interval option saved");
  });
};

// Restores when options.html loaded
const restoreOptions = () => {
  chrome.storage.local.get(["interval"]).then((result) => {
    console.log("save interval in storage is " + result.interval);
    document.getElementById("interval").value = result.interval;
  });
};
document.addEventListener("DOMContentLoaded", restoreOptions);
document.getElementById("save").addEventListener("click", saveOptions);
File Name: background.js
The background.js file is used to perform the logging process of the individual URLs visited by the user during a logging session. This file runs in the background of the browser as the user browses the web. At the top of this file, console.log() is added to note that the file has loaded. An array is added titled urlHistory, which is used for storing all the URLs the user has visited. In addition to this, another array titled uniqueHistory is used for storing unique URLs the user visits.
console.log("In background.js");
let urlHistory = []; // store all URL history here for each snap shot of the URL
let uniqueHistory = []; // only store unique URLs here
When the extension icon is clicked, we need to open the side panel. To do this, the chrome.runtime.onInstalled.addListener() function is added. In this, the sidePanel .setPanelBehavior() function is called to set the default behaviour for the panel. This is passed the JSON openPanelOnActionClick:true indicating that we want to open the side panel when the extension icon is clicked.
chrome.runtime.onInstalled.addListener(() => {
  chrome.sidePanel
    .setPanelBehavior({ openPanelOnActionClick: true })
    .catch(console.error);
});
To provide the user with an easy method of opening the options.html options interface, the chrome.commands.onCommand.addListener() function is used to listen for different key presses from the user. In the case where the user presses the key sequence identified in the manifest.json file to open the options.html file, the chrome.tabs.create() function is used to open a new tab with the URL set to options.html.
chrome.commands.onCommand.addListener((command) => {
  if (command !== "open-tab") return;
  chrome.tabs.create({ url: "options.html" });
});
When the extension’s start and stop session buttons are clicked, the side panel sends messages across to the background.js file. To listen for these messages, the chrome.runtime.onMessage.addListener() function is added that triggers when the background.js file receives a message from other file.
In the case where a message has been sent, the function triggers, providing access to the request, sender, and sendResponse objects. An if statement is then used to check if the request object received has a status attribute that contains the keyword start. If it does, then a call is made to the startRecording() function to begin logging. In the case where the message received was not a start message, it would indicate we have a stop message, and the else statement will trigger calling the stopRecording() function.
chrome.runtime.onMessage.addListener(function (request, sender, sendResponse) {
  console.log(request);
  if (request.status == "start") {
    startRecording();
  } else {
    stopRecording();
  }
});
These two functions are then defined. The startRecording() function begins by resetting the urlHistory array and the uniqueHistory array. A call is then made to the chrome.storage.local.get() function to retrieve the interval attribute from local storage that is used to define the interval delay in minutes between recordings.
A variable titled interval is created to make the variable easy to access. An if statement is then used to check if the result.interval variable has been set. If it was not set by the user, by default, the interval is set to 1/6, providing a 10-second delay. A call is then made to the chrome.alarms.create() function to create the new alarm. This is passed the name myTask and the periodInMinutes defines how often the alarm will trigger. In this example, it is set to the value interval, which is about 10 seconds. This alarm will continue to be called repeatedly with a delay between alarms until cleared later when the logging session is stopped.
function startRecording() {
  // clear the history arrays
  urlHistory = [];
  uniqueHistory = [];
  // Get the number of interval for the delay betwen recordings
  chrome.storage.local.get(["interval"]).then((result) => {
    console.log("save interval in storage is " + result.interval);

    let interval = result.interval;

    if (!result.interval) {
      interval = 1 / 6;
    }
    chrome.alarms.create("myTask", { periodInMinutes: Number(interval) });
  });
}
A new alarm listener is then created with the chrome.alarms.onAlarm.addListener() function. Each time the alarm triggers, the alarm object becomes available. An if statement is then used to check if the alarm.name matches the name myTask we defined earlier. If it does, a call is made to the saveCurrentTabInfo() function to log the page the user is currently viewing.
chrome.alarms.onAlarm.addListener((alarm) => {
  if (alarm.name === "myTask") {
    console.log("Recording in loop");
    saveCurrentTabInfo();
  }
});
When the user is finished with the session, the stopRecording() function is called. Inside this, the chrome.alarms.clear() function is called to remove the alarm. A call is then made to the saveSessionData() function to save all the data from the session to the local storage. The chrome.storage.local.set() function is then called to set the status attribute of the logger to inactive to identify the process has stopped. To update the user interface of the extension with the new results, a call is made to the chrome.runtime.sendMessage() function that will send the attribute status to the popup.js file with the value update, to tell the extension to update the UI with the new results.
function stopRecording() {
  console.log("Stopping recording...");
  chrome.alarms.clear("myTask");
  saveSessionData();
  chrome.storage.local.set({ status: "inactive" }).then(() => {
    console.log("Value is set to inactive");
  });
  // send back to popup.js
  chrome.runtime.sendMessage({ status: "update" });
}
The saveSessionData() function is designed to take all of the data collected in the two arrays and store them in local storage that can later be read by the extension and added to the user interface. In this function, a variable is created titled historyForUI. This is a string variable that will be appended to the user interface <textarea> element with the ID set to history later.
A forEach function is applied to the urlHistory array to loop over each record in the array. For each individual item in the array, the item is appended to the historyForUI string variable. New line characters are also appended for each item in the array, as when the <textarea> displays the records, we require each record to be on a new line. After the historyForUI variable has all the logs, a call is made to the chrome.storage.local.set() function to save the history attribute with the value set to the historyForUI string for future retrieval.
After this, the length of the uniqueHistory array that contains each unique URL the user has visited is stored in a variable titled total. The same set() process is performed to set the total variable into local storage as a new record titled totalUnique. To save the total number of all URLs the user has visited, the length of the urlHistory array is stored into a local variable titled fullHistory. The set() function is called again to store a new record with the name totalURLs into local storage with the value of the fullHistory variable.
function saveSessionData() {
  let historyForUI = "";
  urlHistory.forEach((item) => {
    historyForUI = historyForUI + item + "\n---\n";
  });
  chrome.storage.local.set({ history: historyForUI }).then(() => {
    console.log("session history saved");
  });
  let total = uniqueHistory.length;
  chrome.storage.local.set({ totalUnique: total }).then(() => {
    console.log("saved total unique URLs");
  });
  let fullHistory = urlHistory.length;
  chrome.storage.local.set({ totalURLs: fullHistory }).then(() => {
    console.log("saved total URLs");
  });
}
The last function in this file is the asynchronous function saveCurrentTabInfo() that is responsible for capturing the URL that the user is currently viewing. Inside this, a call is made to the chrome.tabs.query() function. The parameters active:true and lastFocusedWindow:true are sent to get the tab currently being used by the user. This result is placed into an array titled tab.
An if statement is then used to identify if a tab has been found, e.g., true, we can begin the process of storing the data in the local arrays. As we want to store all URLs and also unique URLs, this process is broken into two parts. For the unique URLs, an if statement is used to check if the uniqueHistory array does not have a record of the current tab.url. If it does not exist, the push() function is used to append the new URL to the uniqueHistory array. For all URLs, even if they are not unique, at the end of this code, the tab.url is added to the urlHistory array by calling the push() function and appending the tab.url.
async function saveCurrentTabInfo() {
  console.log("Recording..");
  const [tab] = await chrome.tabs.query({
    active: true,
    lastFocusedWindow: true,
  });
  if (tab) {
    // store unique URLs if we haven't seen them before
    if (!uniqueHistory.includes(tab.url)) {
      uniqueHistory.push(tab.url);
    }
    // Save all URLs to history
    urlHistory.push(tab.url);
  }
}
View Results
Once the extension is complete and loaded into Chrome, the process of starting a new logging activity can be performed. When the extension icon is clicked, as shown in Figure 4, a small message is shown to the user instructing them to right-click the icon and select Open panel to view the extension side panel.
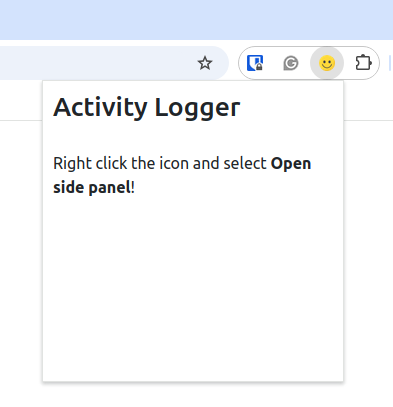
Figure 4: Activity logger dialog pops up when the extension icon is clicked.
In this example, when a logging session is started, the <div> tag at the top of the side panel changes to green as shown in Figure 5.
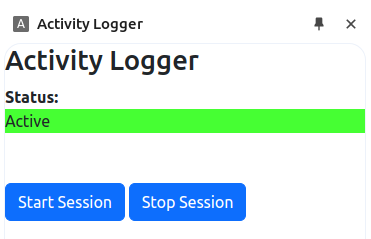
Figure 5: Activity logger in the active state.
In Figure 6, the statistics output can be seen. Here the total number of URLs visited and the total unique URLs visited, can be seen. A counter is used to print the logging duration in seconds. Figure 7 shows each of the URLs that were visited when the logger was in the active state.
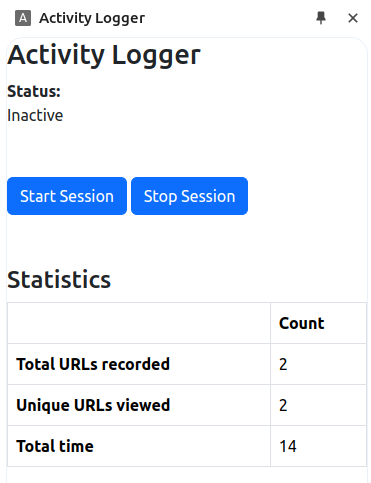
Figure 6: Activity logger showing the total number of URLs visited and the time taken.
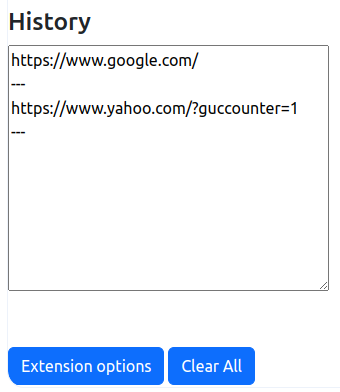
Figure 7: Activity logger showing the individual URLs visited while the logger was running.
Summary
This chapter described the implementation of a browser activity logger that was shown as a side panel. When the user opens the side panel, they have the option to start or stop a logging session. To do this, messages were passed between the side.html file’s associated popup.js file and the background.js file to define when the recording process has started and stopped. To trigger the recording process at defined intervals, alarms were used. As the side panel does not retain any information when opened after being closed, values were read from the local storage and added to the user interface dynamically.
On the side panel, statistics about the session were shown, outlining the total number of URLs recorded, the unique URLs viewed, and the total time in seconds the logging process was running for. A text area was also added to provide a complete log of all URLs visited. This extension also made use of the default options page that is available to all extensions to define core variables that the user can modify. Chapter 9, next, describes the process of developing a screen capture extension.
Take-away Tips:
-
As extensions often have a number of user-defined settings, the options.html page for the extension can be defined in the manifest.json file.
-
When a side panel is opened, it does not retain any previously shown content. Local storage can be used to populate the panel UI with data when the panel is opened.
-
When working with start times and end times, Epoch time is used. This represents the number of milliseconds elapsed since January 1st, 1970. This allows for easy addition and subtraction of time logs.
-
In JavaScript, to get the Epoch time, we can call the Date.now() function, and dive it by 1000 milliseconds.
-
Keyboard shortcuts can be defined in the manifest.json file to trigger different processes, such as opening the extension's options page.
-
The chrome.commands.onCommand.addListener() can be used in a background.js file to listen for key press sequences.
-
When we need to perform ongoing tasks such as logging, they can be defined in the background.js file as alarms. These alarms can be set to trigger at defined intervals, such as every 5 minutes, to perform a task.