Extension: AI Integration
11.1 Introduction
With the advancements of large language models (LLMs) such as ChatGPT (https://chatgpt.com/) and Gemini (https://gemini.google.com/), many developers have begun integrating AI into their applications to further enhance their capabilities. This chapter describes the process of integrating OpenAI's LLM ChatGPT into a custom Chrome extension. In this extension, the user has the ability to highlight any word on a web page and click Explain on a custom right-click context menu. When this is performed, the word is passed from the browser extension to a local Express.js API server, which, in turn, sends the word across to the ChatGPT API to explain. When the definition is returned from the API, it is placed into a browser-side panel for easy viewing.
To get started, Section 11.2 begins by outlining the development of the Chrome extension itself. Section 11.3 then outlines the process of signing up for a new ChatGPT account to gain access to the LLM API. To interact with this API from the developed extension, Section 11.4 walks through the process of developing a local Express.js API server. Finally, Section 11.5 concludes this chapter and provides a list of core takeaway tips from the chapter.
Source code for this chapter can be found here.
11.2 Extension
To get started building the extension, create a new folder titled ai-extension. Inside this folder, create the following empty files:
File Structure
-
/ai-extension/manifest.json
-
/ai-extension/service-worker.js
-
/ai-extension/side.html
-
/ai-extension/side_script.js
-
/ai-extension/icon.png
The manifest.json file is used to define basic information about the extension and the permissions it requires. The service-worker.js file is added to define the right-click content menu that is shown when the user right-clicks on a web page. To present the definition of a word to the user when it is returned from the ChatGPT API, a file titled side.html is added. This file is shown to the user in the form of a browser side panel. The side_script.js file contains the core JavaScript for the extension. This is used for interacting with the local API server to orchestrate tasks. Finally, the icon.png is the simple smiley face icon used by all extensions in this book.
In addition to these files, the extension also contains a lib folder, which is used to hold two additional libraries: Bootstrap and jQuery.
File Structure
-
/ai-extension/lib/
-
/ai-extension/lib/bootstrap.bundle.min.js
-
/ai-extension/lib/bootstrap.min.css
-
/ai-extension/lib/jquery.js
Source code: /ch11/ai-extension/
File Name: manifest.json
The first file in this extension is the manifest.json. This file contains basic information about the extension, including the name, version number, and description. In addition to this, the permissions attribute is added to define the core permissions the extension requires.
These permissions include the activeTab permission. This allows the extension to interact with the tab the user is currently viewing. As we need to execute JavaScript to work with the browser tabs and side panel, the scripting permission is added. To add the side panel itself to the browser, the sidePanel permission is also added. In the extension, the user may manually enter the word they wish to expand or highlight a word on a webpage and right-click to send it to the extension. To allow this right-click menu to be available, the contextMenus permission is added. Finally, the notifications permission is added to pop open a simple notification to the user when the extension is first installed.
The background attribute is then defined as server-worker.js. This file allows us to define a right-click context menu itself that will be added to the web pages the user is viewing. The side_panel attribute is then set to side.html. This side panel is shown in the browser when the extension icon is clicked. As we want the extension to interact with our local API server, the host_permissions attribute is then added with the URL http://localhost:3000/*. The asterisk defines that all the sub-URLs on our local server can be accessed by the extension. Finally, for the action attribute, the default_title is added, which defines the text that is displayed when a user hovers over the extension’s icon. For the icon itself, the default_icon attribute is added.
{
    "manifest_version": 3,
    "name": "Explain Words",
    "description": "Explain Words",
    "version": "1.0",
    "permissions": [
        "activeTab",
        "scripting",
        "sidePanel",
        "contextMenus",
        "notifications"
    ],
    "background": {
        "service_worker": "service-worker.js"
    },
    "side_panel": {
        "default_path": "side.html"
    },
    "host_permissions": [
        "http://localhost:3000/*"
    ],
    "action": {
        "default_title": "Click to open panel",
        "default_icon": "icon.png"
    }
}
File Name: side.html
When the user clicks the extension icon in the menu bar of Chrome, the side.html HTML file is opened as a side panel. This file serves as the main user interface for the extension. Here, a <textarea> tag is first added, which is used to display the text description that is returned by the LLM. The ID for this text area is set to outputArea, which will be referenced later when updating the content of this text area. The rows and cols attributes of this tag are set to 10 and 30, respectively, to provide enough space to show the content returned by the LLM without requiring the user to scroll.
An <input> field is added with the ID set to myWord. This is the main location where the user enters the word they wish to explain with the LLM. A <button> is then added with the ID set to runButton. When this is pressed, it triggers the interaction with the LLM through the local API server.
As the process of interacting with the API server, which then interacts with the LLM, may delay a few seconds, a <div> tag is added with the ID set to spin. Inside this, a <span> tag is added with the class set to sr-only. This tag will show a Bootstrap spinning icon when the interaction with the LLM begins. Below this, a <div> tag is added with the ID set to errorMessage. This is used to display an error message if the extension cannot connect to the API server. The spinner tag is hidden by default (shown later) when the side panel loads, and is shown programmatically using JavaScript.
<h1> Explain Words</h1>
<textarea id="outputArea" rows="10" cols="30">
</textarea>
<div style="height:100px"></div>
<input id="myWord"> </input>
<button id="runButton"> Explain </button>
<p></p>
<div id="spin" class="spinner-border" role="status" style="padding-top:20px">
    <span class="sr-only"></span>
</div>
<div id="errorMessage"></div>
At the end of this file, the imports for the extension are defined. The first of these is the jQuery library, which is used for hiding and showing the loading spinner <div> tag when interacting with the LLM. Bootstrap is then included, which is used for creating the loading spinner itself. Along with this, the Bootstrap CSS file is also imported for styling UI components. Finally, the main JavaScript file for the extension is then imported, titled side_script.js. This file contains the bulk of the JavaScript for the extension.
<script src="lib/jquery.js"></script>
<script src="lib/bootstrap.bundle.min.js"></script>
<link rel="stylesheet" type="text/css" href="lib/bootstrap.min.css" />
<script src="side_script.js"></script>
File Name: side_script.js
The side_script.js file is the main JavaScript file for the extension, which is responsible for listening to the button click events and interacting with the local API server. At the top of this file, when the side panel is first loaded, the jQuery selector is used to select the <div> tag with the ID set to spin, which contains the loading spinner that is shown when the user is interacting with the LLM. A call is made to the jQuery hide() function to hide this spinner by default when the panel first loads. The querySelector() function is then used to select the <button> on the side panel, which has the ID runButton, and place it into a local variable titled btn. A call is made to the addEventListener() function to append a click listener to the button btn.
When the button on the panel is clicked, the function below triggers. Inside this, the getElementById() selector is used to select the <input> field with the ID set to myWord and extract the value from it. This word is placed into a variable titled word. A console.log() call is then added to print the word to the console to aid debugging.
An if statement is then used to check if the length of the word variable is equal to 0. If it is, this indicates that the user has not entered a word and has just clicked the button instead. When this happens, the jQuery selector is used to select the <div> tag with the ID errorMessage and update the HTML using the html() function to include the message Please enter a word.
If the user has entered a word, the else statement triggers. Inside this, it first uses the jQuery selector to select the <div> tag with the ID set to errorMessage. With this, a call is made to the html() function with empty double quotes to remove any message that may have previously existed in the tag. The selector syntax is then used again to select the <div> tag with the ID spin. This tag contains the visual spinner that is shown to the user, indicating that the interaction with the LLM is in progress. To make it visible to the user, a call is made to the jQuery show() function on this <div> tag. Finally, a call is made to the callAPI() function, and the word variable is passed in to begin the interaction with the LLM through the API server.
$("#spin").hide();
// Listen for the user to click the Explain button
// on the side panel
let btn = document.querySelector("#runButton");
btn.addEventListener("click", function () {
  console.log("Explain button clicked");

  let word = document.getElementById("myWord").value;
  console.log(word);
  if (word.length == 0) {
    $("#errorMessage").html("Please enter a word");
  } else {
    $("#errorMessage").html("");
    $("#spin").show();
    callAPI(word);
  }
});
This callAPI() function is the core function responsible for interacting with the API server, which in turn interacts with the LLM API. Inside this function, a console.log() is first performed to output a message to the console to ensure the function has been called correctly. After this, a call is made to the fetchData() function. This takes in the URL for the local API server to call. This URL contains localhost:3000 as the location of the server, and /api/call1/ as the specific page to call. This page takes in the parameter titled word which is set to the value of the word variable entered by the user as a key-value pair.
When the call to the URL is completed, the functions then() function triggers, making a response object available. This object contains the complete JSON returned from the API server. Below this, an if statement is used to check if the response returned is equal to null. If it is, a message is printed to the console saying No data to update. When the response object is returned correctly and contains data, the else statement triggers. Inside this else statement, the JSON is extracted from the response by calling the json() function and placed into a variable titled prom. When this is finished, the then() statement triggers, and a variable titled data becomes available with the JSON. A console.log() call is added here to print this data variable with the JSON to the console to aid debugging.
Once the result has been collected, a call is then made to the getElementById() selector to select the <textarea> on the side panel with the ID set to outputArea. The HTML for this is set to be the data.output_text, which is the raw text extracted from the JSON response. Finally, a call is made to the jQuery selector to select the <div> tag with the ID set to spin. This tag contains the visual loading spinner that was shown to the user during the interaction with the LLM. With this, a call is made to the jQuery function hide() to hide the loading spinner as the process is now complete.
function callAPI(word) {
  console.log("Calling API");

  fetchData("http://localhost:3000/api/call1?word=" + word).then((response) => {
    if (response == null) {
      console.log("No data to update ");
    } else {
      const prom = response.json();

      prom.then((data) => {
        console.log(data);

        document.getElementById("outputArea").innerHTML = data.output_text;

        $("#spin").hide();
      });
    }
  });
} //callAPI
In the previous code, a call was made to the asynchronous function titled fetchData(). Here, the body of this function is defined. This function first takes in a variable titled url, which contains the complete URL of the local API server page to call, and the word of interest (defined in the previous block of code) we wish to get the description of.
A try-catch statement is added to first try make a call to the JavaScript fetch() function and catch the error if one occurs. This fetch() function takes in the url passed to this function earlier. The await keyword is added before this fetch to instruct the code to wait for the response from the server before moving on to the next line. The result of the fetch containing the LLM response JSON is then placed into a variable titled result. A call is then made to return this result to the function caller.
In the case where this fetch() call fails, the catch statement triggers. This first prints an error message to the console and second, using the jQuery selector, selects the <div> tag with the ID set to errorMessage. With this tag, the html() function is called to update the content of the error <div> tag to contain the text Cannot reach API server!
async function fetchData(url) {
  try {
    let result = await fetch(url);

    return result;
  } catch (error) {
    console.log("Error contacting the API server. Is it running?");
    $("#errorMessage").html("Cannot reach API server!");
    return null;
  }
}
The last piece of JavaScript added to this file is a call to chrome.runtime.onMessage.addListener(). The purpose of this function is to listen for messages that are passed across from the service-worker.js file when a user highlights a term and clicks on the right-click context menu item to send the term to the side panel.
This function contains a message object that contains the message sent from the other file, a sender object outlining who sent the message, and a sendResponse object if a response needs to be sent back. Here, only the message object is used. Inside this function, a call to console.log() is performed to print the message object sent across to the console.
As a word is sent across from a page to the panel, a call is made to the chrome.windows.getCurrent() function to get a reference to the current browser window. This provides access to an object titled window. The chrome.sidePanel.open() function is then called to open the extension side panel user interface by passing a parameter titled windowId which has the value set to the window.id attribute.
After this, an if statement is then used to check inside the message object to see if the action attribute was set to update. If this word is found, the getElementById() selector is then used to select the <input> field on the side panel with the ID set to myWord. The value of this is then set to message.text to set the word into the <input> field of the side panel.
A call is then made to the jQuery selector to select the <div> tag with the ID set to spin. With this reference, a call is made to the show() function to make the visual loading spinner visible. Finally, after the word has been added to the side panel's word <input> field, a call is made to the callAPI() function to trigger the process of sending the word to the API server for the LLM to explain. This takes in the message.text attribute, which contains the word selected by the user on the web page.
chrome.runtime.onMessage.addListener((message, sender, sendResponse) => {
  console.log("Got a message from the service worker..." + message);

  chrome.windows.getCurrent({ populate: true }, (window) => {
    chrome.sidePanel.open({ windowId: window.id });
  });

  if (message.action === "update") {
    document.getElementById("myWord").value = message.text;

    $("#spin").show();

    callAPI(message.text);
  }
});
File Name: service-worker.js
The service-worker.js file is first used to define the menu the user sees when they highlight a word on a web page and right-click. It is also used to define the behaviour of the side panel that the user sees. At the top of this file, the default behaviour for the panel is first defined. When this file first loads, a call is made to the chrome.sidePanel.setPanelBehavior() function to set the default action to open the side panel when the user clicks the icon in the browser menu bar by passing in the openPanelOnActionClick parameter as true.
chrome.sidePanel
  .setPanelBehavior({ openPanelOnActionClick: true })
  .catch((error) => console.error(error));
After this, when the extension is first installed, a call is made to the chrome.runtime.onInstalled.addListener() function to listen for the install action being performed by the user. When this happens, the body of the function attached to this is then called. Here, two calls are made to the chrome.contextMenus.create() function to add items to the context menu the user sees when they right-click on a web page. The first menu added is used for opening the extension side panel, and the second is for explaining the word the user has currently selected.
These context menus contain four parameters: a unique id number, the title which is displayed in the menu, the type of menu, and the contexts when the menu will be shown. In this example, as we want to show the menu when a user right-clicks on selected text, we will choose selection for the contexts attribute.
chrome.runtime.onInstalled.addListener(async () => {
    chrome.contextMenus.create({
        id: "open",
        title: "Open Explain with AI",
        type: "normal",
        contexts: ["selection"],
    });

    // right click content menus
    chrome.contextMenus.create({
        id: "explain",
        title: "Explain with AI",
        type: "normal",
        contexts: ["selection"],
    });
Once the two menus have been added, a call is made to the chrome.notifications.create() function to pop open a small notification in the top right corner of the user's browser, telling them they have installed the extension successfully. This contains a type which is set to basic, an iconURL, which is set to icon.png, and title, which defines the text Installed that is shown at the top of the notification. The message attribute then defines the core text shown on the notification. For the buttons attribute, a single button is added to dismiss the notification.
// Notification popup
chrome.notifications.create({
  type: "basic",
  iconUrl: "icon.png",
  title: "Installed",
  message: "Extension installed!",
  buttons: [{ title: "Great job, you installed the extension!" }],
  priority: 0,
});
As we have now added the menus to the right-click context, a listener is needed to identify when one of the menu items has been clicked. To do this, a call is made to the chrome.contextMenus.onClicked.addListener() function, which takes in the name of the function that will trigger when the menu items are clicked. In this example, the function that is called is titled checkClicks()
chrome.contextMenus.onClicked.addListener(checkClicks);
The checkClicks() function takes in two parameters, the data object received from the click and the tab object where the click originated. Inside this, a call is made to the await chrome.sidePanel.open() function to open the side-panel of the extension if it is not already opened. To aid debugging, console logs are then added to print that a click has just occurred, followed by the data.menuItemId, which identifies the ID of the menu item that was just clicked.
An if statement is then used to check if the data.menuItemId attribute is set to explain. If it does, it indicates the context menu item for explaining a word was clicked. Inside this, a call is made to the chrome.tabs.query() function to get the ID of the current tab by passing in the parameters active: true and currentWindow: true. When this is found, an object titled tabs becomes available. A call is then made to the chrome.scripting.executeScript() function to run the window.getSelection().toString() function on the current tab to retrieve the word the user has selected on the current web page.
async function checkClicks(data, tab) {
    // This will open the panel in all the pages on the current window.
    await chrome.sidePanel.open({ windowId: tab.windowId });
    console.log("click in context menu");
    console.log(data.menuItemId);

    if (data.menuItemId == "explain") {

        // get the current tab
        chrome.tabs.query({ active: true, currentWindow: true }, (tabs) => {
            // get the selected text
            chrome.scripting.executeScript(
            {
                target: { tabId: tabs[0].id },
                function: () => window.getSelection().toString(),
            },
When this is complete, a variable titled results becomes available. A check is then performed with an if statement to check if a value is available that can be sent to the side panel. To aid debugging, this result value is printed to the developer console.
Finally, a call is made to the chrome.runtime.sendMessage() function to send a message to the side_script.js file with the action attribute set to update and the text attribute set to the text the user selected (contained in the results[0].result variable).
(results) => {
    if (results && results[0]) {
        console.log(results[0].result);

        // send to the panel word box
        chrome.runtime.sendMessage({
            action: "update",
            text: results[0].result,
        });
    }
}
);
});
} // if
In the case where the user selected the right-click context menu to open the side panel, the else if statement triggers. Inside this, a check is performed to see if the data object menuItemId is set to open. If it is, a call is made to the chrome.sidePanel.open() and a reference to the current windowId is passed to add the panel to the current browser window.
else if (data.menuItemId == "open") {
    await chrome.sidePanel.open({ windowId: tab.windowId });
}
}
Once all the changes have been made to the files, save each file.
View Results
Once all the changes have been made, load the extension into your browser as described in Chapter 2, Section 2.3 Loading your Extension. Once loaded, Figure 11.1 shows the completed side panel of the extension. On this panel, a HTML <textarea> is added that will house the content sent back from the LLM. A single <input> field is added where the user can manually add the word they wish to send to the LLM.
A <button> tag is then added with the text Explain. When the button is clicked, it triggers the extension to extract the word from the <input> field to send it across to the local API server, which in turn sends it to the LLM API.
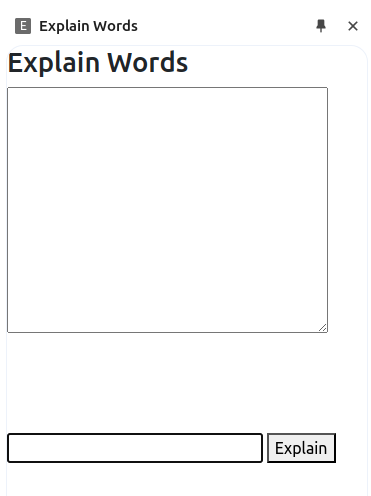
Figure 11.1: Side panel user interface with an input field to enter the word to explain with the LLM.
Figure 11.2 shows a word that was highlighted on a web page and right-clicked. When this is done, the custom context menu is shown titled Explain words. Inside this, two menu items are available: one to open the extension side panel, and another to explain the word the user just highlighted on the web page.
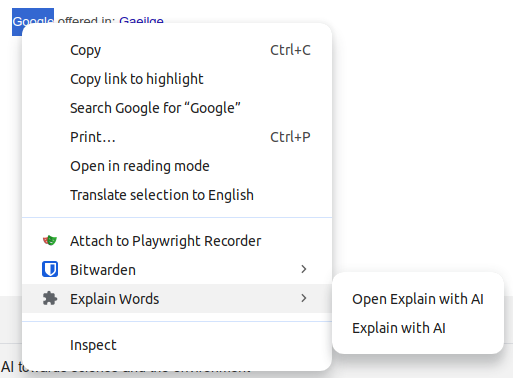
Figure 11.2: When the user right-clicks a word, the custom context menu becomes available.
Section 11.3, next, describes the process of signing up for a new ChatGPT account to get access to the ChatGPT API.
11.3 ChatGPT API
Before we begin the process of creating our API server to interact with the ChatGPT API, we first need to sign up for an account. This can be done on the official OpenAI sign-up page https://auth.openai.com/create-account.
Instead of using the traditional ChatGPT interface, this extension requires programmatic access to the OpenAI API. This API allows us to make calls to different LLM models by making calls to specific OpenAI URLs via JavaScript. When we call these URLs, we will pass parameters outlining what model to use and the API key that defines our user account. This key is unique to your project and is also used to track spending. This API service is called the OpenAI Platform, which can be found on their official website (https://openai.com/api/). Head to this page, and click Login on the top-right corner, as shown in Figure 11.3, to get started.
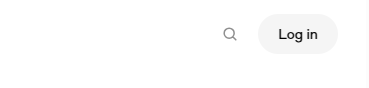
Figure 11.3: OpenAI - Login page button.
We then click the gear icon to enter into the settings page, as shown in Figure 11.4.
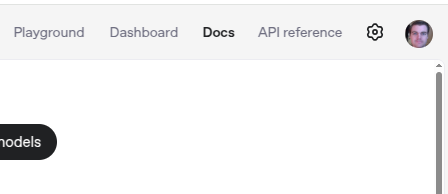
Figure 11.4: OpenAI - Gear icon to enter the settings page.
On the page that opens, click the menu item titled API keys on the left-hand side menu as shown in Figure 11.5.
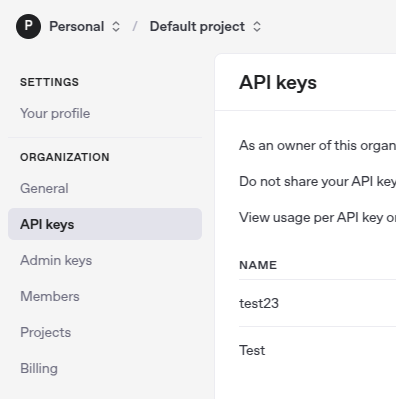
Figure 11.5: OpenAI - Click the API keys menu item on the left-hand side of the settings page.
Next, click Create new secret key on the top-right corner as shown in Figure 11.6.
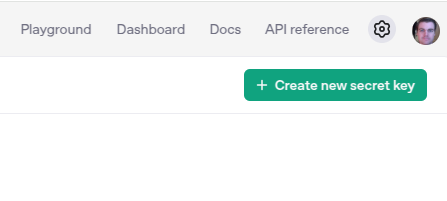
Figure 11.6: OpenAI - Clicking the button to create a new API key.
We then add a name to the key we are creating, and then select the project we wish to add the key to, which in this example, is the Default project. Next, we click Create secret key as shown in Figure 11.7.
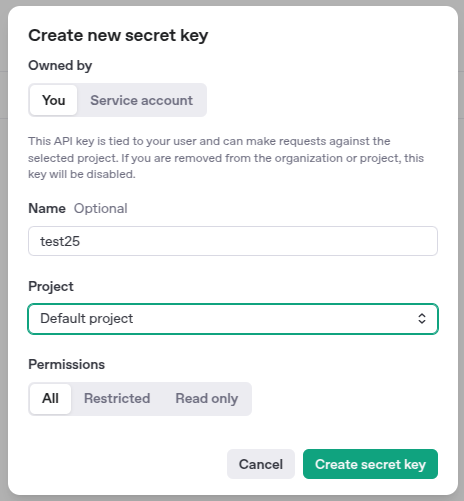
Figure 11.7: OpenAI - Creating a new API key.
Finally, we are presented with the option to copy the new API key to our clipboard, as shown in Figure 11.8. Note: It is important to keep this key safe as it is used to differentiate our API bills from other users. Ensure you do not add this key to any public location or public git repository.
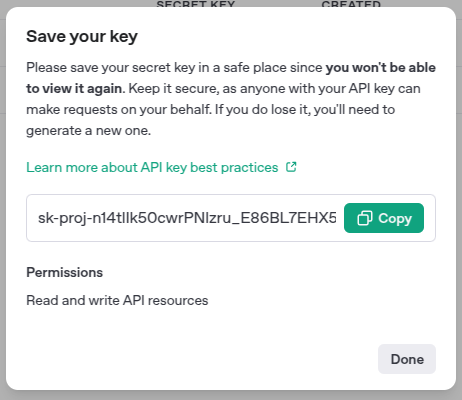
Figure 11.8: OpenAI - Copying the new API key to the clipboard.
Once we have the key, we can now move on to the process of making the API key available to our local development machine (later used by the local API server) as an environment variable. To do this, we create a new folder titled api-server on your desktop. Inside this, create a new file titled .env. This file only contains a single line, which is a key-value pair. The key of the variable we are creating is called OPENAI_API_KEY. This is followed by an equals sign. After this, we add in the value as the API key we just received from the OpenAPI. The complete key-value pair is shown below with a sample API key.
OPENAI_API_KEY=sk-svcacct-vM-1FRNfV6CQTP6yxspF-aRz7Vf3nIETNPENMxG0d9JZ5cJlhjGRX_oRDs7TYrJInFzYPZ9-MOT3BlbkFJtA4mlezJyMfAuLPoqOSlXe_RB4Nw-YIfnb67tey6w22Ca4m6SRuVgIxj2W9
Now that we have the environment variable set up, we can move on to building the API server to make calls to the OpenAI API. Development of this API server is described in Section 11.4, next.
11.4 API Server
As we now have the OpenAI API key set up as an environment variable in a .envfile, we can begin the process of developing a local Express.js API server to call the API. We first begin by adding the files from the Express.js-based API server previously described in Chapter 4, Section 4.4 Custom API Server to the api-server folder that was created in the previous section. Once complete, we should have the existing sample API server and the .env file with the OpenAI API key as shown in Figure 11.9.
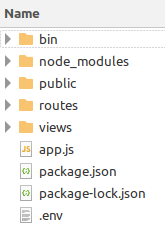
Figure 11.9: Complete API server template with the .env file.
Source code: /ch11/ai-apiserver/
Once the API server has been copied over, two additional libraries are required for this project: 1) The OpenAI library to allow the server to interact with the ChatGPT API, and 2) the dotenv library to allow us to read the API key we stored in the .env file in the root of our project.
To install these libraries, open a command prompt in the root of the project folder and run the following install commands:
npm install openai
npm intall dotenv
File Name: app.js
Inside the API folder, the app.js file is similar to the previous examples. The core change to this file is the import of the /routes/api.js file that contains the main URL definitions shown below.
var createError = require("http-errors");
var express = require("express");
var path = require("path");
var cookieParser = require("cookie-parser");
var logger = require("morgan");

var indexRouter = require("./routes/index");
var usersRouter = require("./routes/users");
var apiRouter = require("./routes/api");
var app = express();

// view engine setup
app.set("views", path.join(__dirname, "views"));
app.set("view engine", "jade");

app.use(logger("dev"));
app.use(express.json());
app.use(express.urlencoded({ extended: false }));
app.use(cookieParser());
app.use(express.static(path.join(__dirname, "public")));

app.use("/", indexRouter);
app.use("/users", usersRouter);
app.use("/api", apiRouter);
Below this, the standard boilerplate code is then added, similar to previous examples.
// catch 404 and forward to error handler
app.use(function (req, res, next) {
  next(createError(404));
});

// error handler
app.use(function (err, req, res, next) {
  // set locals, only providing error in development
  res.locals.message = err.message;
  res.locals.error = req.app.get("env") === "development" ? err : {};

  // render the error page
  res.status(err.status || 500);
  res.render("error");
});

module.exports = app;
File Name: /routes/api.js
The core functionality of the local API server is contained in the /routes/api.js file. Inside this, the require() statement is used to import the express library and place it into a variable titled express. After this, the express.router() is called and placed into a variable titled router.
As we previously installed the two additional libraries during the setup of this API server, the require() function is then used to import the dotenv library and the OpenAI library.
The router.get() function is then used to define the localhost:3000/api/ URL of the API. When this URL is called, the res.send() function is used to send back the text The API was called!.
var express = require("express");
var router = express.Router();
require("dotenv").config();
const { OpenAI } = require("openai");

/* GET users listing. */
router.get("/", function (req, res, next) {
  res.send("The API was called!");
});
Below this, another new route is added to the file titled localhost:3000/api/call1, which is responsible for receiving the word from the extension's side panel that the user wishes to explain using the LLM. This URL is called automatically after the user presses the Explain button on the side panel.
When this URL is called, a call is made to the req.query.word function to extract the word send across, and place it into a local variable titled word. A variable is then created titled prompt which contains the raw prompt text we wish to pass to the LLM. In this example, we are telling it to explain the word we received from the extension by appending it to the prompt Explain in simple terms what the following word means.
// Call the API
router.get('/call1', async function(req, res, next) {
    let word = req.query.word
    const prompt = 'Explain in simple terms what the following word means: ' + word
To retrieve the API key from the .env file in the root of the project, a call is made to process.env.OPENAI_API_KEY, and the result is placed into a local variable titled OPENAI_API_KEY. Once we have the key, we then need to create an instance of the OpenAI library. To do this, a new variable titled client is created with the value set to new OpenAI(). A single parameter is passed in here titled apiKey with the value set to the variable OPENAI_API_KEY we just gathered from the .env file.
The process of calling the OpenAI API is then performed. To do this, the client.responses.create() function is added. Inside this, two core parameters are passed: model, which is the name of the model we want to use, and input, which points to the prompt variable we created earlier. The await syntax is added to the start of this call, telling the code to wait for the response from the API before moving on. When the API returns, an object called response becomes available. Using this, we can print the response.output_text parameter contained inside to the console to view the LLM's response.
Finally, to send the response back to the extension's side panel where this new URL was called, a call is made to the res.json() function and the complete response object is passed in.
let OPENAI_API_KEY = process.env.OPENAI_API_KEY;
const client = new OpenAI({ apiKey: OPENAI_API_KEY });

// call API
const response = await client.responses.create({
  model: "gpt-4o",
  input: prompt,
});
console.log(response.output_text);
res.json(response);
At the very end of this file, we export the router we have just updated to make the changes visible.
module.exports = router;
After all the changes are saved, we can now move on to testing the API server. Head back to the root of the API server and run the following command to turn the API server on:
DEBUG=myapp:* npm start
View Results
Once the API server has been turned on, we can load the extension as previously described in Chapter 2, Section 2.3 Loading your Extension. Once loaded, from the browser, click the extension icon to open the side panel as shown in Figure 11.10.

Figure 11.10: Clicking the extension icon in the Chrome menu bar.
Once clicked, the complete side panel is added to the browser as shown in Figure 11.11.
Figure 11.11: Side panel user interface.
Next, enter a word into the input field. In this example, the word home was entered. After this, click the Explain button. Once the button is pressed, the word is passed to the localhost:3000/api/call1 local API URL, which in turn sends a request to the LLM API to explain the word. During this process, the loading spinner is visible on the side panel, indicating the request is in progress as shown in Figure 11.12.
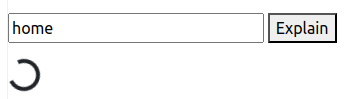
Figure 11.12: Loading spinner showing the request is in progress.
In the console of the local API server (shown below), we can see the request being made to the /call1/ URL, and the word home being passed in as a parameter.
GET /api/call1?word=home 200 3504.013 ms - 1583
When the response from the LLM API becomes available, the loading spinner is removed, and the result is placed into the <textarea> on the side panel as shown in Figure 11.13.
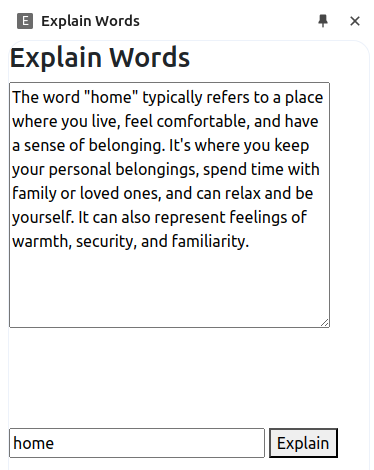
Figure 11.13: The side panel user interface.
Figure 11.14 shows the custom context menu available when the user right-clicks a word.
Figure 11.14: When the user right-clicks a word, the custom context menu becomes available.
The fundamental component of this interaction with the LLM API was the text-based prompt that was sent to the API. This contained the text: Explain in simple terms what the following word means, and the word entered by the user was appended to the prompt. In the future, this prompt can be replaced with any alternative prompt, changing the overall purpose of the developed extension.
11.5 Summary
This chapter described the implementation of an extension that interacted with OpenAI’s ChatGPT API. The extension user interface was contained in a side panel that was made visible when the user clicked on the extension’s icon in the browser menu bar. On this panel, a single input field was available where the user could enter a word that is then explained using AI.
To do this, a local API server was developed to handle the request and pass it off to the ChatGPT API. When returned, the text description was placed into a large text area on the side panel for easy viewing. To provide easy access to this functionality, an additional web page right-click context menu was added that allowed a user to highlight a word on a web page and send it to the extension’s input field to be expanded by the API.
Take-away Tips:
-
When working with APIs such as the OpenAI ChatGPT API, we first create our own custom API server to act as the middleman between the API and the extension.
-
Before using the OpenAI ChatGPT API, we first need to get an API key to identify our user account.
-
Never commit API keys to git repositories as they may be unintentionally shared.
-
API keys should never be stored in the source code itself. A library such as dotenv allows you to store the API key as a key-value pair in a .env file.
-
When making calls to external APIs, visual indicators such as loading spinners can be used to inform your user of the progress. The jQuery hide() and show() functions can be used to programmatically perform these actions.
-
Context menus with the keyword selection can be used to show a right-click menu on a webpage when a user selects a piece of text.
-
When interacting with the ChatGPT API, the model attribute can be used in the client.responses.create() function to change the model it uses.