Browser Extension Security
12.1 Introduction
When developing any application, security is a fundamental aspect that should be implemented early as part of the design process rather than later as an afterthought. In this chapter, various aspects of full-stack security are discussed, outlining examples of securing Chrome extensions and the API servers they interact with.
This chapter begins in Section 12.2, outlining some of the best practices to follow when using libraries in your extension and servers. Section 12.3 then describes the process of implementing client-side validation for user input. As we often need to inform the user of validation progress, Section 12.4 then describes client-side validation with additional error messages to inform the user of the validation status. To complement the client-side validation, Section 12.5 then outlines the process of implementing server-side validation approaches. To build on this server-side validation, Section 12.6 then describes additional validation variations available.
As usernames and passwords are used frequently in extensions, Section 12.7 describes the development of an extension and API server that allows a user to log in, view protected content, and log out. Section 12.8 then describes the process of implementing custom API keys to secure an API server. To conclude this chapter, Section 12.9 provides a list of core takeaway tips.
Source code for this chapter can be found here.
12.2 Libraries
When building both the Chrome extensions described in this book and the API servers to interact with the extensions, many different were used. A deciding factor in using these libraries is the active and ongoing development they have. By the time this book has been published, another version of the libraries may become available.
It is always an important step to monitor the library's official websites to identify when a new version becomes available, as both minor changes and large security vulnerabilities are often quickly addressed in updated releases. As part of the ongoing maintenance of your extension and API servers, each individual library should be updated as soon as a library update becomes available. This can help mitigate against security issues and any bugs that may have been discovered.
An example of this can be seen with the jQuery library used in many of the extensions in this book. A list of jQuery releases is available on their official website (https://releases.jquery.com/). The same can be said for the Bootstrap library, which also contains a main update page to list the stable versions and recent releases (https://getbootstrap.com/docs/versions/). Typically, when a specific version of a library is used, such as version 3.1, the subsequent releases, such as 3.2, 3.3, etc., can often be interchanged without any issues. When the first version number changes, such as 2.0 to 3.0, this indicates a major change in the code base that may unintentionally break any application that uses it due to substantial changes in the library's code. To use these updated versions, often additional work is required to refactor the extension’s code.
When updating a JavaScript library, often different versions of the same JavaScript file are available. These often include:
-
Uncompressed - This is the original JavaScript file with the original formatting and comments in the code.
-
Minified - A compressed version of the code that is achieved by removing comments and formatting.
-
Slim - Original library with additional non-essential functionality of the library removed.
-
Slim minified - The smallest compressed version of the core library functionality without non-essential functionality.
Although they all contain the core library itself, having the full original code in the uncompressed format can aid debugging during development. In addition to these client-side JavaScript dependencies, the server-side JavaScript libraries that were installed using the npm can also be updated easily. To begin this process, we can open a command prompt in the root of our project folder and run the following command:
npm update
The libraries installed in your project that have updates available will be updated. It will not attempt to jump a major version, such as v1.0 to v2.0, as this may break the server. Only small incremental patches are made, such as v1.1.1 to v1.1.2. Figure 12.1 shows the result of the npm update command.
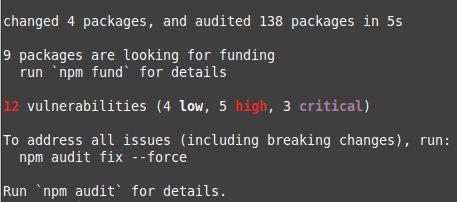
Figure 12.1: Running the npm update command.
Another option also exists, which allows us to perform a security audit on the libraries and dependencies we have installed. This checks if there are any critical updates that need to be made to the installed libraries. To do this, we can run the following command:
npm audit
Figure 12.2 shows us the output of the audit, showing a classification of the vulnerabilities in our packages. Here we can see that the body-parser library has a severity level of high, indicating that it needs to be updated.
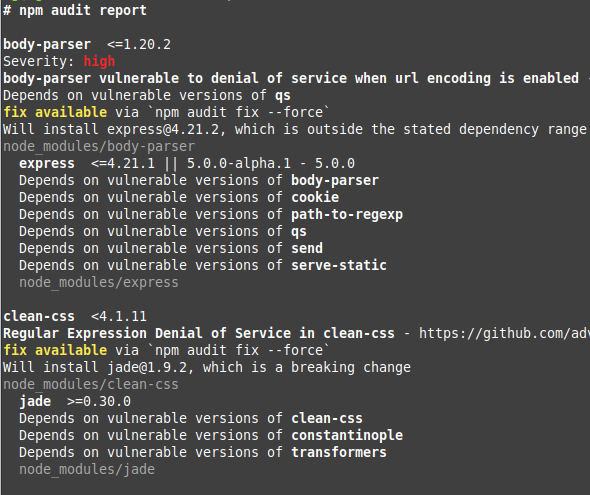
Figure 12.2: Result of running the npm audit command.
As the proposed changes to update packages may break the server, we manually need to apply the audit fix command to continue.
npm audit fix
Figure 12.3 shows the output after all the vulnerabilities identified are fixed.
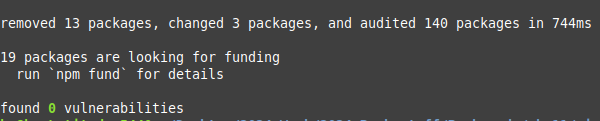
Figure 12.3: Npm showing us that no vulnerabilities are left.
Whenever libraries require an update, always perform the updates on a separate copy of the server code and never on the live version of the code. This is done as the changes that are made to the libraries, such as changing major versions, may unintentionally break the code. When we create a new Chrome extension, additional consideration is needed to identify what JavaScript files are included in the extension. Although it is often easier to dump an entire library's source code into an extension on the off chance we may use it, it is an important step in the process to identify what files are specifically being pulled in using the <script> tags.
Any references to externally hosted libraries, such as JavaScript content delivery networks (CDNs), should be removed. The rationale behind this is that if someone manages to add malicious code to an externally hosted library, everyone with the extension will become susceptible to the attack. This can easily be prevented by removing these external library references and storing the raw JavaScript files in a lib folder of your extension. Chrome extensions are designed to be wary of these externally hosted JavaScript files and make using them difficult to prevent their use.
12.3 Client-side Validation
When developing any extension, we always have the choice of creating our own custom validation techniques or using an existing library for validation. Many developers often build their own validation as they have a rough idea of what it should do. The main issue we find with this is that there are often many different combinations of input that we may have never expected as input into our extension.
Online resources such as the Big Naughty List of Strings (https://github.com/minimaxir/big-list-of-naughty-strings) contain examples of different characters that users may attempt to place into your input fields, such as Unicode characters, long and short sequences of characters, emojis, and even malicious JavaScript samples. To mitigate against this type of user input, this section describes the process of implementing basic client-side validation in an extension. This extension contains the following files:
File Structure
-
/basic_security/manifest.json
-
/basic_security/interface.html
-
/basic_security/popup.html
-
/basic_security/icon.png
Source code: /ch12/basic_security
The manifest.json file contains the basic name, description, and version number of the extension, along with the permissions required. The interface.html file is a simple HTML interface with two <input> fields to allow the user to enter text strings. The popup.js file contains the core button listeners for the extension user interface and the basic client-side validation. The icon.png file is the same simple smiley face icon that appears in the Chrome extension menu bar.
File Name: manifest.json
Inside the manifest.json file, the basic name, description, and version attributes are defined. The action parameter is then added to define what happens when the user clicks on the extension's icon in the browser's menu bar. Here, the default_popup is set to interface.html to open the HTML user interface. The default_icon attribute added is set to the icon.png smiley face used throughout this book.
{
    "manifest_version": 3,
    "name": "Validation test",
    "description": "Validation test",
    "version": "1.0",
    "action": {
        "default_popup": "interface.html",
        "default_icon": "icon.png"
    }
}
File Name: interface.html
The interface.html file is a basic HTML page that pops open when the user clicks on the extension's icon in the browser's menu bar. In this file, a <h1> is used to add a simple header with the text Basic Security. To allow the user to enter their email address, an <input> field is added with the type set to email and the ID set to userEmail. A second <input> field is then added with the type set to password to mask the characters entered in the text field, and the ID set to userPassword.
To trigger the validation process, a <button> is added with the ID set to save. To import the JavaScript file that contains the validation, a <script> tag is used with the src set to popup.js.
<html>
<body>
    <h1>Basic Security</h1>
    Email <input type="email" id="userEmail" />
    <p></p>
    Password <input type="password" id="userPassword" />
    <button id="save">Save</button>
    <script src="popup.js"></script>
</body>
</html>
File Name: popup.js
Inside the popup.js file associated with the extension, the getElementById() function is used to select the element with the ID set to save. This reference is placed into a variable titled saveButton. Using this, the addEventListener() function is used to append a click handler to the saveButton reference. When the button on the user interface is clicked, the body of this listener function is run. In this, a console.log() is used to print a message to the console to indicate that the correct function has been called.
The document.getElementById() function is then used to select the <input> field with the ID set to userEmail and extract the value from the field. This value is placed into a variable titled userEmail. This process is then repeated for the <input> field with the ID set to userPassword. To aid debugging, a console.log() is called on both of the extracted values to print them to the console.
To begin the validation process, a call is made to the basicEmailCheck() function, and the userEmail function is passed in. When this function is finished, the result is placed into a local variable titled result1. To perform a slightly more complex validation, a call is made to the validateEmailRegex() function, and the userEmail variable is also passed in. When this function is finished, the result is placed inside a variable titled result2.
let saveButton = document.getElementById("save");
saveButton.addEventListener("click", () => {
  console.log("Clicked save");

  let userEmail = document.getElementById("userEmail").value;
  let userPassword = document.getElementById("userPassword").value;

  console.log("Email is: " + userEmail);
  console.log("Password is: " + userPassword);

  let result1 = basicEmailCheck(userEmail);
  console.log("Basic email validation status " + result1);

  let result2 = validateEmailRegex(userEmail);
  console.log("RegEx email validation status " + result2);
});
After this, the body of the function basicEmailCheck() is then defined. In this function, an if statement is used to perform three checks on the userEmail variable. The first of these is a check to see if an @ symbol was found in the email address. A double ampersand is then used to append to the second check, which checks to see if the email ended with the string .com. The last check performed checks to see if the email address was less than 20 characters in length.
If each of these checks is true, the function will return true back to the click handler to say the validation passed. If one of the checks fails, the else statement triggers sending back the value false. When an email address such as [email protected] is passed in, the validation works as expected. If we, however, send in [email protected] with the Irish domain extension .ie, the validation will unintentionally fail even though the email is valid. This occurs as we have not added all possible domain extensions to our validation.
function basicEmailCheck(userEmail) {
  if (
    userEmail.includes("@") &&
    userEmail.includes(".com") &&
    userEmail.length < 20
  ) {
    return true;
  } else {
    return false;
  }
}
To mitigate against these flaws, instead of listing all possible combinations, it is better to use a dynamic validation approach. When working with email addresses, it is often better to look for patterns, such as expecting a few characters without spaces, followed by an at symbol, followed by a domain name with no spaces. To do this, RegEx can be used to identify the pattern we are interested in finding, rather than a white list of characters we expect.
The function below, titled validatEmailRegex(), contains a complex RegEx pattern defined in the RFC 2822 specification document. (https://www.rfc-editor.org/rfc/rfc2822.html) This is a standard for the validation of email addresses. This accounts for many different variations and regional differences that might be contained in a user's email address that we may unintentionally miss.
To implement this, a new function titled validateEmailRegex() is created. When this is called, a variable titled userEmail is passed in. Inside this, a new variable titled myRe is created. This variable has the value set to the pattern used in the RFC 2822 document. To use this pattern, we call myRe.test() and pass the userEmail variable passed to the function. The result of calling this test() function is placed into a new variable titled result, which contains true if the variable passed the validation, and false if it did not. To aid debugging, a console.log() is used to print this value to the developer console. At the end of this function, a return statement is used to send the value back to the function caller.
function validateEmailRegex(userEmail) {
  // RFC 2822

  const myRe =
    /^([^\x00-\x20\x22\x28\x29\x2c\x2e\x3a-\x3c\x3e\x40\x5b-\x5d\x7f-\xff]+|\x22([^\x0d\x22\x5c\x80-\xff]|\x5c[\x00-\x7f])*\x22)(\x2e([^\x00-\x20\x22\x28\x29\x2c\x2e\x3a-\x3c\x3e\x40\x5b-\x5d\x7f-\xff]+|\x22([^\x0d\x22\x5c\x80-\xff]|\x5c[\x00-\x7f])*\x22))*\x40([^\x00-\x20\x22\x28\x29\x2c\x2e\x3a-\x3c\x3e\x40\x5b-\x5d\x7f-\xff]+|\x5b([^\x0d\x5b-\x5d\x80-\xff]|\x5c[\x00-\x7f])*\x5d)(\x2e([^\x00-\x20\x22\x28\x29\x2c\x2e\x3a-\x3c\x3e\x40\x5b-\x5d\x7f-\xff]+|\x5b([^\x0d\x5b-\x5d\x80-\xff]|\x5c[\x00-\x7f])*\x5d))*$/;

  const result = myRe.test(userEmail);

  console.log(result);

  return result;
}
Although this complex RegEx pattern works quite often, no pattern is 100% successful. For this reason, it is always important to watch for new RegEx patterns that may have been updated. RegEx patterns can be used for a wide variety of different tasks, such as validating dates, timestamps, credit card numbers, and telephone number formats. Many developers decide that working directly with RegEx patterns is a little too much work and opt to use a JavaScript validation library that contains simple functions that can be called to test data with a variety of patterns.
View Results
Once all the JavaScript has been saved and the extension loaded into a browser as described in Chapter 2, Section 2.3 Loading your Extension, Figure 12.4 shows the completed extension user interface. Here, the email address [email protected] was used.
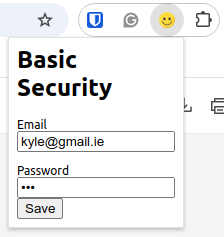
Figure 12.4: Extension showing the input fields that will be validated with JavaScript.
As the validation is designed to run in the background, when we right-click on the extension user interface and click Inspect Element, we can view the developer console. Here, the results of both validation approaches can be seen, as shown in Figure 12.5. The basic validation for the email address failed, returning false, as the country domain .ie was used and the basic validation was not set up to handle it. The second validation using RegEx, however, worked correctly and returned true.
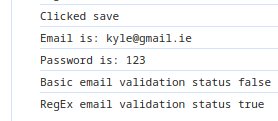
Figure 12.5: Console log showing the output of the basic validation for an email address.
12.4 Client-side Validation with Messages
In this example, we have a simple extension that contains a basic pop-up window that allows the user to enter their first name, last name, email address, and password. Basic validation is then added to each of the <input> fields using JavaScript. When the user enters their information, they can then click the Save button to trigger the validation process to begin. During this process, if any of the <input> fields are invalid, the custom error text is appended to an error variable, which is displayed to the user.
File Structure
-
/validation_with_messages/manifest.json
-
/validation_with_messages/interface.html
-
/validation_with_messages/popup.js
-
/validation_with_messages/icon.png
Source code: /ch12/validation_with_messages
To get started, create a new folder titled validation_with_messages. Inside this folder, the manifest.json is added to define the basic attributes of the extension. The interface.html is the core user interface that pops open when the user clicks the extension's icon in the Chrome menu bar. The popup.js file contains the core validation JavaScript. Finally, the icon.png is the default smiley face icon for the extension.
File Name: manifest.json
This extension begins with the manifest.json file. In this file, basic information, including the name, description, and version of the extension, is defined. When the user clicks on the extension icon in the browser menu bar, the interface.html file is shown. This is done by defining the action attribute. In this, the default_popup is set to interface.html, and the default_icon for the extension is set to the icon.png smiley face icon.
{
        "manifest_version": 3,
        "name": "Validation test",
        "description": "Validation test",
        "version": "1.0",
        "action": {
            "default_popup": "interface.html",
            "default_icon": "icon.png"
        }
}
File Name: interface.html
The main interface to collect data is the interface.html file. At the top of this file, a <h1> tag is used to define the title text Full Validation. A <div> tag is added with the ID errorMessage. Later, when the validation is run, if the validation process fails, the error message generated will be added to this <div> tag.
After this, four <input> fields are added to collect the data from the user. The first is an <input> field with the type set to text and the ID set to firstName. The second <input> has the type set to text and the ID set to lastName. The third <input> has the type set to email and the ID set to userEmail. The last <input> added has the type set to password to obscure the characters when the user is typing, and the ID set to userPassword.
At the end, a single <button> is added with the ID set to save. This button is referenced in the popup.js file to act as the trigger for the validation process. Finally, a <script> tag is added to include the popup.js file, which contains all the JavaScript for this extension.
<html>
<body>
<h1>Full Validation</h1>

<div id="errorMessage"></div>
Firstname <input type="text" id="firstName"/>
<p></p>
Lastname <input type="text" id="lastName"/>
<p></p>
Email <input type="email" id="userEmail"/>
<p></p>
Password <input type="password" id="userPassword"/>
<button id="save">Save</button>

<script src="popup.js"></script>
</body>
</html>
File Name: popup.js
The popup.js file is the main JavaScript file for the extension. In this file, the getElementById() syntax is first added to get a reference to the button on the user interface with the ID set to save. This reference is then placed into a variable titled saveButton. A click listener is then appended to this using the addEventListener() function to listen for the click. When a click occurs, the body of the listener function triggers printing Click saved to the console.
let saveButton = document.getElementById('save');
saveButton.addEventListener("click", () => {

    console.log("Clicked save");
The getElementById() selector is then used to select each of the <input> fields by referencing their IDs. The value of each is extracted using the .value syntax and placing it into local variables.
To aid debugging, each value is printed to the console to ensure it has been correctly extracted from the <input> fields before proceeding. After this, a new variable titled error is created. This variable stores the error messages generated when validating each <input> field if the validation for a particular field fails.
let firstName = document.getElementById('firstName').value;
let lastName = document.getElementById('lastName').value;
let userEmail = document.getElementById('userEmail').value;
let userPassword = document.getElementById('userPassword').value;

console.log("Firstname is: " + firstName);
console.log("Lastname is: " + firstName);
console.log("Email is: " + userEmail);
console.log("Password is: "+ userPassword);

let error = ''; // variable to hold the error message
Four variables are then created titled result1, result2, result3, and result4 to contain the text-based error returned after calling the custom validation functions if an error occurs. The first of these is the validateName() function that takes in the firstName variable. This is repeated again for the lastName variable. The email variable userEmail is passed into the validateEmailRegex() function to apply the RFC 2822 RegEx pattern to the email.
Finally, the validatePass() function is called, which takes in the userPassword variable. This is added separately, as for the password, we may define additional rules on the password length and complexity.
let result1 = validateName(firstName)
let result2 = validateName(lastName)
let result3 = validateEmailRegex(userEmail)
let result4  = validatePass(userPassword)
Once the validation has been performed, each of the result variables will contain true if the validation passed and false if it did not. Four if statements are then used to check if each result variable contained False. If False was found, it indicates that the validation for that particular <input> has failed. When this happens, the error message variable is appended to using the += syntax to add a unique text-based error message to the variable that will be sent back to the user.
Each individual if statement has unique error messages, and a simple <br> tag to break each error message onto a new line instead of showing all the error messages on a single line.
if (!result1) {
  error += "First name not valid <br>";
}
if (!result2) {
  error += "Second name not valid <br>";
}
if (!result3) {
  error += "Email not valid <br>";
}
if (!result4) {
  error += "Password not valid <br>";
}
After the validation is performed, an if statement is used to check the length of the error variable. When the length of the variable is greater than 0, it indicates that an error message is present and the validation has failed. When this occurs, a call is made to the getElementById() selector to select the <div> tag on the interface.html file with the ID errorMessage, and set the HTML to be the value of the error variable. In the case where there were no error messages, indicating that all the validations passed, the else statement triggers to pass the information across to the API server as described in previous chapters.
 if(error.length > 0){
    document.getElementById('errorMessage').innerHTML = error + '<p>';
} else {
    document.getElementById('errorMessage').innerHTML = '<p>';
}
});
As this validation approach depends on functions to perform the individual validations, each function is described below. The first of these is the validateName() function. This function takes in a name variable when called. Inside this, an if statement is used to check if the name variable length is greater than one character, and also the name variable has a length less than 20 characters. When both length checks pass, the function returns true back to the main validation section. In the case where the validation fails, the function returns false.
function validateName(name) {
  if (name.length > 1 && name.length < 20) {
    return true;
  } else {
    return false;
  }
}
The validatePass() function is used to check the password string entered by the user. When this function is called, a variable titled pass becomes available. Instead of using an arbitrary length like the previous example, this uses a RegEx pattern to check if the string has more than 10 characters and contains 3 special characters. The pattern is placed into a variable titled regex. An if statement is then used to check if the regex.test() function which takes in the password variable matches the criteria of the pattern. If it does, the function returns true to the caller. If it fails, the else triggers returning false.
function validatePass(pass) {
  const regex = /^(?=.{11,})(?:.*[!@#$%^&*(),.?":{}|<>]){3,}/;

  if (regex.test(password)) {
    return true;
  } else {
    return false;
  }
}
Similar to the previous function, the validateEmailRegex() function is used to check if the userEmail variable, when passed to the function, meets the criteria of the RegEx pattern. In this example, the RegEx pattern is the RFC 2822 standard RegEx pattern for validating emails used in the previous section. This is often used instead of self-made patterns as it checks a number of different aspects of the email string. To perform the test, the myRe.test() function is called, and the userEmail variable passed to the function is validated. After this, the function returns the result variable, which contains true if it passed, and false if it did not.
function validateEmailRegex(userEmail) {
  // RFC 2822

  const myRe =
    /^([^\x00-\x20\x22\x28\x29\x2c\x2e\x3a-\x3c\x3e\x40\x5b-\x5d\x7f-\xff]+|\x22([^\x0d\x22\x5c\x80-\xff]|\x5c[\x00-\x7f])*\x22)(\x2e([^\x00-\x20\x22\x28\x29\x2c\x2e\x3a-\x3c\x3e\x40\x5b-\x5d\x7f-\xff]+|\x22([^\x0d\x22\x5c\x80-\xff]|\x5c[\x00-\x7f])*\x22))*\x40([^\x00-\x20\x22\x28\x29\x2c\x2e\x3a-\x3c\x3e\x40\x5b-\x5d\x7f-\xff]+|\x5b([^\x0d\x5b-\x5d\x80-\xff]|\x5c[\x00-\x7f])*\x5d)(\x2e([^\x00-\x20\x22\x28\x29\x2c\x2e\x3a-\x3c\x3e\x40\x5b-\x5d\x7f-\xff]+|\x5b([^\x0d\x5b-\x5d\x80-\xff]|\x5c[\x00-\x7f])*\x5d))*$/;

  const result = myRe.test(userEmail);

  return result;
}
Once all the files have been saved, the extension can be loaded into a browser as previously described in Chapter 2, Section 2.3 Loading your Extension.
View Results
When the user clicks on the extension's icon in the browser menu bar, Figure 12.6 shows the complete user interface that opens.
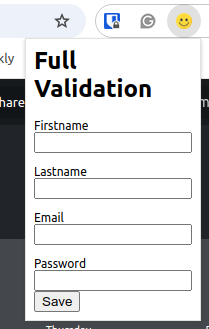
Figure 12.6: Completed user interface with input fields.
Once all the fields have been filled out, the user clicks on the Save button at the bottom. When this occurs, the click handler in the popup.js file triggers, starting the validation process. When all the fields are filled with the correct values and the validation passes, no error message is shown to the user. If one of the validations fails, the associated error message is returned to the user in the user interface as shown in Figure 12.7.
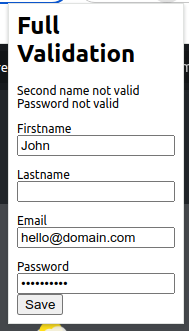
Figure 12.7: As the second name and password were not valid, an error message was shown above the input fields.
12.5 Server-side Validation
When working with user input, the validation process should always be treated as a two-part job. The first line of defence is basic form validation on the client-side in the extension, and the second line of validation is once the data has reached the API server. In this section, we will outline the process of creating an API server to validate the data sent across from an extension to an example API URL titled /register. This example register API URL accepts four parameters sent across: firstname, lastname, email, and password. To get started, create a new folder titled server-side-validation. To speed up development, inside this folder, place the Express.js server previously described in Chapter 4, Section 4.4 Custom API Server.
File Structure
-
/server-side-validation/bin/
-
/server-side-validation/node_modules/
-
/server-side-validation/public/
-
/server-side-validation/routes/api.js/
-
/server-side-validation/bin/views/
-
/server-side-validation/app.js/
-
/server-side-validation/package.json/
Source code: /ch12/server-side-validation
In this folder, the core file of interest is the /routes/api.js file. In this, we define the individual routes of the API. This example API server will have one route titled /register. When this is called, four parameters are passed as key-value pairs to the URL. These include: firstname, lastname, email, and password. Below shows an example of the URL with the key-value pairs with ampersands between pairs.
http://localhost:3000/api/register?firstname=John&latname=Smitt&[email protected]&password=10
To implement this /register URL, we first need to install an additional library that will be used for validating the data on the server-side. In this example, we will utilise the Joi.dev library (joi.dev) which allows for data validation. To get started, open a command prompt in the root folder of the API server and run the following command to install the joi library:
npm install joi
Once this library has been installed, we can move on to modifying the example API server code.
File Name: routes/api.js
The api.js file was the core location where we added our new routes throughout this book. In this file, we add an additional require() statement to pull the joi library in. After this,the router.get() function was used to create a new route http://localhost:3000/api/ which when called returns the text The API was called!
var express = require("express");
var router = express.Router();
const Joi = require("joi");

router.get("/", function (req, res, next) {
  res.send("The API was called!");
});
We can then begin the process of adding a new route. In this example, we will add a new server-side API URL titled /register for registering a user. For this route to function, the router.get() function is called to first define the route itself. When this route is called, the function triggers, first printing the message /register call success to the console. As four variables are passed to this URL, firstname, lastname, email, and password, we need to use the req.query syntax to catch each individually and place them into local variables.
router.get("/register", function (req, res, next) {
    console.log("/register call success");
    const firstname = req.query.firstname;
    const lastname = req.query.lastname;
    const email = req.query.email;
    const password = req.query.password;
After this, we can define a new Joi schema. This schema is a set of rules that the variables must follow for the validation to be considered valid. Here we add the individual variables to validate, such as the firstname, and identify it as being a string, with a minimum length of 1, and a maximum length of 20. This is then repeated for the lastname variable.
As the email address validation is a little more complex, we first define the email variable as a string, followed by including the email() function. This function allows us to identify the minimum number of segments the email should have after the @ sign, where 2 indicates a domain, followed by an extension such as .com. Here we set this to 2. The top-level domains we wish to allow the user to enter for their email, such as .com and .net, are then defined for the tlds attribute,
Finally, the schema for the password is defined. In this case, we define the password as a string, with a minimum length of 10 and a maximum length of 20.
const schema = Joi.object({
  firstname: Joi.string().min(1).max(20),
  lastname: Joi.string().min(1).max(20),
  email: Joi.string().email({
    minDomainSegments: 2,
    tlds: { allow: ["com", "net"] },
  }),
  password: Joi.string().min(10).max(20),
});
Once this is complete, we now have access to both the variables that were sent to the route and the scheme defined. We can then begin the process of validating the schema against the data. This is done by calling schema.validate() function. This function takes in the variable name we want to validate and the name of the validation rule we want to run against it. For simplicity, both the validation rules and the variables have the same names.
When the validation runs, if no errors occur, the error object will be left as undefined. In the case where an error is present, indicating that the validation failed, the error variable will contain JSON outlining the specific error that occurred.
const { error, value } = schema.validate({
  firstname: firstname,
  lastname: lastname,
  email: email,
  password: password,
});
At the end of this route, we then add in an if statement to check if the error was left as undefined, indicating that the variables were valid. If the data is valid, we use the res.json() function to send a piece of JSON back to the caller indicating that the variables were all valid. In the case where one of the variables was invalid, the else statement will trigger. Inside this else, the res.json() function is used to send back a piece of JSON with the result attribute set to validion_error and the message attribute containing the error details. At the very end, the module.exports is set to the router to make the new/register route available to the API server.
if(error == undefined){
    console.log("input valid")
    res.json({ result: "valid" });
} else {
    res.json({ result: "validation_error", "message": error });
}

});
module.exports = router;
View Results
Once the changes to the file have been saved, we can use a command prompt to return to the root of the server's folder and start the server using the following command:
DEBUG=myapp:* npm start
After we have saved the /routes/api.js file, we can restart the server and head to our browser to make a call to test the api/register route and pass in key-value pairs containing the data to validate. You will notice here that the variable names are the same names we used when we caught the variables with the req.query calls earlier.
http://localhost:3000/api/register?firstname=John&latname=Smitt&[email protected]&password=10
When this query is run, as the password variable is too short, the validation failed and returned the following JSON with the error:
{
"result": "validation_error",
"message": {
    "_original": {
        "firstname": "John",
        "email": "[email protected]",
        "password": "10"
    },
    "details": [
        {
            "message": "\"password\" length must be at least 10 characters long",
            "path": [
                "password"
            ],
            "type": "string.min",
            "context": {
                "limit": 10,
                "value": "10",
                "label": "password",
                "key": "password"
            }
        }
    ]
}
}
We can then make the password attribute in the request a bit longer, and rerun the call as follows:
http://localhost:3000/api/register?firstname=John&lastname=Smitt&[email protected]&password=123456789123
The server will now return a JSON message telling us all the data we sent was valid:
{"result":"valid"}
12.6 Server-side Additional Validations
In the previous example, we looked at the basic validation patterns available in the Joi library. In this example, we have another example route titled /api/register2. On this route, we apply additional validation types to the user input. This route accepts the following six parameters from the URL: firstname, lastname, email, password, repeat_password, and dob.
To catch each variable, a call is made to the req.query function and the name of the variable is appended to it. Once the variables have been collected, they are each placed into local variables.
router.get("/register2", function (req, res, next) {
    console.log("/register2 call success");
    const firstname = req.query.firstname;
    const lastname = req.query.lastname;
    const email = req.query.email;
    const password = req.query.password;
    const repeat_password = req.query.repeat_password;
    const dob = req.query.dob;
The schema for these variables is slightly different from the previous example. Instead of the password simply checking for a simple max and min length, here a RegEx pattern is used. In this pattern,[a-zA-Z0-9] indicates that we allow a mix of upper and lower case letters and the numbers between 0-9. The {3,30} syntax defines that the password length should be between 3 and 30 characters.
After this, the repeat_password is linked using the ref() function to ensure the password is the same as the previously defined password. Finally, the dob attribute is defined as being a number, that is between 1900 and 2013.
const schema = Joi.object({
  firstname: Joi.string().min(1).max(20),
  lastname: Joi.string().min(1).max(20),
  email: Joi.string().email({
    minDomainSegments: 2,
    tlds: { allow: ["com", "net"] },
  }),
  password: Joi.string().pattern(new RegExp("^[a-zA-Z0-9]{3,30}$")),
  repeat_password: Joi.ref("password"),
  dob: Joi.number().integer().min(1900).max(2013),
});
Once finished, we run the validate() function on the fields. When the validation runs, if no errors occur, the error object will be left as undefined. The value object contains the input fields with the validation applied.
const { error, value } = schema.validate({
  firstname: firstname,
  lastname: lastname,
  email: email,
  password: password,
  repeat_password: password,
  dob: dob,
});
At the end of the route, the same if statement can be run to check if the error is left as undefined, indicating that no error was found. When an error message is found indicating the validation failed, the error object is returned as JSON.
 if (error == undefined) {
    console.log("input valid");

    res.json({ result: "valid" });
 } else {
    res.json({ result: "validation_error", message: error });
 }
 });
module.exports = router;
Once the changes to the file have been saved, we can use a command prompt to return to the root of the server's folder and start the server using the following command:
DEBUG=myapp:* npm start
View Results
To test this URL, open a web browser and enter the following URL with parameters as key-value pairs. The core difference here is that two additional parameters are added: repeat_password and dob.
http://localhost:3000/api/register2?firstname=John&latname=Smitt&[email protected]&password=1000000000&repeat_password=1000000000&dob=1950
As all the values in the URL are valid, the schema validation will pass, returning a simple JSON message to the browser:
{"result":"valid"}
The Joi validation library used in this example is just one of many validation libraries that exist. Each library contains a number of different validation functions to aid the validation process, removing the need to manually create any form of validation. Additional validation patterns can be found on the official Joi documentation. (https://joi.dev/api/?v=17.13.3) When validating any data, it is always better to use an existing validation library, as they have been thoroughly tested and they often consider use cases we may unintentionally miss. An example of these common issues includes regional domain extension considerations and uncommon Unicode characters.
12.7 Password Management
When building any application, the use of passwords is a common practice during authentication. Storing passwords in plain text in a database is a basic vulnerability that can easily be avoided using off-the-shelf password hashing libraries. This section describes the process of implementing the bcrypt (https://www.npmjs.com/package/bcrypt) password hashing library to hash a password before it is stored in a local database from a custom API server. To create this, we need to first create a copy of the Express.js API server example used throughout this book. This was previously described in Chapter 4, Section 4.4 Custom API Server.
File Structure
-
/hashing-passwords/bin/
-
/hashing-passwords/node_modules/
-
/hashing-passwords/public/
-
/hashing-passwords/routes/api.js/
-
/hashing-passwords/bin/views/
-
/hashing-passwords/app.js/
-
/hashing-passwords/package.json/
Source code: /ch12/hashing-passwords
Unlike other password hashing libraries, bcrypt does not simply generate the same hash each time the algorithm is run on a password. Instead, it relies on running the algorithm a defined number of rounds before the hash is generated. This adds additional work to the process of encryption and decryption, causing an additional time delay.
When the saltRounds variable of the algorithm is set to a high number, such as 31, it can take between 2 and 3 days to decrypt the password as the total number of cycles performed is 2 - to the power of - saltRounds. In this example, we will set the saltRounds variable to 10, which tells the algorithm to perform 1024 cycles. This additional work added during the encryption and decryption process prevents attackers from generating a lookup dictionary of password and hash values (also called a rainbow table) to find the password associated with a given hash.
To get started, from the root of the project, open a command prompt and enter the following command to install the bcrypt library:
npm install bcrypt
Database setup
Once the bycrpt library has been installed in the project, we then need to begin the process of creating the MongoDB database and collection to hold the user data. Open MongoDB Compass and connect to the local database server. Once connected, on the left, hover over the localhost address and click the plus sign to create a new database as shown in Figure 12.8.
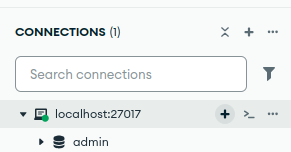
Figure 12.8: Creating a database and collection in MongoDB Compass.
A new dialog will then open as shown in Figure 12.9. Here we can enter the name of the database, extension_password_test, and the collection users. When the fields have been filled out, click Create database.
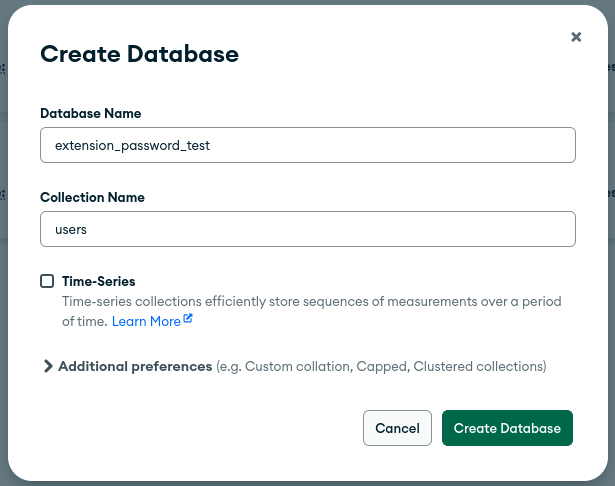
Figure 12.9: Creating the new database and collection.
Once the collection has been set up, we can move on to building the API server.
API server
For this example, we will create an API server with a URL titled /api/register. This URL accepts four parameters, firstname, lastname, email, and password. Below shows a complete example of the URL with the parameters added as key-value pairs. In this URL, the password can be seen in plain text before it has been processed.
http://localhost:3000/api/register?firstname=John&lastname=Smitt&[email protected]&password=12345678
Inside the /routes/api.js file, we first use the require() statement to import the express library itself. After this, the express.router() function is called to place a reference to the router into a new variable titled router. As we have just installed bcrypt, we can use another require() statement to import the library and place it into a variable titled bcrypt.
We add two routes to the API server. The first of these is the default route http://localhost:3000/api/. To do this, we call the router.get() function to define the URL / (slash). When this URL is called, the res.send() function is used to send back the text The API was called! to the browser.
var express = require("express");
var router = express.Router();
const bcrypt = require("bcrypt");

router.get("/", function (req, res, next) {
    res.send("The API was called!");
});
After this, we define the /register URL server. This is done by again calling the router.get() function to define the URL. When it is called, the text /register call success is printed to the server's console. Similar to the previous example, the four parameters passed to the URL firstname, lastname, email, and password are extracted using the req.query syntax and placed into local variables.
router.get("/register", function (req, res, next) {
    console.log("/register call success");
    const firstname = req.query.firstname;
    const lastname = req.query.lastname;
    const email = req.query.email;
    const password = req.query.password;

    // Perform validation here
Once the variables have been captured, the process of interacting with the bcrypt library can begin. This can be broken into two function calls, first generating the salt, and second, generating the hash. Here, a variable titled saltRounds is first defined and set to 10. This refers to the number of cycles the algorithm will go through. A call is then made to the bcrypt.genSalt() function to generate the salt for the hash. This takes in the variable saltRounds that was just defined. When this is called, the function attached will then trigger, making two variables available, err in the case of an error, and salt, if the function completes correctly. This salt variable will be used in the next step when we call the hashing algorithm itself.
After the salt is ready, a call is made to the bcrypt.hash() function to generate the password hash itself. This takes in two variables, password, which is a reference to the plain text password we wish to hash, and salt, which was generated in the previous step. When the hashing process is complete, similar to the previous step, two variables become available. The first of these is the err variable in the case of an error, and the hash variable that contains the newly generated hash of the user's password. To aid debugging, this hash variable is printed to the server's console.
Once generated, the process of storing the user's data along with the hash in the database can begin. The require() function is used to import the mongodb library and place it into a variable titled MongoClient. The address of the local database is then defined in a variable titled uri. Here, the username root and password example are added before the localhost address. The port number 27017 is then appended to this to select the correct port the database is running on. This uri string is then passed into a new instance of the MongoClient and placed into a variable titled client.
const saltRounds = 10;

bcrypt.genSalt(saltRounds, function (err, salt) {
    bcrypt.hash(password, salt, function (err, hash) {

        console.log(hash);
        // Store hash in your password DB.
        const { MongoClient } = require("mongodb");
        const uri = "mongodb://root:example@localhost:27017/";
        const client = new MongoClient(uri);
To perform the insert into the database, an asynchronous function titled run is created. Inside this, a try-catch statement is added to try perform the insert into the database and catch the error if something goes wrong. Inside the try, the client.db() function is used to select the MongoDB database titled extension_password_test and place it into a variable titled database. The database.collection() function is then used to select the users collection and place the reference into a variable titled collection.
To perform the insert, a call is made to the collection.insertOne() function. The await syntax is added in front of this to wait for the insert to be performed before moving on. Inside this, JSON is used to define the attribute names to store in the database. Here, the email address attribute is added, with the value set to the email variable gathered earlier. This is repeated again for the firstname and lastname variables. The last attribute added is the password attribute, which, instead of storing the password variable, which contains the plain text password, we store the hash variable generated by bcrypt.
Once inserted, a call is made to the res.json() function to send back a small piece of JSON indicating that the user is now registered. In the event that the insert process fails, the catch statement will trigger, returning a piece of JSON with the text error. As we are now finished with the database, the finally block will always trigger, making a call to the client.close() function to disconnect from the database.
async function run() {
  try {
    const database = client.db("extension_password_test");
    const collection = database.collection("users");

    const cursor = await collection.insertOne({
      email: email,
      firstname: firstname,
      lastname: lastname,
      password: hash, // saving the hash not the password
    });
    res.json({ status: "registered" });
  } catch {
    res.json({ status: "error" });
  } finally {
    await client.close();
  }
}
At the end of this file, the run() function just created is then called to trigger the hashing and database insert process. The three functions are then closed, followed by a call to export the router with the URLs we just defined.
      run();
});// genSalt
}); // insert
}); // route

module.exports = router;
Once the changes to the file have been saved, we can use a command prompt to return to the root of the server's folder and start the server using the following command:
DEBUG=myapp:* npm start
View Results
Once the changes to the file have been saved, we can use a command prompt to return to the root of the server's folder and start the server using the following command:
DEBUG=myapp:* npm start
Once the MongoDB database and the API server have been started, we can open a browser and make a call to the /register URL and pass in the firstname, lastname, email, and password key-value pairs.
http://localhost:3000/api/register?firstname=John&lastname=Smith&[email protected]&password=12345678
When called, the server will respond with a status message telling us the user has been registered, as shown below:
{"status":"registered"}
In the Express.js server console, we can see that the URL has been called using a GET request to the /register URL. Each of the individual variables, along with their values, can also be seen here. At the end of this, the hash variable that was generated using bcrypt on the user's original plain text password can be seen. As bcrypt is dynamic, each time the /register URL is called, and parameters are passed, a new hash will be generated for the user's original password. Although the hash is different each time, when we perform a login procedure in the future, bcrypt is still able to validate the hash.
GET /api/register?firstname=John&lastname=Smitt&[email protected]&password=12345678 304 138.909 ms - -
/register call success
$2b$10$s3i1WRt4Dy0TF/V5znk2Fub.iYgsKYDAGY6nJGTS2PToTcNP0SMn
When we open MongoDB Compass and view the users collection in the extension_password_test database, the complete JSON record can be seen, which contains the user's data and the bcrypt hash for the password.
{
    "email": "[email protected]",
    "firstname": "John",
    "lastname": "Smitt",
    "password": "$2b$10$hnW9leantN2Gyhcp4z5DUe2Jva/ilAgqP9bLPb18C.GRTX3boJ99O"
}
When the user registers for a new account, a hash is stored in the database. Now that we have this hash, we can simulate the process of creating a login API server page. In this example, we will create the URL localhost:3000/api/login. This URL will accept two parameters, email, and password as shown below:
http://localhost:3000/api/[email protected]&password=12345678
The API server's /login URL is responsible for catching the variables and comparing the plain text password to the bcrypt hash stored in the database. To get started, in the /routes/api.js file, below the previous /register route definition, we will add a new route definition. Here the router.get() function is called to define the /login route. When the route is called, a message is printed to the server's console to ensure the route has been called correctly.
As this URL accepts two parameters, email and password, two calls to req.query are used to extract these values and place them into local variables titled useremail and pass. To interact with the MongoDB database, a require() statement is used to import the mongodb library previously installed. A string variable titled uri is then added with the address for the local MongoDB instance at localhost port 27017. This string is then passed in a new instance of the MongoDBClient object and placed into a variable titled client for use in the next step.
router.get("/login", function (req, res, next) {
    console.log("/login call success");
    const useremail = req.query.email;
    const pass = req.query.password;

    const { MongoClient, ObjectId } = require("mongodb");
    const uri = "mongodb://root:example@localhost:27017/";
    const client = new MongoClient(uri);
A new function is then created titled run() that contains the code to interact with the database and perform a comparison between the password provided by the user and the hash stored in the database. This begins with a try-catch statement to try and make a connection to the database. The client.db() function is used to select the extension_password_test database and place the reference into a variable titled database. A call is then made to the database.collection() function to select the users collection in the database that contains the user's authentication record.
To perform the actual query, a call is made to the collection.findOne() function. This function takes in a small piece of JSON in the form of the attribute in the record we are searching for, titled email, and the value provided by the user in the variable useremail. When this query is performed, the result is placed into a variable titled results. To aid debugging, this variable is printed to the console to ensure the correct record has been found. We then create a new variable titled hash which contains the bcrypt hash stored in the results.password attribute fetched from the database.
 async function run() {
    try {
        const database = client.db("extension_password_test");
        const collection = database.collection("users");
        const results = await collection.findOne({ email: useremail });
        console.log(results);

        const hash = results.password;
As we now have the user's original plain text password in a variable titled pass and the bcrypt hash for the user's password fetched from the database in a variable titled hash, the validation process can begin. First, an if statement is used to check if the results object is equal to true. If it is, this would indicate that the record has been retrieved from the database. Inside this, a message is printed to the console to indicate the comparison is starting.
To perform the comparison, a call is made to the bcrypt.compare() function. This function takes in the variable pass that contains the user's plain text password and the variable hash that was retrieved from the database containing the hashed version of the password. When this function is called, two variables become available: err if an error occurs, and result, which contains true if the password matches the hash, and false if it does not. An if statement is then used to check if the result was true, the res.json() function is used to send back a piece of JSON to the browser indicating the password was valid. If it was not, then the else statement triggers, sending back the invalid status message.
if (results) {
    console.log("found record, comparing....");

    bcrypt.compare(pass, hash, function (err, result) {
        if (result == true) {
            res.json({ status: "valid" });
        } else {
            res.json({ status: "invalid" });
        }
    });
If no data was contained in the results object, indicating that the record was not found, the else statement triggers sending back an error status message to the browser. If any error occurs during the database interaction, the catch statement triggers, also sending back an error message. A finally statement is also added below the catch, which triggers if the database query process is successful or not. This is used to make a call to client.close() on the database connection to ensure it is closed.
Once all the database and password comparison code in the run() function is defined, a call is then finally made to the run() function itself to trigger the process to start.
} else {
     res.json({ status: "error" });
}
} catch {
    res.json({ status: "error" });
} finally {
    await client.close();
}
  } /// run
run();
To make all the changes visible to the API server, the router is then exported at the end of this file.
module.exports = router;
View Results
Once the changes to the file have been saved, we can use a command prompt to return to the root of the server's folder and start the server using the following command:
DEBUG=myapp:* npm start
To test this new /login URL, a call is made to the complete URL, and the user's email address and password are passed in as key-value pairs, as shown below:
http://localhost:3000/api/[email protected]&password=12345678
As the user's record exists in the database, and the password provided by the user when hashed matches the hash stored in the database, a valid status message is returned in the browser. This indicates that the bcrypt.compare() function returned true .
{"status":"valid"}
If the email address added to the URL does not match a record in the database, the following result is shown:
{"status":"error"}
If the email address is correct, but the password provided by the user is incorrect, the text invalid is returned in the browser as the bcrypt.compare() function returned false.
{"status":"invalid"}
12.8 Custom API Keys
When developing any application that interacts with the full-stack, we often need to give additional consideration to the flow of data through our application. One common issue is users or bots making requests to our API when they discover one of the API URLs. To prevent this from happening and to gain finer control on our API server, this section outlines the process of creating a custom API key for our API server back-end to ensure all requests to our server contain an API key that must be validated before any operations can be performed with the API server itself.
To get started, create a new folder titled server-api-key and place a copy of the Express.js API server files from Chapter 4, Section 4.4 Custom API Server into the folder.
File Structure
-
/ch12/server-api-key/bin/
-
/ch12/server-api-key/node_modules/
-
/ch12/server-api-key/public/
-
/ch12/server-api-key/routes/api.js/
-
/ch12/server-api-key/bin/views/
-
/ch12/server-api-key/app.js/
-
/ch12/server-api-key/package.json/
Source code: /ch12/server-api-key/
Below shows an example of an API URL that allows an extension to register a new user by calling the following URL and passing in parameters:
http://localhost:3000/api/register?firstname=John&latname=Smitt&[email protected]&password=123456789123
If a user with a network sniffing application got wind of this URL, they could very easily manually call the URL themselves and attempt to stuff additional values or even parameters into the URL to stress the server in an attempt to profile and attack the server. For this reason, we often need to consider the requests that are being made to our API server with caution, by adding an additional API key parameter that is passed from our extension across to the API for each request.
The API key for a URL is a single key-value pair that is appended to the end of the URL, as shown below:
http://localhost:3000/api/register?firstname=John&latname=Smitt&[email protected]&password=123456789123&apikey=12345678
Database setup
To get started, we need to set up a database structure to store the API keys that we will generate for our server. Using our MongoDB Compass database client, first connect to the local database. Once loaded, we can hover over the localhost address until the plus sign is visible to click, as shown in Figure 12.10.
Figure 12.10: Creating a database and collection in MongoDB Compass.
A dialog will then open, allowing us to define the name of the new database and collection we wish to create. In this example, the database is titled keytracker, and the collection is titled apikeys as shown in Figure 12.11. We can then click Create Collection to finish.
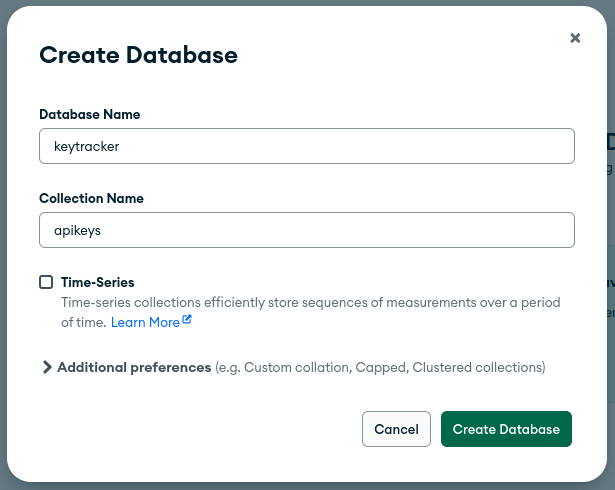
Figure 12.11: Creating the new database and collection.
Once this database has been created, we do not need to manually insert any records, as we will use our API server to perform these tasks via URL calls.
API server
As the database has been set up, we can begin the process of creating our API server, which is used for managing the life-cycle of the API keys. To do this, we will begin with the API server.
File Name: routes/api.js
Similar to previous examples, in the API server's route folder, we will modify the api.js file. This file will contain each of the different URLs we will use to manage the life-cycle of the API keys to create, validate, and remove individual keys. Each of the server’s URLs is listed below:
-
http://localhost:3000/api/- The route URL of the API server.
-
http://localhost:3000/api/createNewKey/ - This is used to take a user ID and their IP address to generate a new API key.
-
http://localhost:3000/api/validateKey / - This allows us to pass a single API key to the server to validate it.
-
http://localhost:3000/api/removeKey/ - When called with a valid API key, the server will remove the key from circulation.
At the top of this file,we first use a require() statement to import the express library itself. The express.Router() is then defined and placed into a variable titled router. After this, to create the root URL for the API server, the router.get() function is called to define the / (slash) URL. When this URL is called, the res.send() function is used to send back the text The API was called! to inform the user that the API server is working as expected.
var express = require("express");
var router = express.Router();

router.get("/", function (req, res, next) {
    res.send("The API was called!");
});
When a user wishes to generate a new API key, a call is made to the route titled /createNewKey. When the URL is called, an additional parameter is passed with the query to identify what user made the request to generate the key. To create this new /createNewKey URL, the router.get() function is first used to define the URL itself. When called, a console.log() is used to print a message to the server's console to aid debugging. Inside this URL, the req.query is used to access the userid variable that is passed to the URL to define who is creating the key. This is followed by the req.ip, which allows us to extract the IP address of the person who made the request. This ip variable does not need to be manually passed to the URL as it is included by default in the request.
router.get("/createNewKey", function (req, res, next) {
    console.log("/createNewKey call success");

    // get the params from the request
    const userid = req.query.userid;
    const userip = req.ip;
Before we proceed to the process of generating a new key, we first check to ensure that the userid variable was not left blank, indicating no ID was passed. To do this, an if statement is used to first check if the userid variable length is equal to 0. If it is, we send back a piece of JSON to the caller informing them that the userid variable was not added to the URL call. In the case where a userid was added, the else statement triggers. Inside this statement, we begin the process of generating a new API key by calling the custom generateRandomKey() function (described later) and placing the returned key into a local variable titled key.
As we wish to expire the key after 24 hours, we need to store the time when the key was created. This is done by calling the Date.now() function and dividing the answer by 1000. This represents the current time in seconds since the 1st of January 1970. This time is placed into a variable titled createTime.
  if (userid.length == 0) {
    res.json({ status: "no user id" });
} else {
    // call the database to check if the key is valid
    const key = generateRandomKey();
    const createTime = Math.floor(Date.now() / 1000);
Once we have the key data, we then need to store it in our local MongoDB database. To do this, a new function is added titled runSaveToDb(). In this function, a connection is first made to the MongoDB database. To do this, the require() function is used to import the mongodb library and place it into an object titled MongoClient. A new variable is then added titled uri, which is used to store the URL for the local database. Here root is passed as the username, and example is added as the password. The database address itself is then added as localhost, which is running on port 27017.
A new MongoClient object is then created, and the uri string is passed in. This new object is placed into a variable titled client. To select the database, a call to the client.db() function is then performed and the database name keytracker is passed in. The database.collection() function is then used to select the apikeys collection.
As we are inserting a new JSON record into the collection, a variable titled json is added. In this, each of the individual attributes we wish to add is defined as key-value pairs. The apikey stores the unique key string, the create attribute stores the Epoch time the record was created, and userid stores the unique ID of the user who made a call to the server's URL. The ip attribute is finally added to store the IP address of the user who made the call.
async function runSaveToDb() {
    try {
        const { MongoClient } = require("mongodb");
        const uri = "mongodb://root:example@localhost:27017";
        const client = new MongoClient(uri);
        const database = client.db("keytracker");
        const col = database.collection("apikeys");

        let json = {
            apikey: key,
            create: createTime,
            userid: userid,
            ip: userip,
        };
Once the JSON record has been created, we then begin the process of calling the insertOne() function and passing the json object to insert the record into our collection. A console.log() is then added to print the result returned to aid debugging. A call is made to the client.close() function to disconnect from the database itself. After the record has been inserted into the database, we then call res.json() and send back a small piece of JSON to the URL caller to inform them that a new, valid, and active API key was created.
In the event an error occurs, the catch statement triggers, making a call to the res.json() function to send back an error message to the caller. Finally, to trigger the function we just created, a call is made to the new runSaveToDb() function.
    const result = await col.insertOne(json);
    console.log(result);
    client.close();
    res.json({ apikey: key });
} catch (error) {
    res.json({ status: "error saving to db" });
    console.log("error inserting new record to db" + error);
}
}

runSaveToDb();
}
});
When the URL was called, it relied on a function titled generateRandomKey(). This function contains a string variable titled chars which contains a long list of characters we can include in the key we are generating. A variable titled result is then added, which is used to hold our final key when the characters are generated.
To perform the actual key generation process, a for loop is used to loop from 0 to 40. For each iteration of the loop, we generate a random index number using the Math.random() function. The random index is placed into a variable titled randomIndex. To place the new character in, we then reference the result variable, and append a new character using the += syntax.
To select the random character, we call chars[randomIndex], which is the character at the random index number of the chars string. At the end of this function, the final result string is sent back to the function caller using a return statement.
function generateRandomKey() {
  const chars =
    "ABCDEFGHIJKLMNOPQRSTUVWXYZabcdefghijklmnopqrstuvwxyz0123456789";
  let result = "";
  for (let i = 0; i < 40; i++) {
    const randomIndex = Math.floor(Math.random() * chars.length);
    result += chars[randomIndex];
  }
  return result;
}
When a key is generated, at any time in the future, a call can be made to the API server to check if the key is still valid. In the previous section, we defined that an API key can remain valid for 24 hours. To allow this validation, a new URL is added to the server titled /validateKey. This URL allows us to pass in a single API key as an attribute titled apikey. When this URL is called, a console.log() is used to identify that the URL was called successfully. A call is then made to the req.query function is performed to extract the apikey variable from the request and place it in a local variable titled apikey.
router.get("/validateKey", function (req, res, next) {
    console.log("/validateKey call success");

    // get the key from the request
    const apikey = req.query.apikey;
Once we have the API key that was passed to the URL, we define a function titled runDbQuery() which is used to make the connection to the database to see if a record for the API key exists. Inside this, a connection to the MongoDB database is first defined, similar to the previous example. The keytracker database we created is then selected, followed by the apikeys collection.
To perform the query to the database, a call is made to the col.findOne() function and the apikey variable is passed in as a key-value pair where apikey is the name of the attribute we are searching for and the apikey variable is the value we are passing in to find. To aid debugging, a console.log() is added to output the result object returned to the server's console. As we now have the record, a call is made to the close() function to disconnect from the database.
Using the result object that was returned, we can extract the result.apikey and the result.create attributes and place them into two variables titled key and createTime. To get the current time in Epoch, a call is made again to the Date.now() function and the result is divided by 1000 and placed into a variable titled currentTime.
 async function runDbQuery() {
    try {
        const { MongoClient } = require("mongodb");
        const uri = "mongodb://root:example@localhost:27017";
        const client = new MongoClient(uri);
        const database = client.db("keytracker");
        const col = database.collection("apikeys");
        const result = await col.findOne({ apikey: apikey });
        console.log(result);
        client.close();

        let key = result.apikey;
        let createTime = result.create;
        const currentTime = Math.floor(Date.now() / 1000);
Once the two variables are available, we then begin the verification process. A new variable titled keyValid is created, which is used to store the flag that is returned to say if the key is valid or not. By default, this is set to false. To aid debugging, both the currentTime and the createTime are printed to the server's console.
Another console.log() is then used to print the currentTime minus the createTime. If this number is less than 86400, it indicates that the API key was created less than 24 hours ago and is still valid. An if statement is then added to perform this check. If the key is valid, a message is printed to the server's console, and the keyValid flag is set to true. In the event that 24 hours have passed, the keyValid is set to false.
let keyValid = false; // by default the key is not valid
console.log("Current time" + currentTime);
console.log("Create time " + createTime);

console.log(currentTime - createTime);

if (currentTime - createTime < 86400) {
  console.log("key valid");
  keyValid = true;
} else {
  console.log("key not valid");
  keyValid = false;
}
At the end of this process, a call is made to the res.json() function to send back a piece of JSON with the attribute key_valid and the resulting true or false contained in the keyValid flag. Once complete, a catch statement is added, which may trigger if the connection to the database fails, which uses the same res.json() to send back an error message to the caller. A call is then made to the runDbQuery() function to trigger this new function process to begin.
res.json({ key_valid: keyValid });
} catch (error) {
    console.log("Error getting record" + error);
    res.json({ key_valid: "error" });
}
}

runDbQuery();
});
As the user has the ability to create and validate API keys, there are times when the user may wish to remove the API key itself from the database. To do this, a new URL is added to the server titled /removeKey which accepts one parameter titled apikey which is the API key string they wish to remove.
This URL is set up similarly to the previous URLs, by first using the router.get() function to define the /removeKey URL. The req.query is then used to extract the apikey variable from the URL and place it into a variable titled apikey. A new function to perform the connection to the database is then created, titled runRemove(). Inside this, the same database connection code is added as in the previous functions.
router.get("/removeKey", function (req, res, next) {
    console.log("/removeKey call success");
    // get the params from the request
    const apikey = req.query.apikey;

    async function runRemove() {
        try {
            const { MongoClient } = require("mongodb");
            const uri = "mongodb://root:example@localhost:27017";
            const client = new MongoClient(uri);
            const database = client.db("keytracker");
            const col = database.collection("apikeys");
The core difference in this code is the action it performs. Here, a call to the col.deleteOne() function is performed to delete a single record from the database collection. A piece of JSON is added to identify which record we wish to remove. Here we are searching for the record with the attribute apikey which has the value set to the apiKey variable we extracted from the URL. When this is found, the record is then deleted from the collection. A call is then made to the client.close() function to disconnect from the database.
A call is then made to the res.json() function to send back JSON containing the word remove to inform the user that the record has been removed. In the case where the database connection or query fails, the catch statement of the try-catch triggers, again, calling res.json() to send back a simple error message to the user.
const result = await col.deleteOne({"apikey":apikey});

client.close();
res.json({ apikey: "removed" });
} catch (error) {
    res.json({ status: "error connecting to db" });
    console.log("error deleting record" + error);
    }
}

runRemove();

});
The very last line of this file is exporting the router, which we have just updated to make all the new URLs available to the API server itself.
module.exports = router;
View Results
Once all the changes have been made to the API server and saved, the server can be restarted using a command prompt by issuing the following command from the root of the project folder:
DEBUG=myapp:* npm start
To test the new routes, we can open a browser and make a request to the /createNewKey URL and pass in a sample ID number as the userid attribute. When this is called, our API server will create a new record in the apikeys collection for the user ID 800 and the new key is returned in the browser.
http://localhost:3000/api/createNewKey?userid=800
Below, we can see the JSON returned with the newly generated API key:
{"apikey":"9mSLt51wJ7r6TyKWts2bHPlNRPufqlrXxoJNlIOC"}
When we open the keytracker database in MongoDB and view the apikeys collection, we can see the complete JSON record that was created. Here we have the apikey itself, followed by the create attribute, which contains the epoch time stamp from when the record was created. The userid attribute contains the sample user ID that we passed to the URL, and the ip attribute shows the IP address of the user who made the call. As the call to the API was performed locally, the localhost address is shown as IP logged.
{
    "apikey": "9mSLt51wJ7r6TyKWts2bHPlNRPufqlrXxoJNlIOC",
    "create": 1744902538,
    "userid": "800",
    "ip": "::1"
}
Now that we have created a new API key, we can call the /validateKey URL and pass the unique API key from the previous step in as a parameter to see if the key is still valid.
http://localhost:3000/api/validateKey?apikey=9mSLt51wJ7r6TyKWts2bHPlNRPufqlrXxoJNlIOC
As the key was still in the 24-hour time validation limit for an API key, a piece of JSON is returned telling the user true. If 24 hours have passed since the creation time of the key, the JSON returned will contain the keyword false.
{"key_valid":true}
Once a new API key has been created, at any stage, the user can call the /removeKey URL and pass in the API key to remove it from the database as shown below:
http://localhost:3000/api/removeKey?apikey=IEPs35kEqCKiC1fV0DljXtcLyjWxJToLzB3ItXwS
When a valid key is passed, the API server returns with the following JSON message:
{"apikey":"removed"}
12.9 Summary
This chapter described the process of adding additional client and server-side validation techniques to prevent malicious input from users. Additional approaches were described to aid security, such as password encryption and custom API keys to authenticate API server requests.
Take-away Tips:
-
As most software is built using libraries, a regular procedure should be established to check for the latest releases of libraries your code uses. These updated releases contain bug fixes and address known vulnerabilities.
-
Security implementation and auditing should be part of the development process and not left as an addition after the project is finished.
-
Users typically add every input combination into text areas that we would never consider. For this reason, use a pre-defined list of sample inputs to thoroughly test your input fields and URLs, such as the Big Naughty List of Strings. (https://github.com/minimaxir/big-list-of-naughty-strings)
-
When adding validation, it is easy to forget to add every possible combination. For this reason, using existing validation libraries such as Joi that have been thoroughly tested is always a better choice.
-
Plain text passwords should never be stored in a database. Instead, a hashing algorithm should be used, such as bcrypt, which runs additional hashing cycles to make the hash more secure when compared to older hashing algorithms such as MD5.
-
Having API server URLs without any additional verification, such as API keys, leaves API servers open to abuse. By implementing a simple authentication process using API keys, we can ensure all calls are made with a valid API key.