Extension: Text Snippet Manager
Introduction
While browsing the web, many users come across pieces of text or links they wish to save. This chapter describes the implementation of a full-stack extension that enables users to select text of interest on a web page and save it to a database through the extension for later viewing. To ensure ease of access, the user have the choice of either highlighting the text on a web page and right-clicking to reveal a context menu to send the selected text to the extension to be saved, or by directly adding the text to be saved to the extension user interface itself.
To get started, Section 6.2 Database Setup describes the setup of a MongoDB database using the MongoDB Compass client and the two collections required for the extension. To store and retrieve snippets from the database, Section 6.3 API Server describes an Express.js API server back-end. Section 6.4 Extension File Structure describes the extension itself, which contains a user interface that allows the user to save and view the snippets. This extension interacts with the API server, which in turn interacts with the MongoDB database. Finally, Section 6.5 Summary outlines the Takeaway Tips for this chapter.
Source code for this chapter can be found here.
Database Setup
Before getting started with the database, we need to ensure that the local MongoDB database is up and running on your machine, and the MongoDB Compass client to interact with the database is also installed. If not, head to Chapter 4, Section 4.5 The Database to review the database installation process.
When your database is set up, launch MongoDB Compass and connect to the database server address localhost:27017. When connected, on the left of MongoDB Compass, click the plus sign that is shown when the mouse hovers over the connection address, as shown in Figure 1 to create a new database.
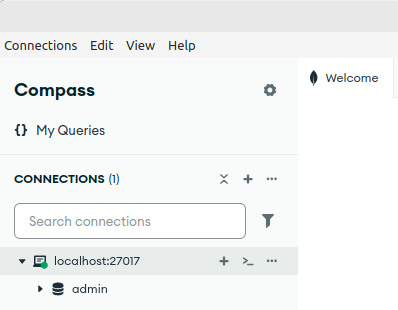
Figure 1: Clicking the plus sign on the left of MongoDB Compass to create a new database.
Next, in this dialog that opens, enter extension_snip as the database name, and myLists as the collection name, as shown in Figure 2. Once complete, click Create Database to continue.
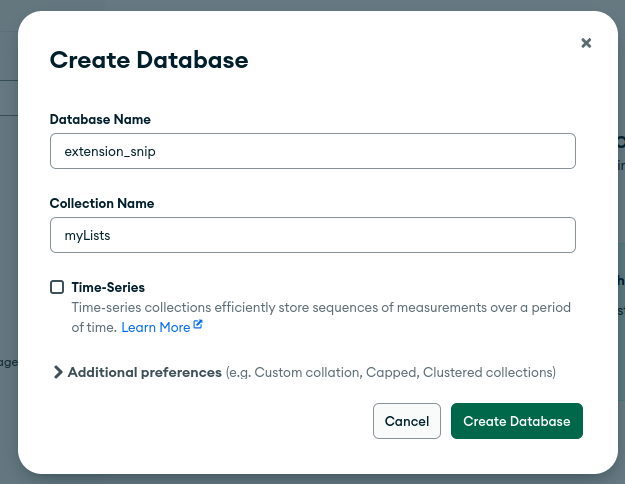
Figure 2: Creating the new database and collection.
Once created, on the left of MongoDB Compass, we can now see the database and the collection we just created. Hover your mouse over the database name and click the plus sign as shown in Figure 3 to create another collection.
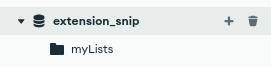
Figure 3: View the list of collections to create another collection.
In the dialog that opens as shown in Figure 4, enter snippets as the collection name and click Create Collection.
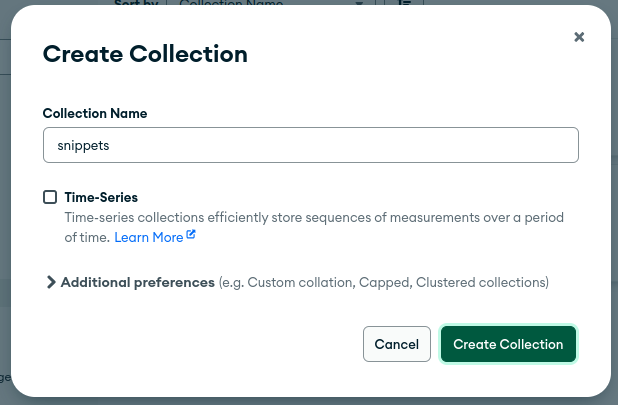
Figure 4: Creating the new snippets collection.
In our MongoDB Compass, we now have a database called extension_snip which contains two collections, myLists and snippets, as shown in Figure 5.
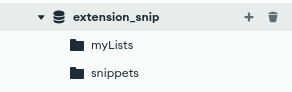
Figure 5: Viewing the new database and collections.
After the collections have been set up, we can move on to creating the Express.js API server that will interact with the database. This is described in Section 6.3 API Server, next.
API Server
This section outlines the process of developing an Express.js-based API server that acts as the middleman between the database and the extension. To get started, we will use the API server previously described in Chapter 4, Section 4.4 Custom API Server. This API server also had the MongoDB JavaScript driver installed, which is used when we need to interact with the local MongoDB database.
Inside the basic Express.js server template, we previously created a file titled api.js inside the /routes/ folder. In this file, different URLs are added that can be called by the extension itself to perform specific back-end tasks. These URLs include:
-
http://localhost:3000/api/ - This is the root of the API and returns the text The API has been called as a check to know if the API is running.
-
http://localhost:3000/api/getOneSnippet/ - Returns a snippet from the database based on the ID that is passed to the URL.
-
http://localhost:3000/api/getListNames/ - Returns the names of different lists that contain snippets.
-
http://localhost:3000/api/getAllByListName/ - Returns a list of snippets identified by list name.
-
http://localhost:3000/api/saveSnippet/ - Save a given single snippet to a specific list.
-
http://localhost:3000/api/addNewList/ - Create a new list that can store snippets.
Source code: /ch6/snippet/snippet-apiserver
File Name: api.js
In the /routes/api.js file, remove any code previously added. We will then add the first route, which is the localhost:3000/api/ URL. This URL is added as the root page of the server that can be called to test if the server is running. At the top of this file, we begin by importing the express library itself and place it into a variable titled express. After this, we import the router, which is used for defining the URLs for the API in the following steps.
We then define our first URL by calling router.get('/') and passing in the URL we wish to define, which in this case is the / (slash) URL. When this URL is called by the extension, the req object becomes available, which is the request coming into the server, and the res object, which is the object reference for the response we will send back to the extension. Inside this function, the res.send() function is used to send a small piece of text back to the extension, telling the user that the API was called.
var express = require("express");
var router = express.Router();

router.get("/", function (req, res, next) {
  res.send("The API was called!");
});
The next route added is the http://localhost:3000/getOneSnippet. This URL is designed to allow the extension to pass a single record ID in, and the API will return that single record from the database. Inside this function, a message is first printed to the console when called. To gather the ID that was passed to the URL, a call is made to the req.query.id function and the result is placed into a local variable titled id for easy access. In the future, if any additional parameters are required, the name of the parameter can be added to the req.query function to extract the value.
Once we have the record ID of interest, we then move on to the process of connecting to our local MongoDB database. To do this, the library is pulled in using a require("mongodb") call. This provides access to the client driver and the ObjectId object type, which is used when we are fetching a record by ID. The address for the database server is then added to a variable titled uri. For this database root is added for the username, and example for the password. The address of the local machine, e.g., localhost, is then added, followed by the port number 27017, the default port for MongoDB. This URL is then passed into a new instance of the MongoClient, and placed into a local object titled client for access.
A simple asynchronous function is then added, titled run(), to contain the database call itself. Inside this function, a try-finally statement is first added to try connect to the database and finally close the database connection when finished. Inside the try, the client.db() function is used to select the extension_snip database that we created earlier and place the reference into a local variable titled database. We then use the database.collection() function to select the collection we created earlier in the database titled snippets.
The process of querying the database is then performed on the collection by calling the findOne() function. This function takes the name of the attribute we are searching for, which in this case is the _id attribute of the record. We then pass in a ObjectId data type, which contains the id variable we gathered at the start.
If the record is successfully found, a console.log() function is called to print the full results record to the console. The res.json() function is then called to return the record we found back to the extension. A finally block is then added, which always runs even if the query was successful or not, to ensure we close the connection to the database. At the end of this block of code, a call is made to the run() function to trigger the asynchronous function we just created calls to query the database.
router.get("/getOneSnippet", function (req, res, next) {
  console.log("/getOneSnippet call success");
  const id = req.query.id;
  const { MongoClient, ObjectId } = require("mongodb");
  const uri = "mongodb://root:[email protected]:27017/";
  const client = new MongoClient(uri);

  async function run() {
    try {
      const database = client.db("extension_snip");
      const collection = database.collection("snippets");
      const results = await collection.findOne({ _id: new ObjectId(id) });
      console.log(results);
      res.json(results);
    } finally {
      await client.close();
    }
  }
  run().catch(console.dir);
});
As the user has the ability to select which list they wish to add their snippet to from the extension user interface, an API URL is set up to return a list of the unique list names when the /getListNames URL is called. This block of code is very similar to the previous code, with the small difference being the name of the collection that is selected. Halfway down this code, the database.collection() function is called, and the collection myLists is passed to select this collection from the database.
router.get("/getListNames", function (req, res, next) {
  console.log("/getListNames call success");
  const { MongoClient } = require("mongodb");
  const uri = "mongodb://root:[email protected]:27017/";
  const client = new MongoClient(uri);
  async function run() {
    try {
      const database = client.db("extension_snip");
      const collection = database.collection("myLists");
      const cursor = collection.find();
      const results = await cursor.toArray();
      console.log(results);
      res.json(results);
    } finally {
      await client.close();
    }
  }
  run().catch(console.dir);
});
From the extension, the user can get any number of different snippets for a given list name. To do this, the API server URL titled localhost:3000/api/getAllByListName is created. The same code is added as the previous example, but just inside the function, the req.query is used to select the listname variable that was passed to the URL. This list name is placed into a local variable titled listname.
As we want to select a list of snippets, the database.collection() function is used to select the snippets collection. The collection.find() is then called to select all the records in the database where the listname attribute is set to the value of the listname variable, which we gathered from the request. When this find() function is complete, the reference is placed into a variable titled cursor. A call is then made to the await cursor.toArray() to convert the data into an array, which is placed into an object titled results. This result object is then printed to the console to aid debugging, and a call is made to the res.json() function to send back the results to the extension.
router.get("/getAllByListName", function (req, res, next) {
  console.log("/getAllByListName call success");

  const listname = req.query.listname;
  const { MongoClient } = require("mongodb");
  const uri = "mongodb://root:[email protected]:27017/";
  const client = new MongoClient(uri);
  async function run() {
    try {
      const database = client.db("extension_snip");
      const collection = database.collection("snippets");
      const cursor = collection.find({ listname: listname });
      const results = await cursor.toArray();
      console.log(results);
      res.json(results);
    } finally {
      await client.close();
    }
  }
  run().catch(console.dir);
});
A core functionality of the extension is the ability to save individual snippets to the database. The localhost:3000/api/saveSnippet URL is designed to take in the individual snippet content and the name of the list the user wishes to add the snippet to. To get started, the router.get() function is used to define the /saveSnippet URL. Just inside this function, a simple console.log() is used to print a message to the console to ensure we have called the correct URL. After this, a call is made to the req.query function to select the content variable that has been sent to the API via the URL. This value is then placed into a local variable titled content. The same procedure as previously described is performed to extract the name of the list the user wishes to add the snippet to. This is done by calling the req.query.selectedList function, and dropping it into the local variable titled selectedList. Once the two variables have been saved, the same procedure of connecting to the database as previously described is performed.
Inside the run() function, the client.db() function is used to select the extension_snip database the database.collection function is used to select the snippets collection. Once this has been completed, to insert the record into the collection, a call is made to the collections.insertOne() function. This function takes a piece of JSON as the record to be inserted into the collection.
This JSON contains the listname attribute with the selectedList variable as the value and the snippet attribute with the content variable as the value. After this insert process is complete, a piece of JSON is added to the res.json() function to return a status message back to the extension indicating that the process was successful.
router.get("/saveSnippet", function (req, res, next) {
  console.log("/saveSnippet call success");
  const content = req.query.content;
  const selectedList = req.query.selectedList;
  const { MongoClient } = require("mongodb");
  const uri = "mongodb://root:[email protected]:27017/";
  const client = new MongoClient(uri);

  async function run() {
    try {
      const database = client.db("extension_snip");
      const collection = database.collection("snippets");
      const cursor = await collection.insertOne({
        listname: selectedList,
        snippet: content,
      });
      res.json({ status: "ok" });
    } finally {
      await client.close();
    }
  }
  run().catch(console.dir);
});
The very last function added to the API is the localhost:3000/api/addNewList URL. This URL is designed to take in a new list name that the user has entered on the extension user interface and add it to the collection of list names available. The main change to this code is the req.query function is used to extract the newlistname attribute that has been passed to the URL that the user wishes to create. Similar to previous examples, a connection is then made to the database to insert the record.
Inside the asynchronous function, the client.db() function is used to select the extension_snip database. The database.collection() function is then called to select the collection titled myLists. Once the collection is selected, a call is then made to the collection.insertOne() function to insert a new JSON record into the database. This JSON contains the attribute listname followed by the value of the variable newlistname. The res.json() function is then used to send back a small status message to the extension indicating that the insert process is complete.
router.get("/addNewList", function (req, res, next) {
  console.log("/addNewList call success");
  const newlistname = req.query.newlistname;
  const { MongoClient } = require("mongodb");
  const uri = "mongodb://root:[email protected]:27017/";
  const client = new MongoClient(uri);
  async function run() {
    try {
      const database = client.db("extension_snip");
      const collection = database.collection("myLists");
      const cursor = await collection.insertOne({ listname: newlistname });
      res.json({ status: "ok" });
    } finally {
      await client.close();
    }
  }
  run().catch(console.dir);
});
module.exports = router;
Once all the code has been added to the /routes/api.js, save all the changes, and we can then navigate to the root of the project using a command prompt. Here we can enter the following command to turn the server on:
DEBUG=myapp:* npm start
Now that the API server is ready, we can move on to building the extension itself that will allow the user to add snippets, get snippets, and create snippet lists. This is described next in Section 6.4 Extension File Structure.
Extension File Structure
This section describes the process of creating a snippet manager extension that interacts with the API server described in Section 6.3 API Server, which in turn interacts with the MongoDB database described in Section 6.2 Database Setup. The first thing we need to create for this extension is a simple folder titled snippet_manager. Inside this folder, we create the following empty files:
File Structure
-
/snippet_manager/manifest.json
-
/snippet_manager/interface.html
-
/snippet_manager/popup.js
-
/snippet_manager/icon.png
-
/snippet_manager/lib/bootstrap.js
-
/snippet_manager/lib/bootstrap.css
-
/snippet_manager/lib/jquery.js
Source code: /ch6/snippet/snippet-extension
In this folder, the manifest.json file outlines the permissions for the extension, and basic metadata such as the title, description, and version. The interface.html file is the main user interface that pops up to the user when the extension icon is clicked. The core JavaScript for the extension that interacts with the interface.html file is contained in the popup.js file. The icon.png is a simple PNG image for the extension icon that will show up beside the address bar.
In addition to this, the Bootstrap JavaScript library is also installed to aid the process of styling user interface buttons and creating pop-up dialogs in the extension. The jQuery JavaScript library is also included to enhance the functionality of the extension. Both of these are placed in the /lib folder. If you have not downloaded them, these files are available in the repository listed above.
File Name: manifest.json
The centre of the extension is the manifest.json file. In this file, we define the name, description, and version number of the extension. The action attribute is then added to define what happens when the extension icon is clicked. In this attribute, the default_popup is set to pop open the interface.html file that contains the main user interface for the extension. The default_icon for the extension shows in the menu bar of Chrome is the icon.png file.
To allow the extension to interact with the API server created in Section 6.3 API Server, the host_permission attribute is added, and the root URL of the API server is added to the extension's white list, allowing the URL to be called by the extension. The asterisk added indicates that all the sub-URLs of the API server can be called.
{
    "manifest_version": 3,
    "name": "Snippet Manager",
    "description": "Manage your snippets",
    "version": "1.0",
    "action": {
        "default_popup": "interface.html",
        "default_icon": "icon.png"
    },
    "host_permissions": [
        "http://localhost:3000/*"
    ]
}
File Name: interface.html
The interface.html file is the main user interface for the extension that pops open when the icon in the browser task is clicked. This interface can be broken into three core components: 1) the user interface the user sees when they click on the icon, 2) the dialog to save a new snippet, and 3) a dialog for viewing a single snippet selected from the list of snippets saved.
At the top of this file, a <link> tag is used to pull in the default Bootstrap CSS file to style the buttons on the interface, and create the dialogs that pop open to the user when buttons are clicked. A <body> tag is used with a style attribute to set the default padding around the pop-up as 100px. To inform the user, a <h1> tag is then added to tell the user the name of the extension. After this, a <div> tag is created that is used for holding the core data of the extension, which is dynamically loaded. By default, the width attribute is set to 500px and the height is set to use 100 percent of the space available. A bold <b> tag is added to highlight the Select list section of the extension. A <select> tag is then added with the ID set to myListNames. This drop-down menu is populated using JavaScript to dynamically call the database when the extension first loads.
<html>
<link rel="stylesheet" href="bootstrap.min.css">

<body style="padding:10px">
    <h1>Snippet Manager</h1>
    <div style="width:500px; height:100%">
        <b>Select list</b>
        <select id="myListNames" class="form-select">
            <option selected></option>
        </select>
        <br>
To provide the user with an option to add a new list, a <input> field is added. The input field has the ID set to newListName. This is used later when we need to extract the name of the new list the user wishes to create. A <button> is then added with the ID addNewList. When this button is pressed, we will later trigger the process to add the new list name to the database. In the class attribute for the button, the value is set to btn btn-primary, which is a Bootstrap basic style for a button pulled in from the Bootstrap CSS file added earlier. Under this, a second <button> is added with the ID set to openSave. When this button is clicked, we will later add JavaScript to trigger a dialog to open, allowing the user to add a new snippet. A <div> tag is then added to add some space between the buttons and the main list of snippets being shown to the server.
<b>Add new list</b>
<input type="text" class="form-control" id="newListName">
<div style="height:10px"></div>
<button type="submit" id="addNewList" class="btn btn-primary">Add</button>
<button type="button" id="openSave" class="btn btn-primary">
    Save new Snippet
</button>
<br>
<div style="height:20px">
</div>
After this, a HTML <table> is added with the ID Snippet_table. This is used as the main location to show each individual snippet to the user. Inside the tables <tbody> tag, a new row is added to the table using the <tr> tag. Each individual column of the table is then added using a <td> tag. These columns contain the header names for each column only. No other content is added here, as all the content that will show up in this table will be dynamically added later.
<b>My Snippets</b>
<table id="Snippet_table" class="table table-hover">
    <tbody>
        <tr>
            <td>ID</td>
            <td>List</td>
            <td>Snippet</td>
            <td>Time saved</td>
        </tr>
    </tbody>
</table>
</div>
As the buttons on the user interface are used to open dialogs, below the user interface for the extension, the HTML for each individual dialog is added. These dialogs are based on the Bootstrap dialogs, which are designed to be hidden in the background of the page until a user clicks a button to open the dialog. The first of these is the Save New Snippet modal. A large amount of this model is the boilerplate code that Bootstrap provides for creating a modal with very few changes needed.
Inside this model, a <div> tag is first added to define the style for the modal. The most important attribute in this tag is the ID, which is set to saveNewModal. This is important as later we will attach JavaScript to the extension to trigger this dialog to open when the Save New Snippet button is pressed. A <h5> tag is then used to add a title to the modal with the text Add New Snippet. Inside the model, a HTML <textarea> tag is used to create a location where the user can paste the snippet they wish to save. Again, the most important element here is the ID of the text area, which is set to newSnippetContent, as later the content of this text area will be extracted using JavaScript to be saved to the database.
Below this, two buttons are added. The first of these is a button with the ID set to closeSave, with the text Close shown on the button. When this button is clicked, later using JavaScript, a click handler will be attached to the button to trigger the process of closing the dialog. The second button with the ID saveSnippet is then added with the text Save. This is used to save the content of the text area to the database and close the dialog.
<!--- ############ Save new Snippet modal ############ -->
<div class="modal fade" id="saveNewModal" tabindex="-1" role="dialog" aria-labelledby="saveNewModalLabel"
    aria-hidden="true">
    <div class="modal-dialog" role="document">
        <div class="modal-content">
            <div class="modal-header">
                <h5 class="modal-title" id="saveNewModalLabel">Add New Snippet</h5>
            </div>

            <div class="modal-body">
                <textarea id="newSnippetContent" rows="5" cols="40"></textarea>
            </div>

            <div class="modal-footer">
                <button id="closeSave" type="button" class="btn btn-secondary" data-dismiss="modal">Close</button>
                <button id="saveSnippet" type="button" class="btn btn-primary">Save</button>
            </div>
        </div>
    </div>
</div>
Similar to the previous modal, this modal is used when we want to provide the user with an area to view an individual snippet. The core component of this modal is the ID attached to the very first <div> with the value set to viewSingleSnippet to identify the modal itself. A <h5> tag is used to add the title to the modal with the text Snippet. After this, a <span> tag is added with the ID set to currentSnippetId. This is used as a placeholder to hold the individual snippet ID. Below this, a <textarea> is added with the ID set to viewSingleTA, which is used as the area where the snippet is displayed to the user. At the very end of this dialog code, a single <button> is added with the ID set to closeSingleSnippet. This is used to close the modal on the screen after the user has finished viewing the snippet. This ID is used later to trigger the modal to close when the button is clicked.
<!-- ############ View single Snippet modal -->
<div class="modal fade" id="viewSingleSnippet" tabindex="-1" role="dialog" aria-labelledby="viewSingleSnippetLabel"
    aria-hidden="true">
    <div class="modal-dialog" role="document">
        <div class="modal-content">
            <div class="modal-header">
                <h5 class="modal-title" id="viewSingleSnippetLabel">Snippet</h5>
            </div>
            <div class="modal-body">
                ID: <span id="currentSnippetId"></span>
                <br>
                <textarea id="viewSingleTA" rows="5" cols="40"></textarea>
            </div>
            <div class="modal-footer">
                <button id="closeSingleSnippet" type="button" class="btn btn-secondary"
                    data-dismiss="modal">Close</button>
            </div>
        </div>
    </div>
</div>
At the very end of the file, we have three <script> tags pulling in the JavaScript dependencies for the extension. These include: jquery.js for functionality, bootstrap min.js for modals, and the popup.js file that contains all the JavaScript for the extension (shown next).
<script src="jquery.js"></script>
<script src="bootstrap.bundle.min.js"></script>
<script src="popup.js"></script>
</body>

</html>
File Name: popup.js
The popup.js file is the core JavaScript file for the extension that contains the individual button listeners and functions to manipulate the interface.html file. This file also contains the functions to call the API server when individual records need to be stored and retrieved from the database. This file is loaded when the interface.html user interface file pops open.
At the very top of the file, it first makes a call to a function titled populateListNames() (described later). This function is used to retrieve a list of the individual list names that the user has created that are stored in the database. When the data is retrieved, this code appends the list names to the HTML <select> drop-down on the user interface.
When called, a then() block will trigger returning JSON containing the individual list names from the database collection. Inside this, a for loop is then used to loop over each record in the list from record 0 to record json.length, which contains the total number of records. For each individual record, a variable titled singleItem is created. The value of this is set to be json[i], which is the current record number i in the json array. Using this current record, the listname attribute is extracted and placed into a local variable.
Once the list name has been extracted from the JSON, the jQuery selector $() is then used to select the <select> drop-down menu with the ID set to myListNames on the user interface. Once it has been selected, the append() function is used to append the new list item to the drop-down menu. This is done by calling new Option() to create the new selection item in the menu, which takes in the variable singleItem as both the name and the value.
populateListNames().then((json) => {
  for (let i = 0; i < json.length; i++) {
    let singleItem = json[i].listname;
    $("#myListNames").append(new Option(singleItem, singleItem));
  }
});
Whenever the HTML <select> for the list names on the user interface is interacted with by the user, we need to dynamically update the list of snippets shown to the user. To do this, the jQuery selector is used to attach an on-change listener to the <select> with the ID myListnames. Whenever the user interacts with it, it will make a call to the getAllInList() function that is responsible for returning all the individual snippets for the selected list name. To ensure we get the correct snippets for the selected list name, the this.value syntax is used to extract the name of the current selected list item and pass it into the function.
$("#myListNames").on("change", function () {
  console.log(this.value);

  getAllInList(this.value);
});
When the user selects a list, a call is made to the function getAllInList(), which takes the name of a list as a parameter and retrieves all the snippets for this list name from the database. When this function is called, a variable titled listname is passed in. A console.log() is performed to log that this function has been called correctly. The jQuery selector is then used to select the table table tbody tag, which contains the content of the table that is used for showing the user all the snippets on the interface. The empty() function is then called to remove all the content from the table before new content is added.
A call is then made to the getAllListSnippets() function that is responsible for retrieving the individual snippets for a given list name. When the records are returned, the associated then() block will trigger printing the records to the console using a console.log() to aid debugging.
To add the records contained in the JSON to the HTML table on the user interface, a for loop is used. This loop runs over the json variable from record 0 to json.length, which contains the total number of records returned. For each individual record, three local variables are created. The attribute singleSnippet contains the raw snippet content, listName contains the list name the snippet was attached to, and id contains the unique ID of the snippet.
To extract these values, calls are made to the json[i], which contains a single record in the json variable at position i, that changes each time the loop runs. While using this record, the snippet, listname, and _id attributes are extracted and placed into the local variables. Once all the variables have been gathered, we begin the process of creating a new HTML table row that will be added to the <table> on the user interface to display all the snippets to the user.
A new variable titled newRow is created with back ticks to allow multi-line content (shown as three backticks). Inside this block, a single HTML table row is then added using the <tr> tag. For each individual column in the row, <td> tags are added. To place the values into the columns, the ${listname} syntax is used to drop the listname into the row, followed by the ${singleSnippet} syntax to drop the snippet content in. A new column is then added to the row to contain a <button>. This button has a custom attribute titled expandId which is the ID of the snippet.
The last step in the process is to update the <table>. This is done by using the jQuery selector to select the table tbody tag. This reference is then placed into a variable titled tableBody. The append() function is then called to append the new complete table row contained in the newRow variable to the table body. When this function is finished running, the user interface will have an updated table with all the snippets in a given list.
// when called will fill the drop down select
function getAllInList(listname) {
  console.log("getting all snippets in list");

  $("table tbody").empty();

  getAllListSnippets(listname).then((json) => {
    console.log(json);

    for (let i = 0; i < json.length; i++) {
      let singleSnipet = json[i].snippet;
      let listName = json[i].listname;
      let id = json[i]._id;

      let newRow = `
                <tr>
                <td></td>
                <td>${listname}</td>
                <td>${singleSnipet}</td>
                <td> <button expandId ="${id}" type="submit" class="btn btn-link">Expand</button></td>
               </tr>
               `;

      tableBody = $("table tbody");
      tableBody.append(newRow);
    }
  });
}
In the cases where the user selects an individual snippet to view, a call can be made to the getSingleSnippet() function that takes in the ID of the required snippet. Inside this function, a variable titled json is added, which is used to hold the JSON retrieved from the database. A call is then made to the getOneSnippet() function, and the ID is passed in to make a call to the database to retrieve the record.
When the record is returned, the attached then() function triggers, and a variable titled json becomes available containing the record. After this, the <textarea> on the dialog that allows the user to view a single snippet is selected using the jQuery selector on the ID viewSingleTA. The val() jQuery function is then used to insert the snippet retrieved into the text area by passing in json.Snippet, where Snippet is the attribute name we want to extract from the JSON.
function getSingleSnippet(id) {
  let json = getOneSnippet(id).then((json) => {
    console.log("completed");
    $("#viewSingleTA").val(json.Snippet);
  });
}
The extension has an additional dialog that opens when the user wants to save a new snippet or view a snippet. To open the modals when the buttons are clicked, listeners are appended to each button. The first of these is the Save New Snippet button. The getElementById() selector is used to select the button with the ID openSave on the user interface, and the reference is placed into a variable titled btn. Using this reference, the addEventListener() function is appended to trigger when the button is clicked. Inside this function, the jQuery selector is used to select the modal with the ID saveNewModal. A call is then made to the modal() function, which is passed in the keyword show. When this runs, the modal hidden at the bottom of the user interface will open, allowing the user to add a new snippet to the database. In the case where the user wants to close the open modal, a button listener is attached to the button with the ID closeSave. This process is the same as the previous button listener. The main difference is when the call is made to the modal() function, the keyword hide is passed in to hide the modal from view.
// open the modal to save a new Snippet
let btn = document.getElementById("openSave");
btn.addEventListener("click", function () {
  console.log("clicked");
  $("#saveNewModal").modal("show");
});

// close button on save modal
let btn2 = document.getElementById("closeSave");
btn2.addEventListener("click", function () {
  console.log("clicked");
  $("#saveNewModal").modal("hide");
});
On the modal that allows the user to save a new snippet to the database, a HTML button with the text Save is available to save the snippet to the database. To listen for this button click, the getElementById() selector is used to select the button with the ID saveSnippet and the reference is placed into a variable. The addEventListener() function is then used to attach a listener to the button.
When the click occurs, the jQuery selector is used to select the <textarea> with the ID newSnippetContent. The value is then extracted by calling the val() function and placing it into a local variable titled content. The selector is used again to select the drop-down <select> with the ID set to myListNames. The val() function is then used to extract the list name selected by the user.
An if statement is then used to check if the variable selectedList is left blank. If it is, this indicates the user has not yet selected the list to add the snippet to. An alert() statement is used to pop up an error message to the user, instructing them to select a list. In the case where they have selected a list, the else statement of the if statement is called. In this, a call is made to the saveNewSnippetToDb() function that takes in two variables. The first is the content variable containing the snippet they wish to add, and the second is the list name they want to add the snippet to.
After this, the selector is used to select the <textarea> with the ID newSnippetContent, and a call is made to the val("") function, which takes in two double quotes to erase the content of the snippet field after the data has been saved. When this process is finished, we are now finished with the modal and can hide it in the background. To do this, the selector is used to select the Bootstrap modal with the ID saveNewModal. A call is made to the modal() function that takes in the attribute hide to make the modal invisible to the user. As a new snippet has been added to the database, when the modal closes, a call is made to the getAllInList() function, which takes a single parameter in the form of the list name the user had selected. This refreshes the list of snippets on the user interface, which now contains one more entry.
// save Snippet button
let btn3 = document.getElementById("saveSnippet");
btn3.addEventListener("click", function () {
  console.log("clicked");
  let content = $("#newSnippetContent").val();
  let selectedList = $("#myListNames").val();

  // if they haven't selected a list yet
  if (selectedList == "") {
    alert("select a list first");
  } else {
    saveNewSnippetToDb(content, selectedList);
    $("#newSnippetContent").val("");
    $("#saveNewModal").modal("hide");
    getAllInList(selectedList);
  }
});
On the modal to save a new snippet, a <button> exists to close the dialog. This button has the ID set to closeSingleSnippet. Here, the getElementById() selector is used to select the button by ID and place the reference into a local variable. The addEventListener() function is then used to append the click listener to the function. When the button is clicked, a message is first printed to the console to ensure the click handler is working correctly when the button is clicked. After this, the jQuery selector is used to select the modal with the ID set to viewSingleSnippet. On this, a call is made to the modal("hide") function to hide it from view.
// close Snippet modal
let btn5 = document.getElementById("closeSingleSnippet");
btn5.addEventListener("click", function () {
  console.log("clicked");
  $("#viewSingleSnippet").modal("hide");
});
In this same file, a number of different functions are added that allow the extension to interact with the database. The first of these is the getAllListSnippets() that is responsible for returning all the records from the database for a given list name. When this function is called, the listName variable becomes available. Inside the function, a variable titled url is built up. This URL is the full address of the API server page titled /getAllByListName to be called. This page takes a single attribute titled listname, which is passed the listName variable that was provided to the function.
After the URL has been defined, the process of calling the API server page can begin. A try-catch block is added to try connect to the API server and catch the error if something goes wrong. A call is then made to the fetch() and the url variable is passed in. When this fetch completes, the result is placed into a variable titled response. A call is then made to the response.json() function to extract the JSON from the response. When this is complete, the return statement is added to send back the json variable to the location where the function was first called in the extension. In the case of an error, the catch block triggers, printing the error to the console.
async function getAllListSnippets(listName) {
  const url = "http://localhost:3000/api/getAllByListName?listname=" + listName;
  try {
    const response = await fetch(url);
    const json = await response.json();
    return json;
  } catch (error) {
    console.error(error.message);
  }
}
When the extension wants to retrieve a single snippet from the database, a call can be made to the getOneSnippet() function, and a single ID of the record to retrieve is passed to the function. This function makes a call to the API page titled /getOneSnippet. This page takes a single variable titled id, which is appended to the URL, followed by the value of the id variable passed to the function. This function performs very similarly to the previous example, getting the single record's JSON from the database and sending it back to the function caller using a return statement.
async function getOneSnippet(id) {
  const url = "http://localhost:3000/api/getOneSnippet?id=" + id;
  try {
    const response = await fetch(url);
    const json = await response.json();
    return json;
  } catch (error) {
    console.error(error.message);
  }
}
In the case where the user wishes to add a new list to the database, a call can be made to the addNewListToDB() function, and the name of the list to add is passed to the function. This function performs the same process as the previous two examples. The main difference here is that the listname is passed to the function, which is then in turn passed to the /addNewList URL that takes in a single parameter titled newlistname. This parameter has the value set to the value of the listname variable passed to the function.
async function addNewListToDb(listname) {
  const url = "http://localhost:3000/api/addNewList?newlistname=" + listname;
  try {
    const response = await fetch(url);
    const json = await response.json();
    return json;
  } catch (error) {
    console.error(error.message);
  }
}
When the user wishes to save a new snippet to the database, a call is made to the saveNewSnippetToDb() function. For this to work, two pieces of information are required: the content of the snippet to add, and the name of the list the user selected, shown as selectedList. The URL is then created to make a call to the /saveSnippet page on the API server, which is passed the content variable and the selectedList variable as key-value pairs. After the fetch() is performed, the new snippet data is saved to the database.
async function saveNewSnippetToDb(content, selectedList) {
  const url = `http://localhost:3000/api/saveSnippet?content=${content}&selectedList=${selectedList}`;
  try {
    const response = await fetch(url);
    const json = await response.json();
    return json;
  } catch (error) {
    console.error(error.message);
  }
}
The last main function added is the populdateListNames() function. The purpose of this function is to make a call to the API server page titled /getListNames, which is responsible for returning a list containing all the snippet list names on the extension user interface. As this function is used for retrieving data and not saving data, no additional parameters are passed to the function.
async function populateListNames() {
  const url = "http://localhost:3000/api/getListNames";
  try {
    const response = await fetch(url);
    const json = await response.json();
    return json;
  } catch (error) {
    console.error(error.message);
  }
}
The last block of code added to the popup.js file is a global click listener. This listener is used to listen for when the user clicks on one of the rows on the main table listing all the snippets added. This begins by appending a listener to the main HTML document using the document.onclick() syntax.
Inside this listener, a variable titled e becomes available, which contains information about the row that was just clicked. An if statement is then used to check if the e.target has an attribute titled expandId, which is accessed using the getAttribute() function. If this is found, the same syntax is used to select the expandId and place it into a variable titled id. This expandId represents the unique ID of the row which corresponds to a single snippet in the database. To aid debugging, this ID is then printed to the console.
A call is then made to the getSingleSnippet() function and the id is passed into it. This function will retrieve the single snippet record from the database. When this is complete, the jQuery selector is used to select the currentSnippetId <span> tag on the snippet modal interface and set the content of the tag using the html() function, which accepts the id as a parameter. This makes the ID visible to the user. The last step is then to show the modal to the user. This is done by using the selector to select the modal with the ID viewSingleSnippet. A call is made to the modal("show") function to make the modal visible to the user.
document.onclick = function (e) {

  if (e.target.getAttribute("expandId")) {
    var id = e.target.getAttribute("expandId");
    console.log(id);
    getSingleSnippet(id);
    $("#currentSnippetId").html(id);
    $("#viewSingleSnippet").modal("show");
  }
If the user had selected the option to add a new list, the second if statement is used to check for this. In the if statement, the e.target.id is checked to see if it has the value addNewList. A new variable is then created titled newListName, which gets its value from the <input> field on the user interface with the ID newListName. The val() function is used to extract the value from it.
Using this new list name, a call is made to the addNewListToDb() function to add it to the database. This function takes a single parameter, which is the list shown as newListName. When this function is finished, the then() function triggers, which provides access to a variable containing JSON titled json. As the new list name has been added to the database, the jQuery selector is used to select the input field with the ID newListName that originally contained the new name. The val("") function is called to wipe the value from the <input> field, making it ready for the next list name to be entered to repeat the process when needed.
As a new list name has been added to the database, the process of filling the HTML <select> with the list of updated names is started again. This is done by making a call to the populateListNames() function. When complete, the then() function triggers, making a variable titled json available containing the individual list names. A for loop is then used to loop over all the individual list names in the JSON. A variable titled singleItem is created, and the value is set to be json[i], which is the current record, and the listname attribute is selected from it and placed into the variable.
The jQuery selector is then used to select the drop-down <select> with the ID myListNames on the main user interface. The append() function is then used to add a new record to the menu. In this, the new Option() syntax is used, which allows us to append a name and value to the new menu. As the list now contains a number of different names, to select the new list name for the user, the selector is used to select the menu again, and the val() function is used to select the menu item by name that was just created. This name is contained in the variable titled newListName.
if (e.target.id == "addNewList") {
  console.log("adding new list..");
  // get the name for the new list from the UI
  let newListName = $("#newListName").val();

  addNewListToDb(newListName).then((json) => {
    console.log("completed");
    $("#newListName").val("");

    // Fill the select with all list names
    // even the new name
    populateListNames().then((json) => {
      for (let i = 0; i < json.length; i++) {
        let singleItem = json[i].listname;
        $("#myListNames").append(new Option(singleItem, singleItem));
      }
      // select the list item we just created
      $("#myListNames").val(newListName);
    });
  });
}
};
View Results
Figure 6 shows the complete snippet manager user interface, which pops up when the user clicks on the extension icon. In this interface, we can see the user has the option to select a snippet list or create a new snippet list. When the user wishes to add a new snippet, they can click on the Save new Snippet button, which opens the Bootstrap modal allowing them to save a snippet. At the bottom of this interface, the <table> headers can be seen. This is where the individual snippets will be shown when a user selects a specific snippet list to view.
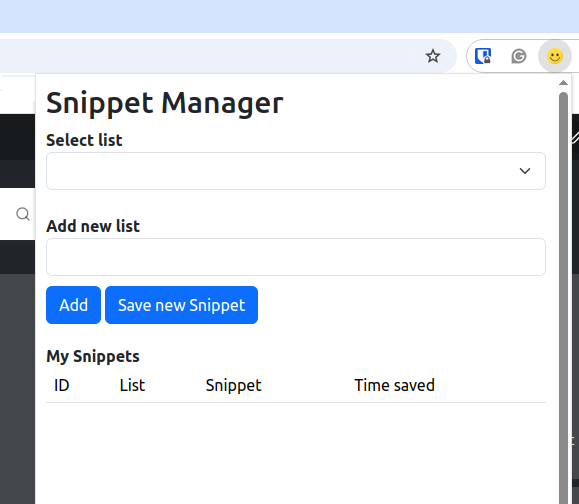
Figure 6: Complete user interface for the snippet manager.
On the user interface, when a user clicks the Add new Snippet button, A Bootstrap modal will open, as shown in Figure 7, which contains a text area allowing the user to enter their snippet. When finished, they can click either Save or Close.
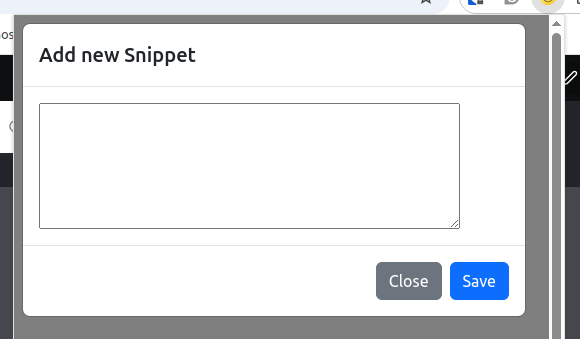
Figure 7: Bootstrap modal shown when the user clicks the button to add a new snippet.
Figure 8 shows the output when a list name is selected by the user. When selected, a list a snippets added to the list is shown along with a few characters from the snippet. A button titled Expand can also be seen, which allows the user to open a modal to view the complete snippet.
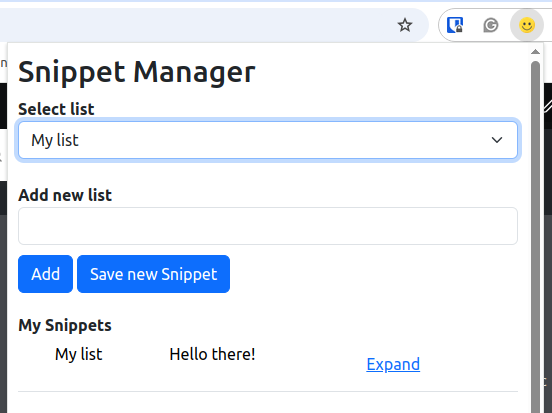
Figure 8: Selecting a list name to view the snippets it contains.
When the user clicks the expand button beside a snippet on the user interface, a modal opens showing the unique ID of the snippet and the snippet content itself inside a <textarea>, as shown in Figure 9.
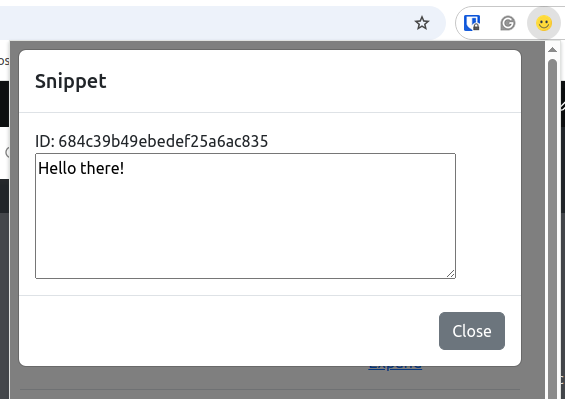
Figure 9: A single snippet selected by the user shown in a Bootstrap modal.
Summary
This chapter walked through the process of developing a custom snippet manager extension that used an Express.js API server and a MongoDB database. Using this extension, the user had the ability to create a new list where individual snippets could be added. Bootstrap was used to provide additional styling to the user interface components and to allow individual dialogs to be opened to show content to the user. Chapter 7, next, describes the process of building a full-stack time tracking extension.
Take-away Tips:
-
When working with a database, JSON record attributes should always be kept in lowercase, such as snippet. This avoids the issue of the extension looking for an attribute titled Snippet in the JSON record, which may not exist.
-
The await keyword is added in front of fetch() function calls to allow the code to wait for the response before proceeding on to the next line of code.
-
When working with HTML, you can add your own custom attributes to any tag, such as the expandId attribute, which was added to a <div> tag in this chapter. This provides a simple way of storing information on the user interface, which may be needed in the future.
-
For a given HTML element, the JavaScript getAttribute() syntax can be used to extract any attribute value, such as class, style, or custom attributes.
-
When building any extension, existing libraries such as Bootstrap provide a simple way to get pre-built components, such as pop-up modals to contain user interface content. These can easily be hidden and shown to the user when required.
-
HTML elements, such as drop-down <select> tags, can have their content loaded dynamically using JavaScript instead of adding the content directly to the HTML itself. In this case, the tag is used as a placeholder until a fetch() call is complete.