Saving Extension Data
Introduction
When working with any extension, we often require the ability to save data and fetch it again in the future. In some cases, the extension may only need to save a small piece of data locally in the browser, such as an email address or name, and for more complex extensions, complete databases are required. In this chapter, we review a variety of different approaches available for saving and retrieving data from Chrome extensions.
To begin, Section 5.2 Saving Data in the Browser outlines the process of saving data from an extension to the local browser for lightweight storage. As saving to a remote location, such as a database, is often required, Section 5.3 Saving to a Database From an Extension outlines saving data and retrieving from a MongoDB database. To expand the functionality of a basic extension, Section 5.4 Working with Files then describes the process of reading and writing to text files from an extension. Finally, Section 5.5 Summary concludes this chapter with a brief summary and lists the core takeaway tips from this chapter.
Source code for this chapter can be found here.
Saving Data in the Browser
When working with any extension, often the ability to save to a user's browser is essential to enhance the functionality of an extension by retaining information such as usernames or layout choices. Although not a permanent solution to storing data long-term, storing data in a browser can offer persistence between browser sessions for basic data. In this section, an extension is described that allows the user to type in individual words into a text box, and then, when a button is clicked, save the data to the extension's local storage. Once saved, a button titled Get words is available that, when clicked, retrieves the words stored in the local storage and puts them into a text area on the extension pop-up window. To get started, create a new folder titled saving-in-the-browser, and create the following empty files:
File Structure - /saving-in-the-browser/
-
/saving-in-the-browser/manifest.json
-
/saving-in-the-browser/interface.html
-
/saving-in-the-browser/popup.js
-
/saving-in-the-browser/icon.png
Source code: /ch5/saving-in-the-browser
File Name: manifest.json
In this manifest, the basic attributes to describe the extension are first added, including the name, description, and version number for the extension. The action attribute of the extension is then defined, which contains two attributes: default_popup to define the HTML page that will open when the extension icon is clicked, titled interface.html, and the default_icon attribute that defines the icon for the extension. The last element of the manifest is the permissions attribute to define the abilities of the extension. These include the scripting permission, as we need to execute code, and the storage permission, as we want to allow the extension to store data in the browser.
{
    "manifest_version": 3,
    "name": "Save and retrieve data",
    "description": "Save and retrieve data",
    "version": "1.0",
    "action": {
        "default_popup": "interface.html",
        "default_icon": "icon.png"
    },
    "permissions": [
        "scripting",
        "storage"
    ]
}
File Name: interface.html
The main user interface for the extension is the HTML pop-up that is shown when the user clicks the extension icon. This interface contains an input field allowing the user to enter a new word to save to storage, and a text area that will display the words currently stored. At the top of this file, a simple <h1> tag is used to add a title to the pop-up. An input field is then added with the ID set to newWord. Below this, a basic HTML button with the ID saveWord is added that triggers the saving process when the button is clicked.
After this, a large text area is added with the ID set to output. This text area is the location where the terms in the storage will be displayed after the button directly below it with the ID getWords is clicked. At the end of this interface, a HTML button with the ID clear is added to allow the user to clear all items in the storage when clicked. Finally, a <script> tag is used to pull in the popup.js file that contains all the JavaScript for saving and retrieving, as the HTML page itself cannot execute any JavaScript.
<html>
<body>
    <h1>Save and retrieve data</h1>
    Enter a word <input id="newWord" />
    <button id="saveWord">Save word</button>

    <p></p>
    <textarea id="output" rows="5" cols="20"></textarea>
    <p></p>
    <button id="getWords">Get words</button>

    <p></p>
    <button id="clear">Clear</button>
    <script src="popup.js"></script>
</body>
</html>
Figure 1 shows an example of the HTML user interface. In this, one field is available to allow the user to enter terms, and the second field allows any words that are stored in local storage to be displayed. At the bottom, A clear button is visible to clear the storage when required.
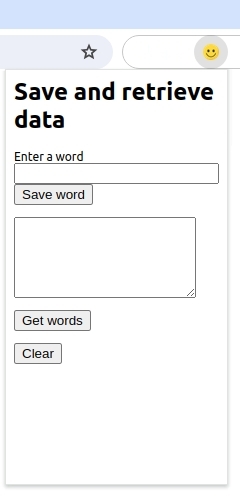
Figure 1: Full user interface for the saving and retrieving data extension.
File Name: popup.js
The popup.js file contains the core JavaScript for the extension. In this file, three core tasks are performed: saving new words, retrieving existing saved words, and clearing all the words from the storage. The first of these is the save new word process. This is done by using the getElementById() selector to select the saveWord button. After this, the addEventListener() function is used to append a click function that will trigger when the button is pressed.
Inside this click handler, a console log is performed so we can follow the execution and ensure the button has correctly triggered the click. After this, the getElementById() selector is used again to select the <input> text field with the ID set to newWord, and then the value is extracted and placed into a local variable titled val. A new variable titled newWord is then created as temporary storage, and the data in the val string is saved to it.
As we need to find out if records exist in the browser's storage, a query is performed. To do this, we first call the chrome.storage.local.get() function and pass in the key we are looking for. In this example, we are looking for the key word. Once found, the then() function will trigger, providing us with the data collected from the storage as a variable titled result.
An if statement is used to check if the result that we got has a value titled word. If it returns true, the first if statement will run. In this, a new JSON variable is created titled newRecord. This piece of JSON has the attribute name as word and the value as result.word that was just collected. The new word in the form of the variable newWord is also appended to this. To save this new JSON, a call is made to the chrome.storage.local.set() and the JSON is passed in.
In the case where the record was not found in storage, the else block of the if statement triggers. In this, no retrieval of the previous record is performed, and a call is made to the chrome.storage.local.set() function to save a new record. At the very end of this process, we use the getElementById() selector to select the <textfield> text area on the user interface with the ID newWord, and then set the value as two single quotes to clear the word for the next use.
// Add a word to the storage
let saveButton = document.getElementById("saveWord");
saveButton.addEventListener("click", () => {
  console.log("Clicked save word");

  // get word to save
  let val = document.getElementById("newWord").value;

  let newWord = val;
  console.log("New word is: " + newWord);
  chrome.storage.local.get(["word"]).then((result) => {
    if (result.word) {
      // if it exists
      console.log("existing result: " + result.word);
      let newRecord = { word: result.word + " " + newWord };
      chrome.storage.local.set(newRecord);
    } else {
      // if it does not exist
      chrome.storage.local.set({ word: newWord });
    }
  });

  document.getElementById("newWord").value = "";
});
For the second HTML button on the user interface titled Get words, the getElementById() selector is used to select the button on the interface with the ID set to getWords. The addEventListener()function is then called to add a click handler, which triggers when the button is clicked. When the button is clicked, a simple console log is used to ensure the function has been triggered correctly.
After this, a call is made to the chrome.storage.local.get() function to retrieve the JSON record from storage containing words that have been stored. This function allows us to define a key which is used in the search through the storage. In our example, word is the name of the key we are looking for. When the function has triggered,the then() statement runs, and a variable titled result becomes available.
A simple if statement is then used to check if the result object contains the attribute word. If it is undefined, we will then set the <textfield> text area to two single quotes, indicating no value is retrieved. In the case where there is a record in the storage, the else statement will trigger. In this, to update the user interface, we first print the result object to the console to aid debugging. We then use the getElementById() selector to select the output <textfield> text area on the user interface with the ID set to output, and set the text of the <input> text field to be the text contained in the result.word JSON key-value pair that was retrieved.
// Get words from the storage
let getWordsButton = document.getElementById("getWords");
getWordsButton.addEventListener("click", () => {
  console.log("Clicked get words");

  chrome.storage.local.get(["word"]).then((result) => {
    // check if there is a record to show on the output box
    if (result.word === undefined) {
      document.getElementById("output").value = "";
    } else {
      console.log(result);
      document.getElementById("output").value = result.word;
    }
  });
});
Once the saving and retrieval functions have been set up, we then add the code for clearing the user interface when the clear button is clicked. In this code, the getElementById() selector is used to select the button with the ID set to clear on the interface.html page. When the button is clicked, a small message is printed to the console to ensure that the click functionality is working. After this, a call is made to the chrome.storage.local.clear() function to remove all the data from the browser’s storage.
Once the data has been removed, the getElementById() selector is then used to select the <textarea> with the ID set to output to clear the text by setting it to null with two single quote marks.
// Clear the storage
let clearButton = document.getElementById("clear");
clearButton.addEventListener("click", () => {
  console.log("Calling clear");

  chrome.storage.local.clear();
  document.getElementById("output").value = "";
});
After these changes have been made to the files, save all the changes. Once saved, load the extension into your browser as described previously in Chapter 2, Section 2.3 Loading your Extension.
View results
In Figure 2 an example of the user interface for the extension is shown. Here, a user has typed a word into the <textarea> and then pressed Save word <button>. After this, the Get words button was pressed, and the data was retrieved from the local storage and displayed in the text area.
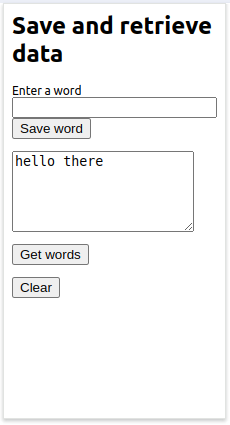
Figure 2: Example of a word that has been saved to local storage being retrieved and placed in a <textarea>.
When debugging extensions that interact with the local storage, it is important to remember that the local storage used by extensions is not the same as web local storage in a browser. In the next section, the process of saving from an extension to a database is described.
Saving to a Database From an Extension
In this section, a simple extension with a pop-up user interface that contains two <input> text fields is described. When the user clicks the <button>, the name of the person along with the word they wish to save is sent to a database via a call to a local API server.
When the user wishes to retrieve records from the database, they can click a <button> on the user interface. This project begins in Section 5.3.1 API Server by outlining the API server that interacts with a database. This is followed by Section 5.3.2 Extension, which describes the extension that programmatically calls the developed API server.
API Server
This example contains two components: the first is the extension itself, and the second is the Express.js API server. We will first begin by outlining the changes that need to be made to the API server previously described in Chapter 4, Section 4.4 Custom API Server. The core changes to this server are focused on the /routes/api.js file.
File Structure
-
/save-words-in-db/express-server/bin/
-
/save-words-in-db/express-server/node_modules/
-
/save-words-in-db/express-server/public/
-
/save-words-in-db/express-server/routes/api.js
-
/save-words-in-db/express-server/views/
-
/save-words-in-db/express-server/app.js
-
/save-words-in-db/express-server/package.json
Source code: /ch5/save-words-in-db/express-server
File Name: routes/api.js
In the API server folder, a subfolder titled routes can be found. In this, a file titled api.js was created previously, where the individual routes we want to add to our API can be defined. At the start of this file, the basic Express.js library import is added using the require() syntax. After this, the router reference is placed into a variable titled router. The router.get() function is then added to create a new URL for the / route. As nothing is performed on this page, a simple message is returned to outline that the API root page has been called. When the http://localhost:3000/api/ URL is opened in a browser, the res.send() returns a simple piece of text back to the web browser.
var express = require("express");
var router = express.Router();

// default / page
router.get("/", function (req, res, next) {
  res.send("The API was called!");
});
Next, we can begin on the /saveData URL that is called by the extension to save data to the database. We first begin by adding the router.get() function to define the new URL. When called, this function processes access to the req object containing the data from the request made to the URL and the res object, which is used for sending data back to the browser. Inside this function, the name of the person who saved the record and the individual word we want to save are extracted. To access these parameters, the req.query is used. We extract two parameters titled name and word. We then place these two values into local variables titled new_name, and new_word for future use.
The require() function is then used to import the MongoDB library. The URL of the local database is then stored in a variable titled uri. A new MongoDB client is then created by passing in the uri string, and the client object is then placed into a variable titled client.
// saveData
router.get('/saveData', function(req, res, next) {

  console.log("Saving new data to the database")
  let new_name = req.query.name;
  let new_word = req.query.word;

  const { MongoClient } = require("mongodb");
  const uri = "mongodb://localhost:27017";
  const client = new MongoClient(uri);
To perform the call to the database, a new asynchronous function titled runSaveToDb() is created. This is designed to run without interrupting the flow of execution by running and finishing when it is ready. In this function, we place a try-catch statement to wrap around the database interaction if an error occurs. The client.db() function is then used to select the word_storage database in our local MongoDB database. The database.collection() function is then used to select the words collection in the database.
As we want to insert two variables into the database, we first create a JSON document structure shown as doc. The attribute name is added, followed by a reference to our local variable titled new_name. The word attribute is added, then followed by thenew_word local variable. After this, a call to the insertOne() function is performed to insert the new record into the database. This is then passed a reference to the doc object we just created. Finally, a console.log() is called to output the result object, which contains data outlining if the insert was successful or not.
During this process, if an error occurs, the catch statement will trigger. Inside this, a small message is printed to the console, and the res.send() function is used to return a piece of text to the web browser to notify them that something has happened. At the end of this code, a simple finally block is used to close the database connection by calling t client.close(). This block always runs if an error has occurred or not, to ensure the connection is always closed.
async function runSaveToDb() {
  try {
    const database = client.db("word_storage");
    const col = database.collection("words");

    const doc = {
      name: new_name,
      word: new_word,
    };

    const result = await col.insertOne(doc);
    console.log(result);
  } catch (error) {
    res.json({ status: "error saving to db" });
    console.log("error inserting new record to db");
  } finally {
    await client.close();
  }
}
At the very end of this block of code, a call is made to the runSaveToDb() asynchronous function. To ensure the user's browser is updated with the current status of the insert, the res.json() function is used to send back a small piece of JSON to the caller to notify them that the process was successful.
  runSaveToDb()
  res.json({"status": "saved"})
});
The second route that is added to the API server is the /getDataroute. This is responsible for returning all the records that were stored in the database document collection. This begins by first adding a console.log() call to ensure we have run the correct piece of code. After this, the same database connection code is added along with the same asynchronous function previously added. The core difference is the code used to retrieve the content from the database instead of adding new records to it. This first starts by importing the database library as previously described. Inside a try-catch block, the client.db() function is sued to select the word_storage database. The database.collection() function is then used to select the words document collection in the database and place it into a local variable titled records.
The records.find() function is then called to query the database. To select all the records,two braces are passed {} to identify that we want to return all records. This reference is stored inside a variable titled cursor. The await cursor.toArray(); function is used to wait for the process of selecting all the records in the collection and converting them into an array. A simple console.log() is added here to print all the records to the console to aid debugging. The res.json(); is then used to send back the array as JSON to the browser by passing in the results object containing all the records from the database.
The catch statement here will trigger if an error occurs, such as connecting to the database. In the case of an error, a status message is returned to the browser containing a simple piece of JSON. Similar to the previous example, a finally block is added, which always runs whether there was an error or not in the database call. This contains a call to the client.close() to ensure the database connection is always closed. At the very end of this block, a call is made to the runDBcall() to trigger the function to begin the retrieval process just created.
// getData
router.get("/getData", function (req, res, next) {
  console.log("/getData call success");

  const { MongoClient } = require("mongodb");
  const uri = "mongodb://localhost:27017";
  const client = new MongoClient(uri);

  async function runDBcall() {
    try {
      const database = client.db("word_storage");
      const records = database.collection("words");
      const cursor = records.find({});
      const results = await cursor.toArray();
      console.log(results);

      // send back the JSON to the browser
      res.json(results);
    } catch (error) {
      // if an error occurs, send back an error message
      res.send({ status: "error" });
      console.log(error);
    } finally {
      await client.close();
    }
  }
  runDBcall();
});
The final route that is added to the API server is the /deleteAll route. The code in this sample is very similar to the previous routes, as it contains the same connection to the database code. The core difference is the call to the deleteMany() function to delete all the records in the collection. Inside this function call, two braces are added {} to identify that we wish to delete all the records.
// deleteAll
router.get("/deleteAll", function (req, res, next) {
  console.log("/deleteAll call success");

  const { MongoClient } = require("mongodb");
  const uri = "mongodb://localhost:27017";
  const client = new MongoClient(uri);

  async function runDBdelete() {
    try {
      const db = client.db("word_storage");
      await db.collection("words").deleteMany({});

      console.log("all records deleted");
      // send back the JSON to the browser
      res.json({ status: "all records deleted" });
    } catch (error) {
      // if an error occurs, send back an error message
      res.send({ status: "error occurred deleting all records" });
      console.log(error);
    } finally {
      await client.close();
    }
  }
  runDBdelete();
});
At the very end of this file, the router updates we just made are set to the module.exports to make them available to the API server.
module.exports = router;
Once the file has been updated, save all the changes. We can now open a command prompt in the root of the API server and start the server using the default run command:
DEBUG=myapp:* npm start
View results
Once the changes have been saved, restart the API server and we will now have the following URLs available on our API server:
-
http://localhost:3000/api/
-
http://localhost:3000/api/saveData/
-
http://localhost:3000/api/getData/
To test these URLs, we can call the URLs from a web browser or by using a dedicated client to call them, such as Postman. It is always important to manually test these URLs before we attempt to programmatically call them from an extension to ensure they work as expected. Below outlines the URL that is called, and the result returned in the browser.
URL Called: http://localhost:3000/api - The root page of the API.
Result:
The API was called!
URL Called: http://localhost:3000/api/saveData/?name=John&word=Test - This URL will attempt to add a new record with the name John and the word value Test.
Result:
{"status":"saved"}
URL Called: http://localhost:3000/api/getData/ - This URL will return all the data in the database collection.
Result:
[
    {
        "_id": "682effeb1dac5f2ff6a3fb59",
        "name": "John",
        "word": "Test"
    }
]
When all the URLs have been tested, we can begin the process of creating the extension to call these URLs programmatically is described next in Section 5.3.2 Extension.
Extension
Now that the back-end API has been created, we can move to the process of creating an extension that utilizes the API server. This extension is designed to provide the user with two HTML input fields that allow them to enter a word, followed by the name of the person who saved the word. A simple HTML button is then added titled Save Name and Word, which, when clicked, the extension sends the data across the to the API server via a URL to add the terms into the database. A HTML <textarea> is then added below this as a display area for all the terms that are stored in the database. To trigger this process, the second button titled Get words is added. To clear all the records in the database, a third HTML button is added titled Clear.
To get started, we first begin by creating a folder titled words_to_db. Inside this folder, create three blank files and a PNG icon as shown below.
File Structure
-
/words_to_db/interface.html
-
/words_to_db/manifest.json
-
/words_to_db/popup.js
-
/words_to_db/icon.png
Source code: /ch5/save-words-in-db/words-to-db
File Name: manifest.json
Inside the manifest.json file, we begin by adding the basic name, description, and version of the extension. The action attribute for the extension is defined here, which contains two attributes, default_popup, which is set to show the interface.html file when the user clicks on the extension icon, and the default_icon attribute, which is used to point to the smiley face icon icon.png.
After this, the host_permissions attribute is added. This is used to define the URL the extension will interact with, also known as whitelisting. As our Express.js API server is running on our local machine on port 3000, this address is added here. An asterisk is added to outline that we want to be able to interact with all URLs on this base URL. The last attribute added is the permissions attribute. For this, the scripting attribute is added as we wish to execute JavaScript from the extension to perform tasks.
{
    "manifest_version": 3,
    "name": "Save to database",
    "description": "Save and retrieve data from a database",
    "version": "1.0",
    "action": {
        "default_popup": "interface.html",
        "default_icon": "icon.png"
    },
    "host_permissions": [
        "http://localhost:3000/*"
    ],
    "permissions": [
        "scripting"
    ]
}
File Name: interface.html
Similar to the previous extensions, a simple HTML user interface is created that will be shown when the user clicks the extension's icon in the menu bar. Two <input> fields are added to allow the user to enter a word, and also the name of the person who is adding the word. The IDs for the input fields are set as newWord and newName. These IDs will be used later when we need to access the content of these input fields.
A HTML<button> is then added with the text Save Name and Word and the ID set to saveNameAndWord. This ID is used later in the JavaScript when we wish to identify which button has been clicked on the user interface. A <textarea> is then added, which will be used for displaying the records that we retrieve from the database. The ID for this is set to output. Below this, a <button> is added with the ID getWords. This is designed to trigger the process of retrieving the records from the database. At the end of this file, a final <button> is added with the ID clear. This is used when we wish to remove all the documents stored in the database. As no JavaScript can be added to this file, a <script> tag is used to reference the popup.js file that contains all the JavaScript that is used with these buttons.
<html>
<body>
    <h1>Save to the database</h1>

    New word <input id="newWord" />

    <p></p>
    Saved by <input id="newName" />
    <p></p>
    <button id="saveNameAndWord">Save Name and Word</button>
    <p></p>
    <textarea id="output" rows="5" cols="20"></textarea>
    <p></p>
    <button id="getWords">Get words</button>
    <p></p>
    <button id="clear">Clear</button>
    <script src="popup.js"></script>
</body>
</html>
In Figure 3 we can see the complete HTML UI of the extension.
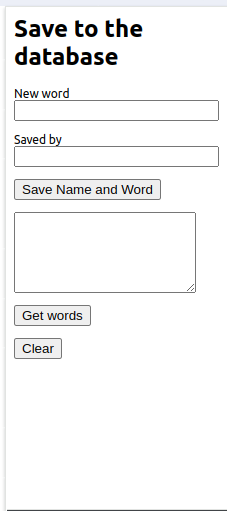
Figure 3: Extension UI showing the two <input> fields allowing the user to save a name and word to the database.
File Name: popup.js
The popup.js file is the main JavaScript file that interacts with the extension's HTML interface. At the start of this code, the getElementById() selector is used to grab the saveNameAndWord <button> from the user interface. The addEventListener() function is then used to append a click listener to the <button> that triggers when the <button> is clicked.
When the <button> is clicked, the contents of this function are run. First, a small message is printed to the console to aid debugging. After this, the getElementById() selector is used twice to select both of the <input> fields on the user interface by ID. Using these references to the <input> fields, the value is then extracted from them and placed into two local variables. To aid debugging, the values are printed to the console. As we now have the two values we wish to store in the database, the URL for the API server's /saveData page is then added. With this URL, the two values we wish to send to it are appended as key-value pairs where name is the key and \${newName} is used to drop the newName value into the URL.
Once the URL is populated with the values, we begin the process of building a new asynchronous function titled saveToDb(). This function is responsible for making the call to the API server to save the data to the database. Inside this function, a try-catch statement is first added to surround the calls to the API server. In the try block, a call to the fetch() function is performed to call the local API server, which is passed in the variable titled url. In front of this fetch(), the await keyword is added to wait for the response from the API server before proceeding on to the next line.
When completed, the data is placed into a variable titled response. The response.json() function is then used to extract the JSON and place it into a local variable titled data, which is then sent to the location where the saveToDb() function we are creating was called. This is done by adding the return keyword before the data variable. In the case where the database connection fails, the catch block will execute, printing the error to the console.
// Add a word to the storage
let saveButton = document.getElementById('saveNameAndWord');
saveButton.addEventListener("click", () => {
    console.log("Clicked save")

    // get word to save
    let newName = document.getElementById('newWord').value;
    let newWord = document.getElementById('newName').value;
    console.log("New name is: " + newName);
    console.log("New word is: " + newWord);
    const url = `http://localhost:3000/api/saveData?name=${newName}&word=${newWord}`;

    async function saveToDb() {

    try {
      console.log("running fetch for saving")
      const response = await fetch(url);
      const data = await response.json();
      return data

    } catch (error) {
        console.log(error);
      }
    }//saveToDb
The trigger that begins the process of interacting with the API server is a call to the saveToDb() function. When this call is performed, and the resulting data is available, a then() function is triggered. Inside this, a simple message is printed to the console to outline that we have reached the then() statement. After this, a simple if statement is used to check if the data object returned from the server contains the status attribute with the value saved. If this is true, we can then use the document.getElementById() selector to select the newWord and newName <input> fields on the user interface and set them to blank using two single quotes.
In the case where the data.status was not equal to saved, the else block of the if statement triggers, printing a simple message to the console outlining that an error has occurred.
    saveToDb().then(function(data){
      console.log("clearing values from text boxes")

      if(data.status == 'saved') {
        document.getElementById('newWord').value='';
        document.getElementById('newName').value='';
      } else {
        console.log("cannot clear, db call error")
      }
    })//then
}); // route
The next block of code added to the API server is a simple getElementById() selector to select the <button> with the ID set to getWords. When the <button> has been selected, a simple click listener is then appended to it using the addEventListener() function. When the <button> is clicked, the body of the function is run.
In this, a small status message is printed to the console, followed by the definition of a new asynchronous function titled getData() that is used for getting all the data from the database added earlier. Similar to the previous example, the URL, which we will call titled /getData is added. A simple try-catch block is then added to try to perform a fetch() call on the URL. When the fetch is completed, the result is placed into a variable titled response. The response.json() function is then used to extract the JSON from the response and place it into a variable titled data.
The return statement is then used to send back the JSON contained in the data variable to the location where the getData() function is called in the code. This function is used for calling the API server's /getData route, which is responsible for returning all the records from the MongoDB document collection relevant to this extension. Similar to the previous code, a fetch() is performed, and an await is attached to the fetch() and the response object to wait for the JSON to be returned from the call. At the end of this block of code, when the JSON has been returned from the call, a simple return statement is used to send back the data. The catch block is then added, which triggers if the database connection failed during the try block of code and prints a simple error message to the console.
// Get words from the storage
let getWordsButton = document.getElementById('getWords');
getWordsButton.addEventListener("click", () => {
  console.log("Clicked get words")
  async function getData() {

    const url = `http://localhost:3000/api/getData`;

    try {
      const response = await fetch(url);
      const data = await response.json();
      console.log(data);
      return data;
    } catch (error) {
      console.error("error");
    }
  }//getData
To trigger this function, a call is made to the getData() function. When this function is called, the then() function attached to the function will trigger with the response shown as data. Although it is possible to add the JSON directly to the HTML user interface, we instead create a variable titled dataToSend that holds the output we wish to append to the output field on the user interface.
With this data variable, a simple forEach() statement this used to iterate over the records returned. Each individual record contains an element that has a name attribute and a word attribute. When the loop runs, both of these are placed into local variables. Instead of returning the values directly in their raw form, a newLine variable is created to hold the variables along with a piece of text word is between them.
Finally, the newLine is appended to the dataToSend variable using the += syntax. To make it visible to the user, the output field is selected using the getElementById() selector, and the value is set to the dataToSend variable just created.
getData().then(function (data) {
  console.log("..................running then..");
  console.log(data);

  let dataToSend = "";

  data.forEach((element) => {
    let name = element.name;
    let word = element.word;

    let newLine = `${name} word is ${word}`;

    dataToSend += "\n" + newLine;
  });
  console.log("adding data to UI");
  document.getElementById("output").value = dataToSend;
});
});
The last functionality added to the HTML UI was the ability to clear all the records in the database. To do this, the getElementById() selector is first used to select the button with the ID clear and place the reference into a local variable titled clearButton. Using this reference, the addEventListener() syntax is then used to append a click listener. When the button is clicked, a small message is printed to the console to ensure the button has triggered.
A new asynchronous function is then added titled deleteAll(). This function is designed to call the API URL /deleteAll. The async syntax added to the front of this function allows the function to run and allows the rest of the code to run without stopping. Inside this function, the complete URL of the API page we wish to call is defined and placed into a variable titled url.
A try-catch statement is then added to try to perform the call to the API page, and catch the error if the page cannot be reached. Inside this try, a call to the fetch() command is performed to call the URL. The await syntax is added in front of this as we wish the code to wait for the response from the API page before continuing. When the fetch is complete, the result is placed into a variable titled response. The await response.json() function is then called to extract the JSON from the response variable and place it into a new variable titled data. To ensure the JSON has been collected, a simple console.log() is added to print the value to the console.
At the end of this block of code, before the catch statement, a simple return statement is added to send the resulting data back to the location where this function was called. In the case of an error, the catch block triggers printing a simple error message to the console.
// Clear the database records
let clearButton = document.getElementById('clear');
clearButton.addEventListener("click", () => {
    console.log("Calling clear");

    async function deleteAll() {
      const url = `http://localhost:3000/api/deleteAll`;
      try {
        const response = await fetch(url);
        const data = await response.json();
        console.log(data);
        return data

      } catch (error) {
        console.error("error");
      }
    }//deleteAll
At the end of this code, a call is made to the deleteAll() asynchronous function that was just defined. When the response is returned from the function, the then() statement attached to it is triggered. Inside this function, the getElementById() selector is used to select the <input> field on the user interface with the ID set to output and set the value to '' to wipe any content that may be visible to the user.
  deleteAll().then(function(data){
    document.getElementById('output').value = '';
});
});
View results
After all the changes have been made to the extension, load the extension into your browser as previously defined in Chapter 2, Section 2.3 Loading your Extension. Before using this extension, ensure the API server developed in the previous section is running in the background, along with the MongoDB database. Figure 4 shows the complete extension interface. In this, we can see the value that has been retrieved from the database when the user clicked the button titled Get words. In the future, if the user wishes to add more data to the database, they can enter values into the two <input> fields and click Save to database.
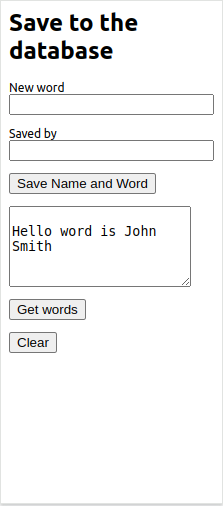
Figure 4: Here we see the complete extension after using the save functionality. Content can be seen in the <textarea>, which was retrieved by pressing the Get words <button>.
Working with Files
To provide a lightweight solution for data storage, file handling can be incorporated into Chrome extensions. As many common file types, such as TXT, CSV, or HTML, are text-based, no additional tools are required to work with this data. This section describes an extension that allows the user to select, open, edit, and save a file. To get started, create a new folder titled working_with_files along with the following blank files:
File Structure
-
working_with_files/manifest.json
-
working_with_files/icon.png
-
working_with_files/interface.html
-
working_with_files/viewer.html
-
working_with_files/viewer.js
-
working_with_files/popup.js
-
working_with_files/list of names.txt
Source code: /ch5/working_with_files
Inside this folder, six files are listed. The first of these is the manifest.json containing the basic information and permissions for the extension. The icon.png file is the same smiley face icon used in the previous examples. The interface.html is a simple HTML page that contains three HTML buttons to allow the user to load, save, and clear the user interface. The viewer.html is a HTML page that is opened as an editor window when a file is selected by the user. The viewer.js file is the accompanying JavaScript to work with the selected file. The popup.js file contains the core JavaScript for the extension user interface. Finally, the list of names.txt file is a text file with a collection of names to demonstrate the extension’s functionality.
File Name: manifest.json
The first file that we will create is the manifest.json file. This file contains the basic information about the extension, including the name, description, and version. The action attribute is then added, which contains the default_popup attribute, which points to the interface.html file that is opened when the extension icon is clicked. After this, the default_icon attribute is defined, which points to the icon.png smiley face icon that is shown in the menubar of Chrome when the extension is loaded.
At the end of this file, the permissions attribute is then added to define the two permissions required for the extension to function. The first of these is the tabs permission that allows the extension to interact with the browser tabs, and the activeTab permission, which allows the extension to interact with the tab the user currently has open.
{
    "manifest_version": 3,
    "name": "File viewer and editor",
    "description": "File viewer and editor",
    "version": "1.0",
    "action": {
        "default_popup": "interface.html",
        "default_icon": "icon.png"
    },
    "permissions": [
        "tabs",
        "activeTab"
    ]
}
File Name: interface.html
When the user clicks on the extension icon in the browser menubar, the HTML user interface is opened. This interface contains a <body> tag with a <style> attribute which defines the width of the pop-up window as 400px. This is done to ensure the complete user interface can be seen. After this, a simple <h1> tag is used to print a title at the top of the user interface.
To allow the user to interact with the extension, three HTML <button> tags are added. The first of these is titled Load file, which, when clicked, opens a file browser allowing the user to select the file to open. The second is titled Save file, which, when clicked, will open a file saving dialog allowing the user to save the file locally on their machine. The last button added is the Clear UI button, which allows the user to clear the previously opened file from the user interface.
It is important to note here that for each <button>, a unique ID is added, which is used later to identify when the button has been clicked. The final element added to this file is a simple <script> tag that links to the popup.js file. This file (discussed later) contains the core JavaScript for the user interface.
<html>
<body style="width:400px">
    <h1>File viewer and editor</h1>
    <p></p>
    <button id="selectFile">Load file</button>
    <button id="saveFile">Save file</button>
    <button id="clear">Clear UI</button>

    <p></p>

    <script src="popup.js"></script>
</body>
</html>
Although we have not yet loaded the extension into Chrome, Figure 5 shows a sample of the HTML user interface with the three buttons.
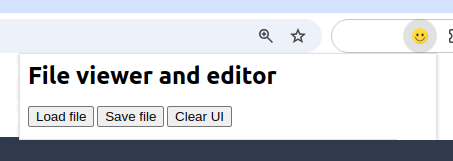
Figure 5: The extension with three buttons allowing the user to interact with a local file.
File Name: viewer.html
The viewer.html file is a HTML user interface that is used to show the content of a text file to the user when opened. In this file, a HTML <textarea> element is then added with the ID set to output. This <textarea> will be manipulated by the extension to hold the contents of a text file when loaded. The rows attribute is set to 30, and the cols attribute is set to 40 to provide a large area to view the loaded file. At the end of this file, a <script> tag is used to pull in the viewer.js file, which contains the core JavaScript for the viewer.html file.
<html>
<head></head>

<body>
    <textarea id="output" rows="30" cols="40"></textarea>
</body>
<script src="viewer.js"></script>
</html>
File Name: popup.js
The popup.js file is the main JavaScript file that is run went the extension icon is clicked in the Chrome menubar. This file contains three core code sections: Select file, Save file, and Clear UI, each of which relates to the HTML <button> tags on the main user interface. This JavaScript begins with a getElementById() selector that is used to select the <button> on the user interface with the ID selectFile and place it into a local variable titled selectedFile. Using this reference, the addEventListener() function is then used to append a click handler to the button that will trigger when the <button> is clicked. The async keyword is added to the function as we want the following piece of code to run by itself and not block up the user interface when running.
When the <button> is clicked, a call to the showOpenFilePicker() function pops open a file picking dialog for the user. This code is native browser functionality to allow the user to select a file. The reference to the open file picker is placed into a variable titled fileHandle. The fileHandle.getFile() function is then used to get the file selected by the user and place the reference into a variable titled file. Using this reference, a call is then made to the await file.text() function to extract the text. This text is then placed into a local variable titled contents. The await keyword is added to this call as we want the process to wait for it to finish before moving on.
Once the contents have been extracted from the file, we can begin the process of saving the file to the browser's storage. This is done to have a temporary copy of the file that we can edit. To do this, a call is made to the localStorage.setItem() function allows us to pass a key representing the name of the variable we want to store, and the value representing the data we want to store in it. In this example, the key used is titled tempFile and the value used is the contents variable containing the file contents extracted in the previous steps.
Finally, after we have saved the contents of the file to the browser's storage, a call is made to the chrome.tabs.create() function to open the file titled viewer.html in a new tab. This HTML file is used to show the HTML <textarea>, containing the temporary copy of the content stored in the browser’s storage.
let selectedFile = document.getElementById("selectFile");
selectedFile.addEventListener("click", async () => {
  const [fileHandle] = await window.showOpenFilePicker();
  const file = await fileHandle.getFile();
  const contents = await file.text();

  localStorage.setItem("tempFile", contents);
  chrome.tabs.create({ url: "viewer.html" });
});
After a user has made changes to the content in the viewer.html file, the user can click the Save file HTML <button> on the user interface. When this happens, the content of the <textarea> on the viewer.html will be saved locally to their machine as a file. To do this, we use a getElementById() selector to first select the <button> on the user interface with the ID set to saveFile. Then, similar to the previous code, the addEventListener is used to append a click handler onto the <button>. When the <button> is clicked, an asynchronous function is then called. In this, a message is printed to the browser's console to indicate that the button click event has been successful to aid debugging.
In this function, the chrome.tabs.query() function is first used to select the last tab the user had open in Chrome, e.g., the tab containing the viewer.html file where the user was editing the file. To do this, the {active: true, lastFocusedWindow: true} attributes are passed to this function. Once the tab is selected, it is placed into a local variable titled tab. A call is then made to the chrome.tabs.sendMessage() function which takes in the tab.id, followed by a custom piece of JSON with the content {status: "save"}. This sends the message to the viewer.html file telling it to save the contents of the <textarea>. To aid debugging, a console.log() is then added to print to the developer console to indicate that the message has been sent.
// Save file
let saveFile = document.getElementById("saveFile");
saveFile.addEventListener("click", async () => {
  console.log("save file called");
  const [tab] = await chrome.tabs.query({
    active: true,
    lastFocusedWindow: true,
  });
  const response = await chrome.tabs.sendMessage(tab.id, { status: "save" });
  console.log("message sent");
});
The last function defined in this file is related to the Clear UI HTML <button> on the extension user interface. Similar to the previous examples, the getElementById() selector is used to select the <button> with the ID set to clear. Using this reference, the addEventListener() function is appended that will trigger when the <button> has been clicked.
When clicked, the body of the function runs. In this, a message is printed to the developer console to identify that the <button> has been clicked. A call is then made to the chrome.tabs.query() function to select the tab last opened by the user that contains the viewer.html file where the file was edited. This tab reference is placed into a variable titled tab. A call is then made to the chrome.tabs.sendMessage() function, which is passed the tab.id to send a small piece of JSON with the content {status: "clear"}, to the viewer.html file.
let clear = document.getElementById("clear");
clear.addEventListener("click", async () => {
  console.log("Clearing...");
  const [tab] = await chrome.tabs.query({
    active: true,
    lastFocusedWindow: true,
  });
  const response = await chrome.tabs.sendMessage(tab.id, { status: "clear" });
  console.log("message sent");
});
File Name: list of names.txt
As the extension allows files to be opened, edited, and closed, a short text file titled list of names.txt is created to provide content to test the functionality. In this file, four names are added:
John Smith
Jane Smith
Thomas Smith
Kate Smith
Although this is a simple text file, any human-readable file, such as a CSV file or HTML file, can be used instead of this one.
File Name: viewer.js
When the extension opens a text file, it is shown in the viewer.html file in a new tab. As this file cannot have any JavaScript, it instead pulls in the viewer.js file. This file does not open the text file itself, but reads the file from a temporary version stored in the user's localStorage.
When this file first runs, the getElementById() selector is used to select the <textarea> with the ID output. After this, the reference is placed into a local variable titled output. To retrieve the data stored in the local storage, the localStorage.getItem() function is used. This is passed the key tempFile which, when the data is found, returns the raw text from the file previously saved. Once found, the data retrieved is set into the <textarea> by referencing output, which is the ID of the <textarea>, and value, which is the reference to the content in the <textarea>.
let output = document.getElementById('output')
output.value =  localStorage.getItem("tempFile")
In the previous code, we mentioned that the extension is responsible for sending messages across to the viewer.html page that is opened in a new tab. To listen for these messages, the chrome.runtime.onMessage.addListener() function is used. When a message is received, the function inside triggers and prints a message to the console.
To check what type of message was sent across, an if statement is used to check if the request, which contains the JSON's status attribute, is equal to clear. If it is, the getElementById() selector is used to select the <textarea> with the ID output and set the value to two single quotes to clear the content away.
chrome.runtime.onMessage.addListener(
    function(request, sender, sendResponse) {
        console.log("Got message!");
        if(request.status == 'clear'){
               console.log("Running clear")
               let output = document.getElementById('output').value = ''
               localStorage.setItem("tempFile", '');
        }
An else if is then added to check if the request.status is equal to save. If it is, the process of saving the content to the local storage is started. This is done by first adding a new function titled getNewFileHandle(). Inside this, a try-catch is then added to try to save the file and catch the error if it fails. In this try, the window.showSaveFilePicker() is first called to open a file picking dialog to the user. The await syntax is added to the front of this to wait for the user to pick a file before proceeding to the next line of code.
When a file is picked, the path to the file is stored in a variable titled newHandle. To access this file, a call is made to the newHandle.createWritable() function that creates an output connection to the file and stores it in an object titled writableSteam.
Next, the getElementById() selector is used to select the text area on the page with the ID output and extract the content from it using the .value syntax. When this is retrieved, it is placed into a variable titled content. Once the output location and the file content have been collected, a call is made to the writableStream.write(content) function, which saves the contents of the content variable to the user's hard drive as a file.
When working with files, it is always an important step to close the connection to the writableStream to indicate we are finished. In the case where the extension cannot find the file, the catch block is added, and an error message is printed to the console. To trigger this new function to run, a call is made to the getNewFileHandle() function at the end.
else if(request.status == 'save'){

    console.log("saving file locally")
    async function getNewFileHandle() {
        try {
            const newHandle = await window.showSaveFilePicker();
            const writableStream = await newHandle.createWritable();
            let content = document.getElementById('output').value;
            await writableStream.write(content);
            await writableStream.close();
        } catch (err) {
            console.error(err.name, err.message);
        }
    }//async function
    getNewFileHandle();
}
}//req function
);
View results
Once the extension files have been saved, the extension can be loaded into Chrome as previously described in Chapter 2, Section 2.3 Loading your Extension. Once loaded, the user can select a file by clicking Load file button as shown in Figure 7.
Figure 7: Extension showing the options to load, save, and clear the file from the file editor.
A file browsing dialog is then opened, allowing the user to select a text file from their hard drive, which in this case is the list of names.txt file, as shown in Figure 8. During this process, your browser may prompt you to allow access to the files. When this happens, approve the request to continue.
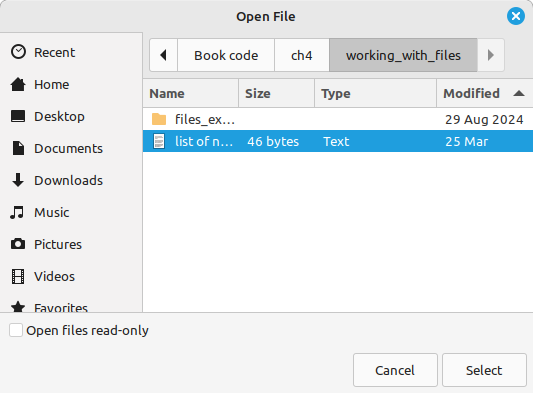
Figure 8: File picker dialog allowing the user to select a text file to open in a new tab.
After the file has been selected, Figure 9 shows the text file containing the list of names loaded into the view.html file in a new tab.
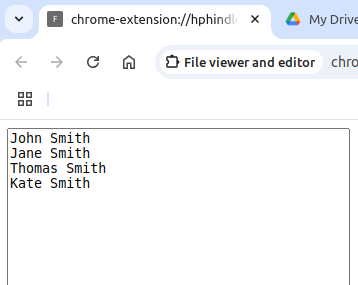
Figure 9: After picking a file, the contents of the text file can be seen in the viewer.html file in a new tab.
When changes are made to the text file in the text area, the user can return to the main user interface and click the Save button to save the changes. In the case where the user wishes to start again, the Clear UI button on the interface can be clicked to remove all content from the viewer.html file that the user can see, as well as the temporary copy of the file stored in the browser's storage.
Summary
This chapter described different approaches to storing data from a Chrome extension. Depending on the quantity of data to be stored and the duration of storage time required, different storage methods can be selected. Local browser and extension storage is most useful for basic structured data such as key-value pairs and JSON. Databases are most appropriate when long-term storage is needed external to the extension and browser environment. Finally, human-readable text files can be used to store data that can easily be transported to another machine. This method is useful for backing up extension-specific configurations and user setting choices.
Chapter 6, next, describes the process of developing a complete text snippet manager extension.
Take-away Tips: - Before building any browser extension, some additional consideration is needed to assess where the data for the extension should be stored. Although more work is required for an additional API server and database, they often prove to be the most versatile for long-term storage.
-
The local storage for a Chrome extension is different from the browser storage. For this reason, when using the Chrome developer tools, you will not see data stored by an extension in the browser data storage area.
-
Extensions are stateless and do not remember any data that was added to <input> fields when the extension user interface is reloaded. For this reason, browser and extension storage can be used to allow the extension to remember data that can subsequently be reloaded into <input> fields when the extension user interface reloads.
-
To send messages from the extension user interface to another extension page, Chrome offers the chrome.tabs.sendMessage() function. This allows you to send custom JSON messages between the pages.
-
When sending messages from one page to another, the receiving page must have a listener function ready to listen for the incoming messages. An if statement can then be used to decide what action to perform based on the message content.
-
The local storage in an extension can be used to store JSON-based data locally. To save this data, a key is needed to identify the record, and the value can be set to the JSON we wish to save.
-
The chrome.tabs.query() function allows the extension to select a specific browser tab in the user’s browser. Typically, we search for the last viewed tab.
-
Browsers have native JavaScript code to open a file browsing dialog to select a file from a user’s machine. The File System Access API can then be used to save content to the selected file with user consent.