3. Chrome Extension Functionality
3.1 Introduction
In the previous chapter, we started the journey of creating a custom Chrome extension and loading it into a browser. To expand on the basic extension, this chapter outlines some of the functionality available to an extension while working in the browser environment.
This chapter begins in Section 3.2 Modifying the Current Page - Static Declaration by describing how we can modify the page the user is currently viewing without any direct user intervention. In this example, the extension is used to change the background color of the current page. As we may wish to change a page in the future as a result of a user interaction, such as a button click, Section 3.3 Modifying the Current Page - Button Click describes this process. Section 3.4 Removing HTML Tags and Inserting Text then describes how to perform custom page filtering by removing HTML tags from the current page. Section 3.5 Replacing Words on a Page then describes the process of creating a word-replacing extension that is contained in a browser-side panel to provide easy access. To finish, Section 3.6 Summary provides a summary of this chapter and describes the core takeaway tips.
3.2 Modifying the Current Page - Static Declaration
When we first think of a Chrome extension, one of the most basic functionalities often used is modifying a web page the user is currently viewing. In this section, we will review the process of creating a basic extension that changes a web page's background to a different color without user intervention. This approach is defined as a static declaration as we are describing the extension functionality ahead of time and not performing any dynamic loading at run time with code.
To get started, create a new folder titled background_changer_static, and in this folder, create the following empty files:
File Structure
- /background_changer_static/
- /background_changer_static/manifest.json
- /background_changer_static/contentscript.js
- /background_changer_static/popup_interface.html
- /background_changer_static/icon.png
Source: /ch3/background_changer_static
In this folder, the manifest.json file is used to define the basic attributes of the extension and the permissions it requires. The contentscript.js file is used to run JavaScript to change the background color of the current page. The popup_interface.html defines the pop-up user interface that the user will see when they click on the extension's icon in the browser menu bar. The icon.png is the sample smiley face icon used by all extensions in this book.
File Name: manifest.json
In this JSON file, similar to our previous examples, we are using the latest manifest version, V3, and adding some basic information about our extension, including the name, description, and version number. After this, we add the action attribute. This attribute defines what happens when someone clicks on the extension icon in the menu bar. In this example, the default_popup attribute is used to pop open a simple HTML page with a message titled popup_interface.html. Below this, we add the default_icon attribute, which defines the icon that is shown in the browser menu bar. In this example, the icon used is a simple smiley face titled icon.png.
{
    "manifest_version": 3,
    "name": "Background changer",
    "description": "Background changer",
    "version": "1.0",
    "action": {
        "default_popup": "popup_interface.html",
        "default_icon": "icon.png"
    },
    "permissions": [
        "activeTab",
        "scripting"
    ],
    "content_scripts": [
        {
            "matches": [
                "https://*.google.com/*"
            ],
            "js": [
                "contentscript.js"
            ]
        }
    ]
}
The main change shown in this manifest is the permissions attribute that we are including. As we want to give the extension the ability to interact with the current tab the user is viewing to change the background color, we include the activeTab permission. As we are executing scripts to modify the background colour of the page we are viewing, we will include the scripting attribute.
Finally, at the end of the manifest, we need to identify the script we want our extension to run. This is done by including the content_scripts attribute. Inside this, we have two attributes available, the matches attribute and the js attribute. The matches attribute defines what page the script should run on. In our example, we are telling the code to run whenever we are on any of the google.com URLs. The asterisk is used to indicate that it can run on any pages before the domain name and any pages after the domain name.
The second is the js attribute that is used to define the JavaScript file we wish to run when we find a page that matches the URL pattern defined. In this case, it is the contentscript.js file. This style of defining the content script early is defined as a static declaration, as the JavaScript to run is predefined and can run without any user intervention.
File Name: popup_interface.html
We then create a second file, in this case a HTML file titled popup_interface.html. As we wish to present the user with a message when the extension icon is clicked, in the popup_interface.html file, we can add the message content here. This HTML file will be shown as a small pop-up when the user clicks the extension icon.
<body>
    <h1>Background changer</h1>
    Head to Google.com to see the background change!
</body>
</html>
File Name: contentscript.js
The last file we add to the extension folder is a file titled contentscript.js. This file contains a single line of JavaScript that will execute when we are on one of the Google.com pages. In this example, we are changing the * backgroundColor attribute of the page to grey* using JavaScript.
document.body.style.backgroundColor = "grey";
View Results
Now that we have created the three files we need for the extension, we can save all the changes and load the extension into our browser as described in Chapter 2, Section loading_extension.
Once the extension has been loaded, Figure 1 shows the output when we visit the Google.com URL. This this example, the background color of the page is changed to grey automatically by our extension.
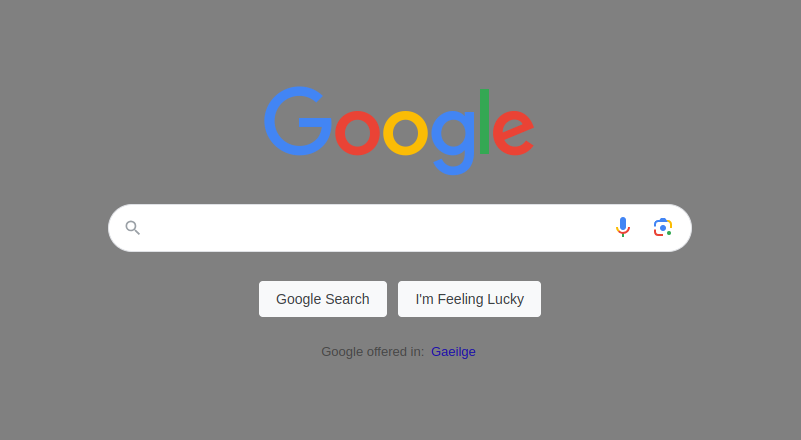 Figure 1: Background color of Google.com is changed to grey by the extension.
As a user interface was added to the extension, when we click the smiley face icon in the menu bar, a small pop-up is shown to the user telling them to head to Google.com as shown in Figure 2.
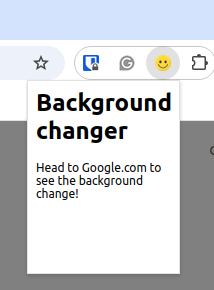
Figure 2: A small pop-open user interface telling the user to head to Google.com.
3.3 Modifying the Current Page - Button Click
In the previous example, we automatically made changes to a web page background when the extension was loaded. In many cases we may not want this process to happen automatically but as a result of a user interaction such as a button click. This section describes the process of modifying the page the user is currently viewing as a result of a click event. This style of modification described as programmatic injection. As this extension is designed to run in the background, it does not have a typical user interface. To get started, we first begin by creating a new folder titled change_background_button, and then creating two empty files and an icon as shown below:
File Structure
- /change_background_button/
- /change_background_button/manifest.json
- /change_background_button/background.js
- /change_background_button/icon.png
Source: /ch3/background_changer_button
In this folder, the manifest.json file is used to define the basic attributes of the extension and the permissions it requires. The background.js file is used to listen for a user's button click to trigger the background color change. The icon.png is the sample smiley face icon used by all extensions in this book.
File Name: manifest.json
This file begins with the standard attributes to define the name, description, and version number of the extension. The permissions attribute includes two permissions, the activeTab, as we wish to work with the page the user is currently viewing, and the scripting attribute, as we wish to inject code to perform the changes. Under the background attribute, we define the name of the service worker we want to run in this background, which in this case is a file titled background.js.
Finally, we add the action attribute, which contains two attributes. The first is the default_title attribute that shows the title when a mouse is hovered over the extension icon. The default_icon is used to define the default smiley face icon for the extension.
{
    "manifest_version": 3,
    "name": "Background Changer Button",
    "description": "Background Changer Button",
    "version": "1.0",
    "permissions": [
        "activeTab",
        "scripting"
    ],
    "background": {
        "service_worker": "background.js"
    },
    "action": {
        "default_title": "Click me!",
        "default_icon": "icon.png"
    }
}
File Name: background.js
We then create another file titled background.js. In this file, there are two core components. The first is the function that will perform the action we want, e.g., change the color of the background, and the second is the piece of code to trigger the change when the icon for the extension in the browser is clicked.
To aid debugging, we first print a message to the console to ensure the file has loaded correctly. After this, we create a function titled injectedFunction(). This function has the sole purpose of modifying the style attribute of the current page to change the backgroundColor attribute to grey. After this, a button listener is added using the chrome.action.onClicked.addListener() function. When the icon for the extension in the menu bar is clicked, the listener triggers, passing in a reference to the current tab.
Inside this, a function call is made to the chrome.scripting.executeScript() function. This function is responsible for running the function that we just defined to change the background color. The first attribute inside this is the target attribute, which defines the tab we wish to run the script on. In this example, we set the tabID to be the id extracted from the tab object. The func attribute is then used to define the name of the function we wish to run, which in this example is the injectedFunction we previously defined.
console.log("In background.js");

function injectedFunction() {
  console.log("Changing color");
  document.body.style.backgroundColor = "grey";
}

chrome.action.onClicked.addListener((tab) => {
  chrome.scripting.executeScript({
    target: { tabId: tab.id },
    func: injectedFunction,
  });
});
View Results
Now that we have created the files we need for the extension, we can save all the changes and load the extension into our browser as described in Chapter 2, Section loading_extension. When the extension is loaded, we first head to google.com and then click the icon in the menu bar. When clicked, the background color is changed to grey as shown in Figure 3.
Figure 3: Background color of Google.com is changed to grey when our extension icon is clicked
At any time, if we want to view the console, we can head to the chrome://extensions URL. Here we can see the extension that we loaded and a small piece of text titled Inspect views as shown in Figure 4. When we click this, the console log from the background.js file will become visible.
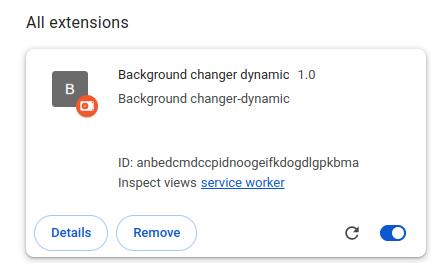
Figure 4: Inspecting the service worker.
In Figure 5 we can see the console log text for the service worker that runs from the background.js file.
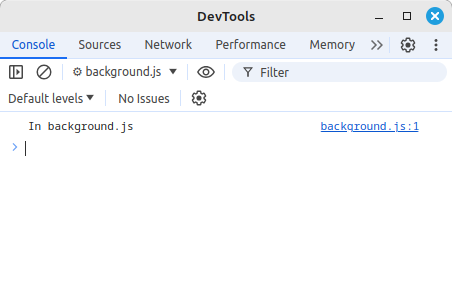
Figure 5: Inspecting the service worker console.
This console view is very useful when debugging JavaScript files, particularly service worker files that are designed to run in the background and do not have their own user interface.
3.4 Removing HTML Tags and Inserting Text
One of the most basic applications of an extension is removing content from the page the user is currently viewing. This can be seen in the case of advertisement removal extensions, which search the current page for Before we begin, create a new folder titled remove_div_tags_from_page and create the empty files shown below: File Structure Source: /ch3/remove_div_tags_from_page As this extension is designed to run in the background, it does not have a typical HTML user interface. In the extension folder, the manifest.json file is used to define the basic attributes and permissions of the extension. The contentscript.js file is used to define the JavaScript that will run in the background to remove the defined tag from the current web page. File Name: manifest.json In the manifest.json file, basic information is first added to the file outlining the name, description, and version number of the extension. After this, two permissions are then added: the activeTab permission, which allows us to interact with the content of the tab the user is currently viewing, and the scripting permission, which allows us to execute our custom JavaScript when required. The content_scripts attribute is then added, which outlines the JavaScript file that will run and which pages it is applied to. This is done by inserting a matches attribute, which contains the URL for the site that the extension will target. In this case, the URL for the New York Times is added. The asterisk indicates that any sub-URL or page of the domain will still be included in the matching process. The js attribute then defines the name of the JavaScript file we wish to run when a match is found, which in this example is the contentscript.js file. As this extension will automatically run in the background, no additional buttons are needed to perform the tag removal process. File Name: contentscript.js Next, we create the main body of JavaScript in a file titled contentscript.js. At the top of this file, a console.log() call is performed that is shown in the developer console, indicating the file has run as expected. A simple try-catch statement is used to wrap around the entire block of JavaScript. With it, the JavaScript will first try to execute the code, and catch the error if any appear during execution. Inside the try, a call to the querySelector allows us to select elements on the web page the user is currently viewing. Inside this, the ID of the div tag we wish to remove from the web page is inserted. In this example, the dfp-ad-top is a div tag at the very top of the newyorktimes.com site. A call is then made to the remove() function to remove the div from the top of the page. To add a note to alert the user what happened, we can use the document.createTextNode() function to create a text element that we will append to the page to replace the removed div tag. This new text is placed into a variable titled newContent. Finally, after the text has been created, we use the querySelector() function again to identify where we want to put the text on the web page. In this example, we are using the div with the ID masthead-bar-one. This is a location at the top-right of the main header of the website. To ensure we correctly selected the div tag, a console.log() is added to print the HTML to the developer console for manual inspection. Although the new replacement text element has been created, we need to make a call to the appendChild() function to attach the new text element to the div tag we selected by passing in the newContent variable. At the very end of this code, if any error occurs during this process, a simple console.log() is placed inside the catch block to print a message to the developer console indicating that something failed. View Results After saving the files, we can head to the chrome://extensions URL to load the extension as shown in Chapter 2, Section 2.3 Loading your Extension. As this extension is designed to run automatically, when we open the URL www.nytimes.com , the div tag containing the advert is automatically removed. In addition to this, the small piece of text we added in its place can be seen to the right of the site's logo. Figure 6 below shows the updated webpage. When working with individual div tag IDs, it is important to remember that sites will change their HTML tag structure and IDs without notice, breaking your extension. For this reason, it can be useful to identify specific tags or IDs that may commonly not change for a long time, such as banner IDs, header IDs, etc. This section describes how to create a simple word replacement extension. This extension is designed to provide the user with a list of word pairs, each containing the original word and the word it will be replaced with. This list is shown to the user on a panel to the right-hand side of the browser, allowing the user to update the word pairs when needed. A simple button is added below the list, allowing the user to trigger the replacement process. Before we begin, create a folder titled change_words_panel and the empty files shown below: File Structure File Structure Source: /ch3/background_changer_button In this folder, the manifest.json file is used to define the basic attributes of the extension and the permissions it requires. The background.js file is used to listen for a user's button click to trigger the background color change. The icon.png is the sample smiley face icon used by all extensions in this book. File Name: manifest.json This file begins with the standard attributes to define the name, description, and version number of the extension. The permissions attribute includes two permissions, the activeTab, as we wish to work with the page the user is currently viewing, and the scripting attribute, as we wish to inject code to perform the changes. Under the background attribute, we define the name of the service worker we want to run in this background, which in this case is a file titled background.js. Finally, we add the action attribute, which contains two attributes. The first is the default_title attribute that shows the title when a mouse is hovered over the extension icon. The default_icon is used to define the default smiley face icon for the extension. File Name: background.js We then create another file titled background.js. In this file, there are two core components. The first is the function that will perform the action we want, e.g., change the color of the background, and the second is the piece of code to trigger the change when the icon for the extension in the browser is clicked. To aid debugging, we first print a message to the console to ensure the file has loaded correctly. After this, we create a function titled injectedFunction(). This function has the sole purpose of modifying the style attribute of the current page to change the backgroundColor attribute to grey. After this, a button listener is added using the chrome.action.onClicked.addListener() function. When the icon for the extension in the menu bar is clicked, the listener triggers, passing in a reference to the current tab. Inside this, a function call is made to the chrome.scripting.executeScript() function. This function is responsible for running the function that we just defined to change the background color. The first attribute inside this is the target attribute, which defines the tab we wish to run the script on. In this example, we set the tabID to be the id extracted from the tab object. The func attribute is then used to define the name of the function we wish to run, which in this example is the injectedFunction we previously defined. View Results Now that we have created the files we need for the extension, we can save all the changes and load the extension into our browser as described in Chapter 2, Section 2.3 Loading Your Extension. When the extension is loaded, we first head to google.com and then click the icon in the menu bar. When clicked, the background color is changed to grey as shown in Figure 7. At any time, if we want to view the console, we can head to the chrome://extensions URL. Here we can see the extension that we loaded and a small piece of text titled Inspect service worker as shown in Figure 8. When we click this, the console log from the background.js file can be seen. In Figure 9 we can see the console log text for the service worker that runs in the background.js file. This console view is very useful when debugging JavaScript files, particularly service worker files that are designed to run in the background and do not have their own user interface. One of the most basic applications of an extension is removing content from the page the user is currently viewing. This can be seen in the case of advertisement removal extensions, which search the current page for Before we begin, create a new folder titled remove_div_tags_from_page and create the empty files shown below: File Structure File Structure Source: /ch3/change_words_panel In the extension folder, the manifest.json file is used to define the basic attributes and permissions of the extension. The side.html is a HTML-based user interface that is shown to the user in the form of a side panel in the browser. The side_script.js file is the associated JavaScript for this side panel. The contentscript.js file contains the JavaScript that is run on the current page in the browser to perform the replacement process. The icon.png is the same smiley face icon used throughout this book. File Name: manifest.json This file begins with the standard attributes to define the name, description, and version number of the extension. The permissions attribute includes the activeTab permission, as we need to modify the content of the page the user is currently viewing. The scripting attribute is added as the extension executes a script to perform the replacement. The sidePanel permission is added as it allows us to open a side panel on the browser to hold the user interface of the extension. The side_panel attribute is then used to define attributes of the panel itself. In this example, we define the default_path to be side.html, which is a simple HTML file used as the user interface for the extension. The content_scripts attribute is used to define the URL we wish the extension to run on and the JavaScript file we want to execute on it. The matches attribute defines the specific URL pattern the extension will look for. In this example, we are using the Google.com address, with two asterisks at the start and end of the URL indicating that any of the sub-pages of Google.com * can be included. The js* attribute is used to define the script that we want to execute on the selected URLs. The action attribute is then added to define the default_title attribute, which shows a simple piece of text when a mouse is placed over the extension's icon. Finally, the default_icon attribute is used to define the default icon for the extension that will show up in the browser's menu bar. In this example, the simple smiley face icon is used. File Name: side.html The side panel is a simple HTML user interface that is used to display a piece of text to the user in the form of a h1 tag as the panel title. A HTML textarea element is used to hold a list of word and replacement word pairs that the extension will use. The textarea has an ID set to filer_words, which will be used in the future when we need to select the textarea to get access to the word pairs. In this textarea, by default, four sample words are added. Each new word pair to replace is on a separate line, as when the extension executes the replacement process, it will treat each new line as a separate word pair. Between each original word and replacement word, an equals sign is added to indicate they are a pair. The main trigger for this extension is the HTML button with the ID set to myButton. When this is clicked, the process of executing the filter is performed to replace the terms on the current webpage. At the end of this file, a <script> tag is included, which points to the JavaScript file titled side_script.js that contains additional JavaScript for the extension. This <script> tag is added here as no JavaScript can be directly added to a HTML file. In the future, when the user wishes to add another word pair, they can add a new line into the textarea on the side panel in the browser. File Name: side_script.js As no JavaScript could be added directly to the HTML user interface file, at the end of the file, a <script> tag was added which pointed to the side_script.js file. Inside the file, the querySelector is used to select the button we created earlier with the ID myButton.
Using this button reference, the addEventListener() function is added to the listener for clicks. When a click is performed on the button, the body of the function is run. Inside this, a small message is printed to the developer console indicating the button has been clicked. The getElementById() selector is then used to select the filter_words attribute (which is the textarea) and extract the value from it. The terms are then placed into a local variable titled wordsString, which is then printed to the console. After this, a call is made to the runProcess() function, and the word list is passed to it. This is the main replacement function that is responsible for taking a list of words and replacements words in, and running the replacement process. To create this function, a new function definition is then added titled runProcess(). This function is an asynchronous function designed to run in the background without holding up the extension. In this, a console.log() is added to print to the developer console that we have reached this location in the code to aid debugging. As users often have many different tabs open, we need to get the tab that was in focus in the user's browser. This tab contains the web page to perform the replacement on. To do this, a call is made to the await chrome.tabs.query() function, which is passed the two parameters active: true, lastFocusedWindow: true to tell the browser to give us a reference to the last focused tab. This reference is then placed into a local variable titled tab. When working in a restricted environment, such as browser extensions, the abilities of JavaScript can be quite limited, and the panel itself cannot run the replacement process. For this reason, we need to send a message from the panel across to the web page to tell it to run the replacement process. To do this, a call is made to the chrome.tabs.sendMessage() function to send a message from the extension across to the web page we want to modify in the user's browser. Three core pieces of information are passed to the function. The first is the tab.id which contains the ID of the tab we want to send the message to, second is a custom piece of JSON we will send that indicates to the extension we wish to run the filter, and third, a variable titled words which has the value set to the list of words we gathered from the textarea in the form of a variable titled wordsString. Although unused, the result of calling this function is placed into a variable titled response. File Name: content-script.js Now that we have the side panel user interface set up with a list of replacement terms and a method of triggering the process in the form of a button, we can begin the process of implementing the actual replacement script itself. This script is designed to wait for the message that is sent across from the panel to the content script to run the replacement when the button is clicked. This content-script.js file is designed to run on the web page itself, and has access to the DOM tree of the web page. In this file, a console log is added to indicate that the file has loaded correctly. After this, the chrome.runtime.onMessage.addListener() function is added. This allows the code to listen for incoming messages that are sent across from the panel. When a message is sent across, the listener is triggered, and this function has access to three references. The first is the request, which contains all the data that was sent across, the second is the sender variable, which outlines which tab sent the message, and the third is the sendResponse function reference, which can be used if we wish to send a message back. Inside this function, a console log is used to print the value of the request to the developer console, which contains the terms sent across to aid debugging. An if statement is then added to check if the request.status sent across was equal to run_filter. This status attribute was contained in the JSON sent across by the panel. In the case where this is true, a console.log() is used to print a message to the developer console indicating that the filter is being run. A call is made to the processWords() words. This function takes in the request.words attribute, which contains the list of words and their replacements. When this function is run, the individual word pairs in the form of strings represented as word=replace on separate lines are then broken into key-value pairs. The final set of processed key-value pairs is placed into a local variable titled pairs. A for loop is then used to loop over each of the words and their replacement words as key-value pairs. For each of these pairs, they are first printed to the console using a console.log() call, and then a call is made to the replaceText() function, which is used to perform the actual replacement process of terms on the web page the user is viewing. This function takes in three parameters. The first is document.body, which is the HTML of the web page the user is viewing. The second is the key, which is the word the user wants to replace, and the third is the value, which represents the word it will be replaced with. After the for loop has finished, all the words on the web page will have been replaced with their updated replacements. The above piece of code is dependent on a function titled processWords(). This function receives a raw list of words extracted from the text area on the panel. As mentioned before, these words are represented as originalWord=newWord. And each set of replacement words is separated onto individual lines. To process these terms into simple key-value pairs, we first create a new array titled pairs. After this, we take the wordList, which contains the raw list of words on separate lines, and split the list of words based on the n character, which separates each word into an individual slot of the array titled items. A call is then made on the items in the array using a forEach loop. In this, while looping over each item in the array, a variable titled singleItem is available. An if statement is then used to check if the singleItem contains an equals sign. If this returns true, this would indicate that we have a word and its replacement. A console log is then performed to print the complete word pair to the developer console to aid debugging. After this, we need to separate the word and the replacement word and place them into variables titled key and value. To do this, the singleItem variable is first accessed, and a call to the split() function is performed on it. This takes a reference to the parameter we wish to separate the variable on, which in this case is an equals sign. When this is performed, as we want to extract the word first, we call [0] to access just the word by itself and place it into the key variable. After this, the process is repeated again for the replacement word, but this time the second variable in the array is accessed using [1] to extract the new replacement term and place it into a variable titled value. As we now have the key variable and the value variable separate, a call is made to the pairs array and the value is placed into the array at position key. This is then performed for each of the word pairs in the list to fully populate the pairs array. At the very end of this process, we finally called the return function to send back the complete pairs array. If the pairs array that was returned when the processWords() function is finished was viewed, it would contain four entries in the array as shown below. This array provides a simple structure to move the words and their replacements around. In the next step, this array will be looped over, and each word will be replaced with its corresponding replacement word in the array. At the end of this file, we add a function titled replaceText() which is responsible for performing the actual replacement process of the words. This function works by calling itself to iterate through the DOM tree. When this function is called, three references are available. The first is the node reference, which is the location in the web page's DOM tree where the replacement will be performed. The second is the key, which is the word we wish to replace. And finally, the third is the value, which is the word we are replacing the key with. In this function, an if statement is used to check if the node.nodeType we are currently looking at is a TEXT_NODE. If this returns true, the replacement process is performed. This is done by creating a new RegEx object, which is passed a pattern to search for the key representing the word we are looking for in the web page. After the RegEx is created, it is placed into a variable titled regex. Next, a call is made to the node.textContent, which represents the raw text of the word we are replacing. We then call node.textContent.replace() to perform the replacement by passing in the reference to the regex which contains the word location and the value indicating the replacement word. In the case where the if statement does not find the term, the else statement triggers, in which a loop is used to loop through each child node the current node has. It then makes a call to the replaceText() function to be called again to retry the entire process on the child node found. It is important to remember here that the innerHTML element is not used during the replacement process, as when this is called, it causes the entire page to be parsed again, often returning errors. View Results In Figure 10, the content of the browser side panel can be seen. Individual words are shown to the right. Inside this, the key-value pairs are added in the form of the original word, followed by an equals sign, followed by the new replacement word. In Figure 11, the console output from the extension can be seen. At the top, the JSON sent from the side panel to the content script can be seen. This is performed as the side panel does not have access to the webpage itself. The command we wish to run is contained in the status attribute of this JSON. The words attribute contains all the raw text with new line characters from the textarea that was extracted. When the extension is run, the replacement process is performed on each key-value pair. The output of this process can also be seen. Figure 12 shows the panel on the right of the browser and the Google homepage on the left. On the webpage, you can see that the word Google on the button has been replaced with GOOGLE by running the extension.
This chapter introduced the basic functionality of Chrome extensions by performing actions such as modifying the webpage the user is currently viewing. This was done in two different formats: automatically when the extension is loaded, and also dynamically as a result of user interaction. The side panel was also introduced as a simple method of containing a user interface that is always available to the user. Chapter 4, next, furthers the development process by exploring full-stack extensions and the technologies required.
{
    "manifest_version": 3,
    "name": "Remove divs",
    "description": "Remove divs",
    "version": "1.0",
    "permissions": [
        "activeTab",
        "scripting"
    ],
    "content_scripts": [
        {
            "matches": [
                "https://*.nytimes.com/*"
            ],
            "js": [
                "contentscript.js"
            ]
        }
    ]
}
console.log("In contentscript.js");

try {
  console.log("Attempting to remove element...");
  var e = document.querySelector("#dfp-ad-top");
  console.log(e);

  e.remove();
  console.log("Element removed");

  // create a new text element
  const newContent = document.createTextNode("We got rid of that ad!");

  // Attach the element to the top right corner of the header
  let newtop = document.querySelector("#masthead-bar-one");
  newtop.appendChild(newContent);
} catch (error) {
  console.log("Well that didn't work");
}
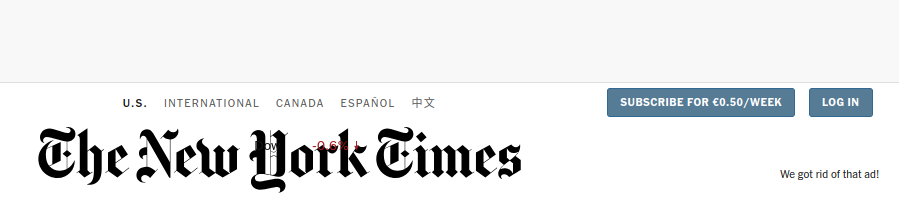
Figure 6: New York Times website with the banner advertisement removed. The new replacement text can also be seen to the right of the logo.3.5 Replacing Words on a Page
{
    "manifest_version": 3,
    "name": "Word filter",
    "description": "Word filter",
    "version": "1.0",
    "permissions": [
        "activeTab",
        "scripting",
        "sidePanel"
    ],
    "side_panel": {
        "default_path": "side.html"
    },
    "content_scripts": [
        {
            "matches": [
                "https://*.google.com/*"
            ],
            "js": [
                "content-script.js"
            ]
        }
    ],
    "action": {
        "default_title": "Click to open panel",
        "default_icon": "icon.png"
    }
}
function injectedFunction() {
  console.log("Changing color");
  document.body.style.backgroundColor = "grey";
}

chrome.action.onClicked.addListener((tab) => {
  chrome.scripting.executeScript({
    target: { tabId: tab.id },
    func: injectedFunction,
  });
});
Figure 7: Background color of Google.com is changed to grey when our extension icon is clicked.
Figure 8: Inspecting the service worker.
Figure 9:Inspecting the service worker console.3.4 Removing HTML Tags and Inserting Text
{
    "manifest_version": 3,
    "name": "Word filter",
    "description": "Word filter",
    "version": "1.0",
    "permissions": [
        "activeTab",
        "scripting",
        "sidePanel"
    ],
    "side_panel": {
        "default_path": "side.html"
    },
    "content_scripts": [
        {
            "matches": [
                "https://*.google.com/*"
            ],
            "js": [
                "content-script.js"
            ]
        }
    ],
    "action": {
        "default_title": "Click to open panel",
        "default_icon": "icon.png"
    }
}
<h1> Word filter list</h1>

<textarea id="filter_words" rows="10" cols="40">
Google=GOOGLE
second=2nd
third=3rd
fourth=4th
</textarea>

<button id="myButton"> Run filter </button>

<script src="side_script.js"></script>
let btn = document.querySelector("#myButton");

btn.addEventListener("click", function () {
  console.log("main button clicked");

  let wordsString = document.getElementById("filter_words").value;
  console.log(wordsString);

  runProcess(wordsString);
});
  console.log("in runProcess async");
  const [tab] = await chrome.tabs.query({
    active: true,
    lastFocusedWindow: true,
  });

  const response = await chrome.tabs.sendMessage(tab.id, {
    status: "run_filter",
    words: wordsString,
  });
}
chrome.runtime.onMessage.addListener(

function(request, sender, sendResponse) {

console.log(request);
console.log("running filter");

let pairs = processWords(request.words);

for (const [key, value] of Object.entries(pairs)) {
    console.log(`${key}: ${value}`);
    replaceText(document.body, key, value);
}
}

}//listener function
); //listener
  console.log("Processing words");
  let pairs = {};

  let items = wordsList.split("\n");

  items.forEach((singleItem) => {
    if (singleItem.includes("=")) {
      console.log(singleItem);

      key = singleItem.split("=")[0];
      value = singleItem.split("=")[1];

      pairs[key] = value;
    }
  });

  return pairs;
}
pairs[second]  = 2nd
pairs[third]   = 3rd
pairs[fourth]  = 4th
  if (node.nodeType === Node.TEXT_NODE) {
    const regex = new RegExp(`\\b${key}\\b`, "gi"); // case-insensitive match for whole words
    node.textContent = node.textContent.replace(regex, value);
  } else {
    for (let child of node.childNodes) {
      replaceText(child, key, value);
    }
  }
}
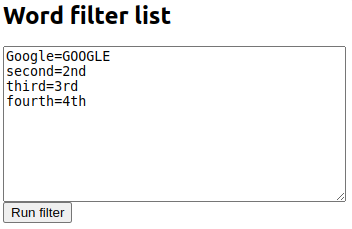
Figure 10: Word filter panel content containing the words we want to replace and their replacement words.
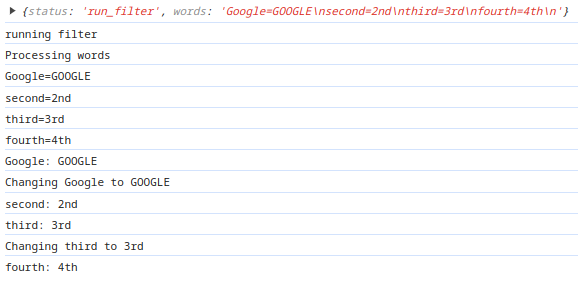
Figure 11: Word filter console output.
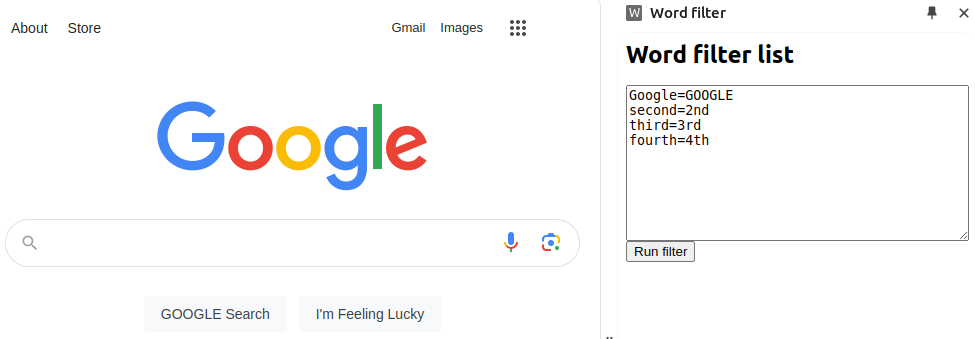
Figure 12 Side filter panel opened after running on the Google.com homepage.3.6 Summary